学习使用Vue,Vue的生命周期是无论如何绕不过去的知识点,虽说单组件的声明周期很简单,大家都能理解,但是复杂稍微复杂一点的场景,往往就是因为对生命周期了解不深入,会引发不少bug。目前项目用的还是Vue2.X版本,所以以下的分析都是基于Vue2.X。
单Vue组件的生命周期
图片来自官网:
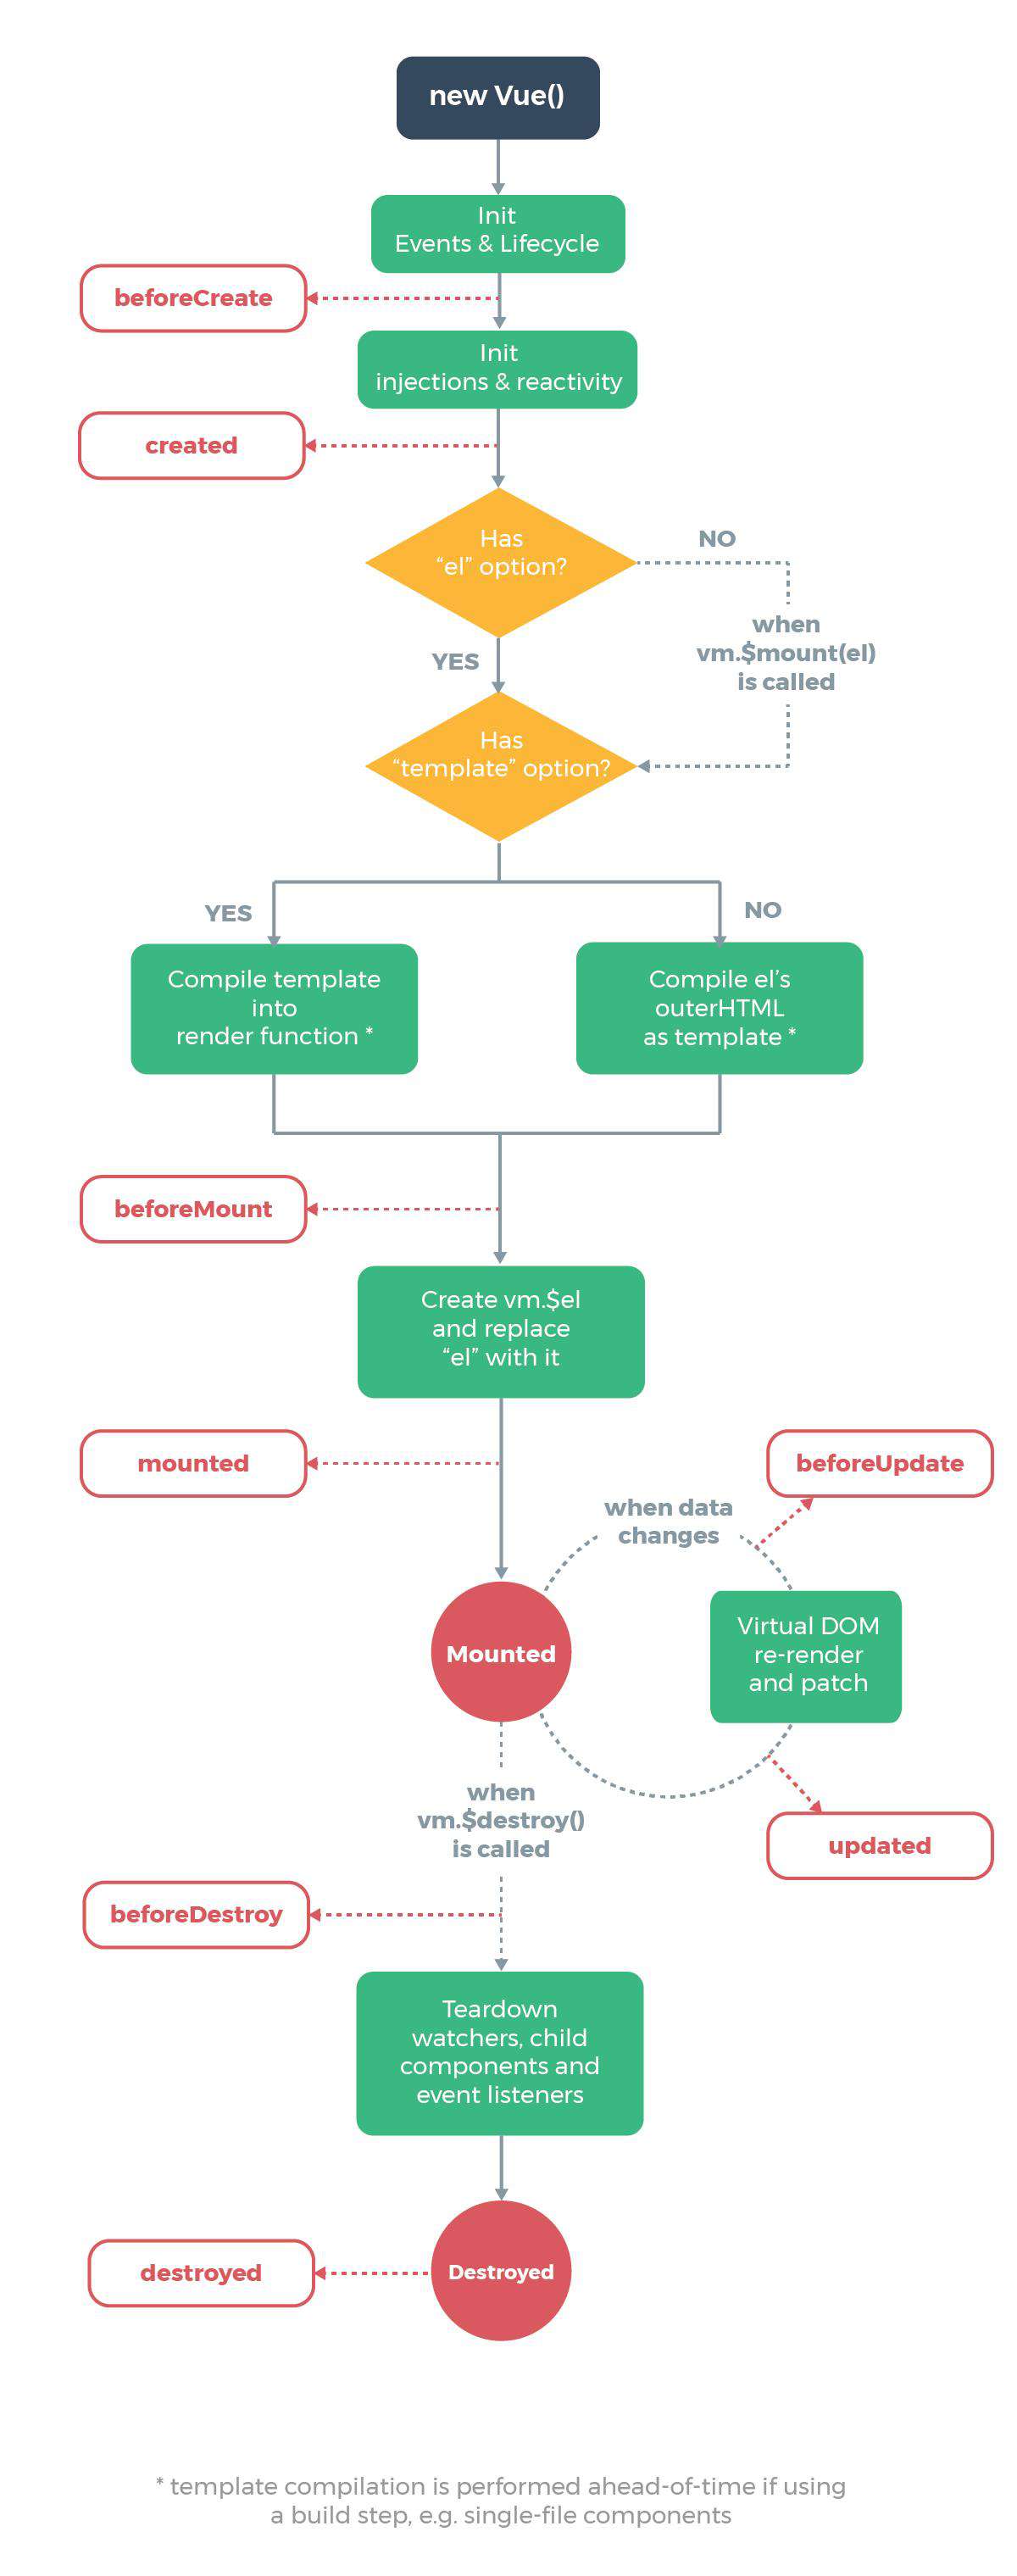
可以分为四个阶段,共八个钩子函数:
-
创建
-
beforeCreate:实例尚未创建,访问不了this。此时data没有挂载,$el也不存在,watch、computed、methods上面的数据都不能访问。适合添加loading状态,初始化非响应式变量。
-
created:实例创建完成。完成数据的初始化,可以访问data、computed、watch、methods上的方法和数据,但是el和ref仍然访问不到,DOM还未生成,如果非要和DOM进行交互,可以使用vm.$nextTick来访问Dom。
-
-
挂载
-
beforeMount:数据挂载之前,此时已经能访问$el,但此时并未渲染到dom中。
-
mounted:挂载完成。页面渲染完毕,完成双向绑定。适用于已挂载完成的dom节点的获取,ajax请求等等。
-
-
更新
-
beforeUpdate:数据更新、重新渲染视图之前调用。适用于更新前访问现有的DOM,比如手动移除已添加的事件监听器。
-
updated:数据更新完成、视图更新完成。注意避免在这个钩子函数中操作数据以免陷入死循环 。
-
-
销毁
- beforeDestroy:实例销毁之前,实例仍然可用。适用于:实例销毁前一些判断销毁定时器、解绑全局事件、销毁插件对象等操作。
-
destroyed:实例销毁后调用,调用后,Vue 实例指示的所有东西都会解绑定,所有的事件监听器会被移除,所有的子实例也会被销毁。
单Vue组件就是按照上面的顺序来的,很简单,就不写demo了。
父子组件
测试代码
<!DOCTYPE html>
<html lang="en">
<head>
<meta charset="UTF-8" />
<meta name="viewport" content="width=device-width, initial-scale=1.0" />
<title>Document</title>
<script src="https://cdn.jsdelivr.net/npm/vue/dist/vue.js"></script>
<script src="https://unpkg.com/vue-router/dist/vue-router.js"></script>
<title>生命周期Demo</title>
</head>
<body>
<div id="app">
<router-link to="/">HOME</router-link>
<router-link to="/other">OTHER</router-link>
<router-view></router-view>
</div>
<script>
const Son = {
template: `<div>
<h1>I am a son.</h1>
<h2>来自父级的数据:{{ msg }}</h2>
<h2>自身的数据:{{ info }}</h2>
<button @click="changeMsg">点击改变状态</button>
</div>`,
name: 'Son',
props: {
msg: {
type: String,
default: ''
}
},
data() {
return {
info: ''
}
},
methods: {
changeMsg() {
console.log(this)
this.info = 'new info'
this.$emit('update', 'new')
}
},
beforeCreate: function () {
console.log('Son beforeCreate')
},
created: function () {
console.log('Son created')
},
beforeMount: function () {
console.log('Son beforeMount')
},
mounted: function () {
console.log('Son mounted')
},
beforeUpdate: function () {
console.log('Son beforeUpdate')
},
updated: function () {
console.log('Son updated')
},
beforeDestroy: function () {
console.log('Son beforeDestroy')
},
destroyed: function () {
console.log('Son destroyed')
}
}
const Father = {
template: `<div>
<h1>I am your Father!</h1>
<Son msg="Welcome!" @update="updateParent"></Son>
<h2>{{ fatherData }}</h2>
</div>`,
components: {
Son
},
data() {
return {
fatherData: 'old'
}
},
methods: {
updateParent(val) {
this.fatherData = val
}
},
beforeCreate: function () {
console.log('Father beforeCreate')
},
created: function () {
console.log('Father created')
},
beforeMount: function () {
console.log('Father beforeMount')
},
mounted: function () {
console.log('Father mounted')
},
beforeUpdate: function () {
console.log('Father beforeUpdate')
},
updated: function () {
console.log('Father updated')
},
beforeDestroy: function () {
console.log('Father beforeDestroy')
},
destroyed: function () {
console.log('Father destroyed')
}
}
const Other = {
template: `<div>
<h1>Other Page...</h1>
</div>`,
beforeCreate: function () {
console.log('Other beforeCreate')
},
created: function () {
console.log('Other created')
},
beforeMount: function () {
console.log('Other beforeMount')
},
mounted: function () {
console.log('Other mounted')
},
beforeUpdate: function () {
console.log('Other beforeUpdate')
},
updated: function () {
console.log('Other updated')
},
beforeDestroy: function () {
console.log('Other beforeDestroy')
},
destroyed: function () {
console.log('Other destroyed')
}
}
const routes = [
{
path: '/',
name: 'father',
component: Father
},
{
path: '/',
name: 'other',
component: Other
}
]
const router = new VueRouter({
routes
})
var app = new Vue({
el: '#app',
router
})
</script>
</body>
</html>
创建过程
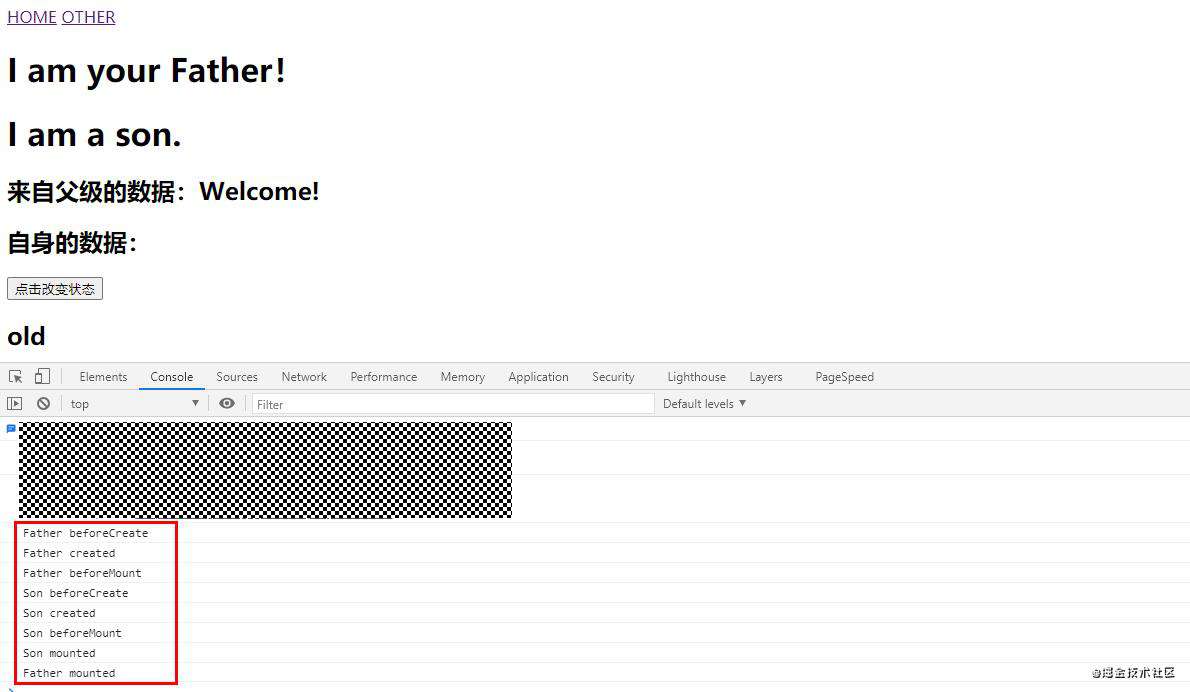
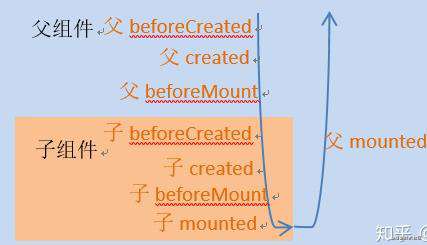
父beforeCreate->父created->父beforeMount->子beforeCreate->子created->子beforeMount->子mounted->父mounted
知乎上看的文章,这边画的图不错,直接搬过来了,下面一样也是。。
更新过程
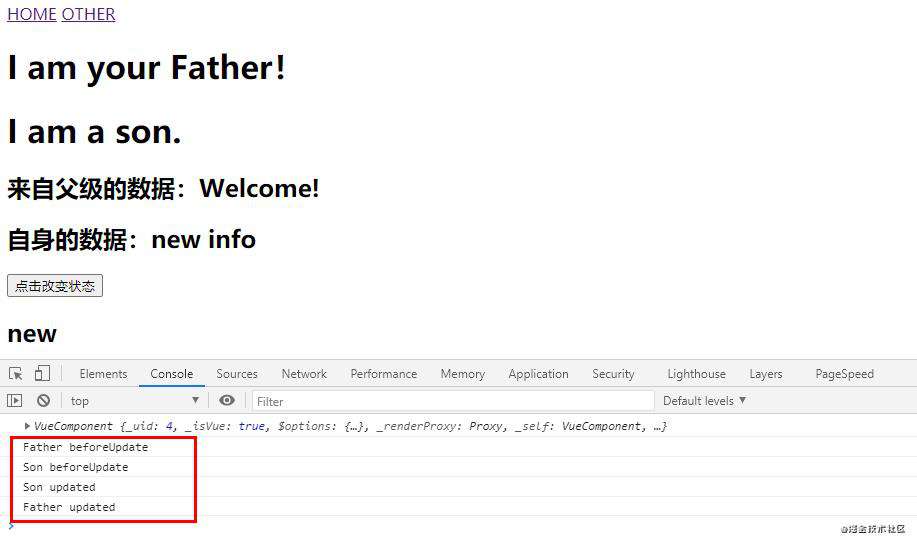
当子组件使用emit修改父组件状态时,刚好这个状态又绑定在子组件的props上,更新过程是:父beforeUpdate->子beforeUpdate->子updated->父updated
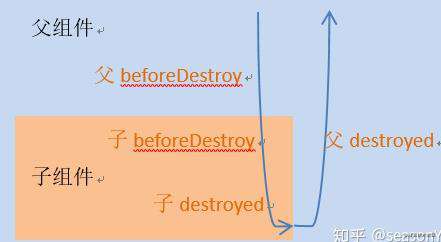
销毁过程
点击"OTHER",当前页面会销毁,"OTHER"组件会加载。
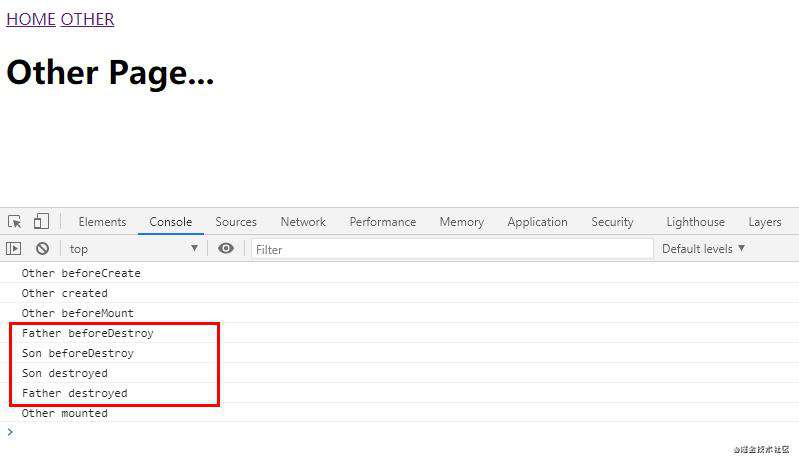
父组件被销毁时子组件也同时被销毁,销毁的钩子过程是:父beforeDestroy->子beforeDestroy->子destroyed->父destroyed
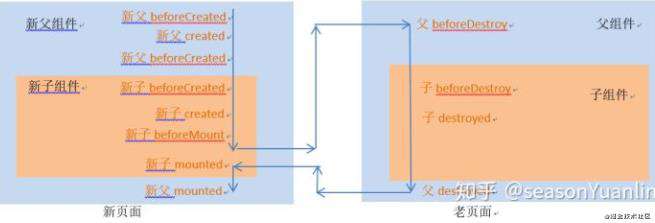
组件切换
由“销毁过程”可以看到,"Father"组件切换到"Other"组件的时候,会先走"Other"组件的创建过程,在"Other"的mounted之前完成"Father"的销毁。
如果"Other"组件中还有子组件,过程同上面的"创建过程"。
总结下,假设从父组件切换到新父组件,新父组件也有子组件,切换的过程生命周期过程是:新父beforeCreated ->新父created ->新父beforeMount –>新子beforeCreated -> 新子created ->新子beforeMount ->原父beforeDestroy ->原子beforeDestroy –>原子destroyed ->原父destroyed –>新子mounted ->新父mounted
源码分析
有些部分,看了其他同学的分析:从源码解读Vue生命周期,让面试官对你刮目相看,Vue.js源码学习二 —— 生命周期 LifeCycle 学习
相关函数
// src/core/instance/lifecycle.js
/**
 * 在当前vue实例中,调用某个生命周期钩子注册的所有回调函数
 * @param {*} vm Vue实例
 * @param {*} hook 生命周期名字
 */
export function callHook (vm: Component, hook: string) {
  // #7573 disable dep collection when invoking lifecycle hooks
  pushTarget()
  const handlers = vm.$options[hook]
   // 初始化合并 options 的过程,将各个生命周期函数合并到 options 里
  const info = `${hook} hook`
  if (handlers) {
    for (let i = 0, j = handlers.length; i < j; i++) {
      invokeWithErrorHandling(handlers[i], vm, null, vm, info)
    }
  }
  if (vm._hasHookEvent) {
    vm.$emit('hook:' + hook)
  }
  popTarget()
}

// src/core/util/error.js
export function invokeWithErrorHandling (
  handler: Function,
  context: any,
  args: null | any[],
  vm: any,
  info: string
) {
  let res
  try {
    res = args ? handler.apply(context, args) : handler.call(context)
    if (isPromise(res)) {
      res.catch(e => handleError(e, vm, info + ` (Promise/async)`))
    }
  } catch (e) {
    handleError(e, vm, info)
  }
  return res
}
上面的invokeWithErrorHandling中使用apply或者call改变了this 指向,但是箭头函数this指向无法改变,所以编写生命周期函数的时候不要用箭头函数
beforeCreate和created
// src/core/instance/init
export function initMixin (Vue: Class<Component>) {
  Vue.prototype._init = function (options?: Object) {
    const vm: Component = this
    ...
    // expose real self
    vm._self = vm
    initLifecycle(vm)
    initEvents(vm)
    initRender(vm) // vm添加虚拟DOM,slot等相关的属性、方法
    callHook(vm, 'beforeCreate') // 调用 beforeCreate 钩子
    initInjections(vm) // resolve injections before data/props
    initState(vm) // 初始化props,methods,data,computed,watch
    initProvide(vm) // resolve provide after data/props
    callHook(vm, 'created') // 调用 created 钩子
    ...
  }
}

// src/core/instance/state
export function initState (vm: Component) {
  vm._watchers = []
  const opts = vm.$options
  if (opts.props) initProps(vm, opts.props)
  if (opts.methods) initMethods(vm, opts.methods)
  if (opts.data) {
    initData(vm)
  } else {
    observe(vm._data = {}, true /* asRootData */)
  }
  if (opts.computed) initComputed(vm, opts.computed)
  if (opts.watch && opts.watch !== nativeWatch) {
    initWatch(vm, opts.watch)
  }
}
可以看到,在beforeCreate中访问不到props,methods,data,computed,watch,但是created中可以。
beforeMount和mounted
// src/core/instance/lifecycle
/**
 * 核心逻辑是先实例化一个渲染Watcher,在它的回调函数中会调用 updateComponent 方法
 * @param {*} vm
 * @param {*} el
 * @param {*} hydrating SSR相关的属性,设置为true就会实现SSR(服务端渲染)
 */
export function mountComponent (
  vm: Component,
  el: ?Element,
  hydrating?: boolean
): Component {
  vm.$el = el
  if (!vm.$options.render) {
    vm.$options.render = createEmptyVNode
    ...
  }
  callHook(vm, 'beforeMount') // 调用 beforeMount 钩子

  let updateComponent
  if (process.env.NODE_ENV !== 'production' && config.performance && mark) {
    updateComponent = () => {
      const name = vm._name
      const id = vm._uid
      const startTag = `vue-perf-start:${id}`
      const endTag = `vue-perf-end:${id}`

      mark(startTag)
      const vnode = vm._render() // 生成虚拟DOM
      mark(endTag)
      measure(`vue ${name} render`, startTag, endTag)

      mark(startTag)
      vm._update(vnode, hydrating) // 虚拟DOM映射到真实DOM
      mark(endTag)
      measure(`vue ${name} patch`, startTag, endTag)
    }
  } else {
    updateComponent = () => {
      vm._update(vm._render(), hydrating)
    }
  }

  // we set this to vm._watcher inside the watcher's constructor
  // since the watcher's initial patch may call $forceUpdate (e.g. inside child
  // component's mounted hook), which relies on vm._watcher being already defined
  // updateComponent被传入渲染Watcher,每当数据发生变化就会触发Watcher更新就会执行该函数,重新渲染视图。
  // updateComponent在传入渲染Watcher后会被执行一次进行初始化页面渲染
  new Watcher(vm, updateComponent, noop, {
    before () {
      if (vm._isMounted && !vm._isDestroyed) {
        callHook(vm, 'beforeUpdate')
      }
    }
  }, true /* isRenderWatcher */)
  hydrating = false

  // manually mounted instance, call mounted on self
  // mounted is called for render-created child components in its inserted hook
  if (vm.$vnode == null) {
    vm._isMounted = true
    callHook(vm, 'mounted') //调用 mounted 钩子
  }
  return vm
}
可以看到,在执行渲染函数vm._render()之前,执行了beforeMount。在执行完vm.__update()把虚拟DOM patch到真实DOM之后,执行mounted。所以,mounted阶段才能获取到DOM。
beforeUpdate和updated
 // src/core/instance/lifecycle
export function mountComponent (
  vm: Component,
  el: ?Element,
  hydrating?: boolean
): Component {
  ...
  new Watcher(vm, updateComponent, noop, {
    before () {
      if (vm._isMounted && !vm._isDestroyed) { // 已挂载且未销毁
        callHook(vm, 'beforeUpdate') // 调用 beforeUpdate 钩子
      }
    }
  }, true /* isRenderWatcher */)
  ...
}

 // src/core/observer/scheduler
function callUpdatedHooks (queue) {
  let i = queue.length
  while (i--) { // 遍历watcher 数组
    const watcher = queue[i]
    const vm = watcher.vm
    // 只有满足当前 watcher 为 vm._watcher(也就是当前的渲染watcher)
    // 以及组件已经 mounted 并且没有被 destroyed 才会执行 updated 钩子函数
    if (vm._watcher === watcher && vm._isMounted && !vm._isDestroyed) {
      callHook(vm, 'updated') // 调用 updated 钩子
    }
  }
}

// callUpdatedHooks在flushSchedulerQueue中被调用
// src/core/observer/scheduler
/**
 * Flush both queues and run the watchers.
 */
function flushSchedulerQueue () {
  flushing = true
  let watcher, id

  // Sort queue before flush.
  // This ensures that:
  // 1. Components are updated from parent to child. (because parent is always
  //    created before the child)
  // 2. A component's user watchers are run before its render watcher (because
  //    user watchers are created before the render watcher)
  // 3. If a component is destroyed during a parent component's watcher run,
  //    its watchers can be skipped.
  queue.sort((a, b) => a.id - b.id)

  // do not cache length because more watchers might be pushed
  // as we run existing watchers
  for (index = 0; index < queue.length; index++) {
    watcher = queue[index]
    if (watcher.before) {
      watcher.before()
    }
    id = watcher.id
    has[id] = null
    watcher.run()
    // in dev build, check and stop circular updates.
    if (process.env.NODE_ENV !== 'production' && has[id] != null) {
      circular[id] = (circular[id] || 0) + 1
      if (circular[id] > MAX_UPDATE_COUNT) {
        warn(
          'You may have an infinite update loop ' + (
            watcher.user
              ? `in watcher with expression "${watcher.expression}"`
              : `in a component render function.`
          ),
          watcher.vm
        )
        break
      }
    }
  }

  // keep copies of post queues before resetting state
  const activatedQueue = activatedChildren.slice()
  const updatedQueue = queue.slice()

  resetSchedulerState()

  // call component updated and activated hooks
  callActivatedHooks(activatedQueue) // 这里面还设计另一个生命周期钩子函数'activated'(keep-alive 组件激活时调用)
  callUpdatedHooks(updatedQueue)

  // devtool hook
  /* istanbul ignore if */
  if (devtools && config.devtools) {
    devtools.emit('flush')
  }
}

// flushSchedulerQueue在queueWatcher中被调用
// src/core/observer/scheduler
/**
 * Push a watcher into the watcher queue.
 * Jobs with duplicate IDs will be skipped unless it's
 * pushed when the queue is being flushed.
 */
export function queueWatcher (watcher: Watcher) {
  const id = watcher.id
  if (has[id] == null) {
    has[id] = true
    if (!flushing) {
      queue.push(watcher)
    } else {
      // if already flushing, splice the watcher based on its id
      // if already past its id, it will be run next immediately.
      let i = queue.length - 1
      while (i > index && queue[i].id > watcher.id) {
        i--
      }
      queue.splice(i + 1, 0, watcher)
    }
    // queue the flush
    if (!waiting) {
      waiting = true

      if (process.env.NODE_ENV !== 'production' && !config.async) {
        flushSchedulerQueue()
        return
      }
      nextTick(flushSchedulerQueue)
    }
  }
}

// src/core/observer/watcher.js
/**
 * A watcher parses an expression, collects dependencies,
 * and fires callback when the expression value changes.
 * This is used for both the $watch() api and directives.
 */
export default class Watcher {
    ...
    constructor (
    vm: Component,
    expOrFn: string | Function,
    cb: Function,
    options?: ?Object,
    isRenderWatcher?: boolean // 构造函数里会判断 isRenderWatcher,接着把当前 watcher 的实例赋值给 vm._watcher
  ) {
    // 当前 wathcer 实例 push 到 vm._watchers 中,
    // vm._watcher 是专门用来监听 vm 上数据变化然后重新渲染的,
    // 所以它是一个渲染相关的 watcher,因此在 callUpdatedHooks 函数中,
    // 只有 vm._watcher 的回调执行完毕后,才会执行 updated 钩子函数
    this.vm = vm
    if (isRenderWatcher) {
      vm._watcher = this
    }
    vm._watchers.push(this)
    ...
    }
    ...
    update () {
      if (this.lazy) {
        this.dirty = true
      } else if (this.sync) {
        this.run()
      } else {
        queueWatcher(this)
      }
    }
  }
这边涉及到Vue的数据响应机制,相对还是比较复杂的。总的来说,就是Vue是通过watcher来监听实例上的数据变化来控制渲染流程。
beforeDestroy和destroyed
// src/core/instance/lifecycle.js
Vue.prototype.$destroy = function () {
  const vm: Component = this
  if (vm._isBeingDestroyed) { // 避免重复destroy
    return
  }
  callHook(vm, 'beforeDestroy') // 调用 beforeDestroy 钩子
  vm._isBeingDestroyed = true
  // remove self from parent
  const parent = vm.$parent
  if (parent && !parent._isBeingDestroyed && !vm.$options.abstract) {
    remove(parent.$children, vm)
  }
  // teardown watchers 拆卸 watchers
  if (vm._watcher) {
    vm._watcher.teardown()
  }
  let i = vm._watchers.length
  while (i--) {
    vm._watchers[i].teardown()
  }
  // remove reference from data ob
  // frozen object may not have observer.
  if (vm._data.__ob__) {
    vm._data.__ob__.vmCount--
  }
  // call the last hook...
  vm._isDestroyed = true
  // invoke destroy hooks on current rendered tree
  vm.__patch__(vm._vnode, null) // 调用当前 rendered tree 上的 destroy 钩子, 发现子组件,会先去销毁子组件
  // fire destroyed hook
  callHook(vm, 'destroyed') // 调用 destroyed 钩子
  // turn off all instance listeners.
  vm.$off()
  // remove __vue__ reference
  if (vm.$el) {
    vm.$el.__vue__ = null
  }
  // release circular reference (#6759)
  if (vm.$vnode) {
    vm.$vnode.parent = null
  }
}
销毁Vue实例的过程,就是将各种配置清空、移除。
常见问题FAQ
- 免费下载或者VIP会员专享资源能否直接商用?
- 本站所有资源版权均属于原作者所有,这里所提供资源均只能用于参考学习用,请勿直接商用。若由于商用引起版权纠纷,一切责任均由使用者承担。更多说明请参考 VIP介绍。
- 提示下载完但解压或打开不了?
- 找不到素材资源介绍文章里的示例图片?
- 模板不会安装或需要功能定制以及二次开发?


发表评论
还没有评论,快来抢沙发吧!