创建项目
vue create vuecli-demo
自定义配置
// 新建 vue.config.js 文件
module.exports = {
    // 自定义配置开发服务器
    devServer: {
        // 端口
        port: 3000,
        // 运行 yarn serve 的时候自动打开浏览器
        open: true
    },
    // 关闭 eslint 语法检查
    lintOnSave: false
}
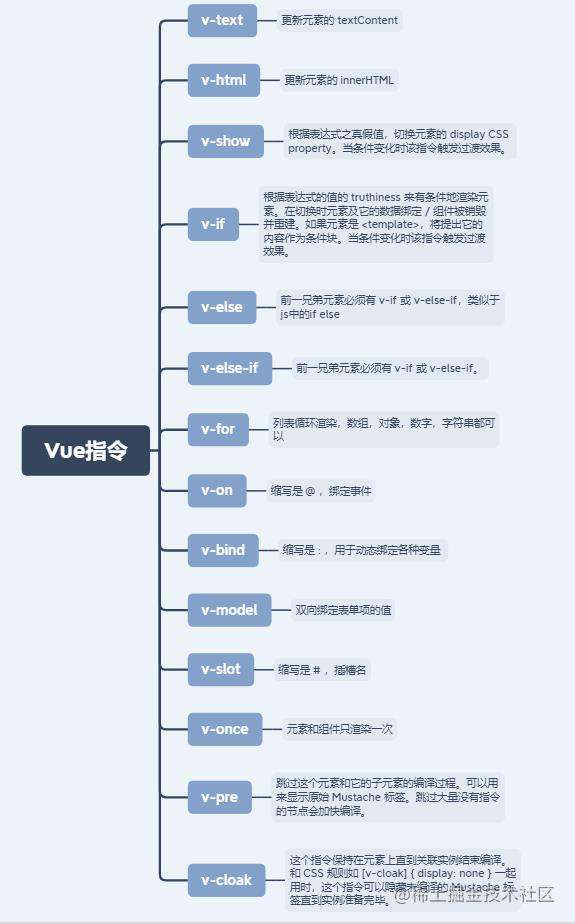
Vue指令
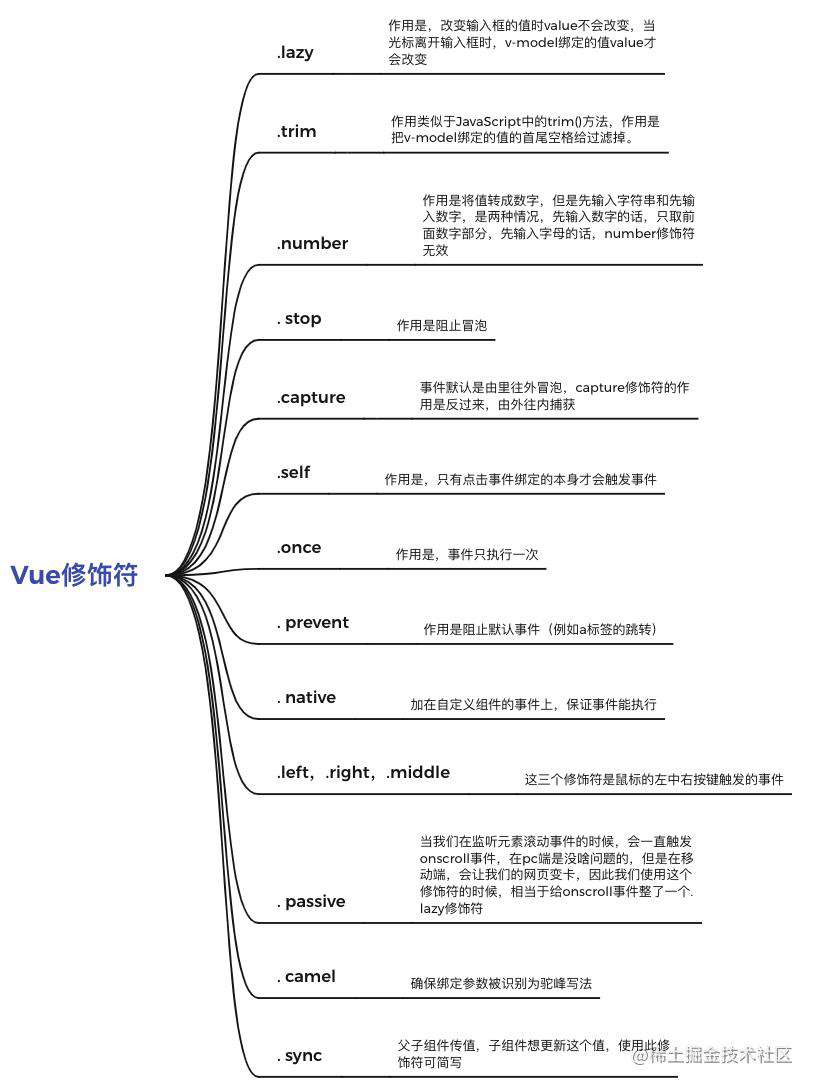
Vue的修饰符
过滤器filter
// main.js
Vue.filter('过滤器名', val => '回调函数体')
计算属性computed
完整写法
computed: {
  // 被赋值时调用
  set(val) {},
  // 初始值
  get() { return }
}
侦听器watch
watch: {
  '被侦听变量名': {
    // 页面加载时触发一次
    immediate: true,
    // 深度监听
    deep: true,
    handler(){}
  }
}
组件component
组件通讯
父传子
// 子组件中
export default{
  // 声明变量,由父组件传值
  props: ['值1', '值2'] //简写
}
<!--父组件中
    调用的时候设置属性-->
<pennel 值1='val'></pennel>
props接收完整写法
porps:{
  background:{
    type:, //类型校验
    requied:, //是否必传
    default: //默认值
  }
}
子传父
<!--  父组件中,传入index和自定义事件  -->
<pennel :index='index' @自定义事件='方法'></pennel>

 data () {
   return {
    qq:{}
   }
 },
methods: {
   方法(e){
     this.qq=e
     console.log(this.qq);
   }
 }
// 子组件中 触发自定义事件
@click='btn'

btn(){
  this.$emit('自定义事件', '实参')
}
动态组件(与路由的作用有点相同)
// 父组件
// html区域
<template>
  <div>
  // 组件缓存,保持不销毁
  <keep-alive>
    // 组件标签的is属性
    <component :is='dongtai'></component>
  </keep-alive>
  </div>
</template>

// js区域
<script>
// 引入外部组件
import UserName from '....'
import UserInfo from '....'
  export default{
    data (){
      return {
        // 通过修改is属性达成动态
        dongtai: 'UserName'
      }
    },
    // 生成组件
    components: {
      UserName,
      UserInfo
    }
  }
</script>
- 使用
component标签的is属性控制动态组件切换 - 性能优化,使用
keep-alive标签,组件缓存避免组件频繁销毁创建 - 使用
activated和deactivated生命周期监听keep-alive标签的激活状态
slot组件插槽
子组件
<slot name='插槽1' :val='局部内容'>
  <p>默认内容</p>
</slot>
父组件
  <template #插槽1="scope">
    <p>{{ scope.局部内容 }}</p>  //v-slot 缩写是#
  </template>
axios
axios({
            method: '请求方式',
            url: '请求地址',
            data: {
                // post请求参数
            },
            params: {
              // get 请求参数,拼接到url
            }
        }).then(res => {
          // 相当于success
            console.log(res.data);
        }).catch(err => {
          // 相当于fail
        })
设置请求基础地址
axios.defaults.baseURL = "基础地址"
路由vue-router
1 安装、导入、
2 把 vueRouter 插件挂载至 Vue
Vue.use(vueRouter)
3 创建映射配置(数组)
const routes = [
  { path: '/路径1', component: 组件1 },
  { path: '/路径2', component: 组件2 children:[套娃]},
]
4 使用上方映射配置生成路由对象
const router = new VueRouter({
  routes: routes
})
5 开启路由
new Vue({
  ...
  router: router
})
6 components(组件) 标签 换成 router-view 标签
路由重定向(默认页面)
const routes = [
  { path: '/', redirect: '/路径'},
  ...
]
路由-404
const routes = [
  ...
  { path: '*', component: 404组件}
]
router-link标签替代 a 标签
<router-link to='url'></router-link>

<style>
  .router-link-active{

  }
</style>
编程式导航
this.$router.push({
  path: '路径',
  name: '路由名' //需要对应 映射 name 配置
  // 传参
  query 或 params: {

  }
})
全局前置守卫
// 登录状态
let isLogin = false

router.beforeEach((to, from, next) => {
  // to 是当前(目标)页面路径
  // from 是上一个页面路径
  // next() 放行
  if(to.path === '路径' && isLogin === false) next(false) //阻止路由跳转
  else next()
})
生命周期
初始化-->挂载-->更新-->销毁
初始化阶段
beforeCreate created (主要用来写api)
挂载阶段
beforeMount mounted(可以获取到真实的dom)
更新阶段
beforeupdata(更新前数据) updataed (更新后数据)
销毁阶段
veforeDestroy destroyed
路由守卫
// 登录状态
let isLogin = false

router.beforeEach((to, from, next) => {
  // to 是当前(目标)页面路径
  // from 是上一个页面路径
  // next() 放行
  if(to.path === '路径' && isLogin === false) next(false) //阻止路由跳转
  else next()
})
export 和 export default
export default暴露一个 export可以多次使用 暴露多个
vuex
- state:存储状态(变量)
- getters:对数据获取之前的再次编译,可以理解为
state的计算属性。 - mutations:修改状态,并且是同步的。这个和我们组件中的自定义事件类似。
- actions:异步操作 也可以同步。
- modules:
store的子模块
vue实现按需加载组件
使用() => import()
<template>
    <div>
       <ComponentA />
       <ComponentB />
    </div>
</template>
<script>
const ComponentA = () => import('./ComponentA')
const ComponentB = () => import('./ComponentB')
export default {
    // ...
    components: {
    ComponentA,
    ComponentB
    },
    // ...
}
</script>
使用resolve => require(['./ComponentA'], resolve)
<template>
    <div>
       <ComponentA />
    </div>
</template>
<script>
const ComponentA = resolve => require(['./ComponentA'], resolve)
export default {
    // ...
    components: {
    ComponentA
    },
    // ...
}
</script>
$nextTick 延迟操作
this.$nextTick().then() //写法一

this.$nextTick(function(){})  //写法二

await this.nextTick() //写法三
父组件获取子组件的方法
//父
   <button @click="getway">点击获取子的方法</button>
  <HelloWorid ref=aqaq />
methods: {
   getway(){
      this.$refs.aqaq.way();
   }
 }
 //子
 methods: {
    way(){
      console.log("我是子的方法");
    }
  }
路由传参
// 路由定义
{
  path: '/describe/:id',
  name: 'Describe',
  component: Describe
}
// 页面传参
this.$router.push({
  path: `/describe/${id}`,
})
// 页面获取
this.$route.params.id
// 路由定义
{
  path: '/describe',
  name: 'Describe',
  component: Describe
}
// 页面传参
this.$router.push({
  name: 'Describe',
  params: {
    id: id
  }
})
// 页面获取
this.$route.params.id
// 路由定义
{
  path: '/describe',
  name: 'Describe',
  component: Describe
}
// 页面传参
this.$router.push({
  path: '/describe',
    query: {
      id: id
  `}
)
// 页面获取
this.$route.query.id
样式处理 -class和style
<!-- 1 -->
<div v-bind:class="{ active: true }"></div> ===><div class="active"></div>

<!-- 2 -->
<div :class="['active', 'text-danger']"></div> ===><div class="active text-danger"></div>

<!-- 3 -->
<div v-bind:class="[{ active: true }, errorClass]"></div> ===><div class="active text-danger"></div>


--- style ---
<!-- 1 -->
<div v-bind:style="{ color: activeColor, 'font-size': fontSize + 'px' }"></div>
<!-- 2 将多个 样式对象 应用到一个元素上-->
<!-- baseStyles,overridingStyles 是data中定义的对象 -->
<div v-bind:style="[baseStyles, overridingStyles]"></div>
常见问题FAQ
- 免费下载或者VIP会员专享资源能否直接商用?
- 本站所有资源版权均属于原作者所有,这里所提供资源均只能用于参考学习用,请勿直接商用。若由于商用引起版权纠纷,一切责任均由使用者承担。更多说明请参考 VIP介绍。
- 提示下载完但解压或打开不了?
- 找不到素材资源介绍文章里的示例图片?
- 模板不会安装或需要功能定制以及二次开发?


发表评论
还没有评论,快来抢沙发吧!