前言
哈哈哈,看到了自己上一篇文章被推荐到了首页,很激动,于是就开始迫不及待的准备这一篇文章了了,这篇文章只有一个目的,就是解决动态路由的匹配和使用。
系列前作
vue2.x从零到一的搭建自己风格的后台管理系统 - 项目新建及基础配置
vue2.x从零到一的搭建自己风格的后台管理系统 - 项目整体布局
动态路由
先介绍一下我现在项目的背景,一个项目被分为N个不同的系统(模块),每个系统(模块)都执行各自内容,有公共数据也有模块私有数据(以后会试着用微前端)。所以在一个侧边栏下全部渲染处理可能会超过一屏的高度,虽然侧边栏可以滚动,但展示太多,影响观感,所以就新增了一个中转页面,用来切换不同的系统,所以项目的动态路由就从这里而来。后续会根据用户权限从后端获取路由。动态路由使用的是vue-router中的addRoutes。
router.addRoutes
router.addRoutes(routes: Array<RouteConfig>)
动态添加更多的路由规则。参数必须是一个符合routes选项要求的数组。详见router.addRoutes
router-index.js
import Vue from "vue";
import Router from "vue-router";
// 第三方库需要use一下才能用
Vue.use(Router)

const originalPush = Router.prototype.push
   Router.prototype.push = function push(location) {
   return originalPush.call(this, location).catch(err => err)
}
export const defaultRoutes = [
    {
      path: "/",
      component: () => import("@/views/login"),
      hidden: true,
    },
    {
        path: "/login",
        name: "登录",
        component: () => import("@/views/login"),
        meta: { title: "登录", icon: "dashboard", affix: true },
        hidden: true,
    },
    {
        path: "/stage",
        name: "中转",
        component: () => import("@/views/stage"),
        meta: { title: "中转", icon: "dashboard", affix: true },
        hidden: true,
    },

]

const router = new Router({
    routes: defaultRoutes
});

export default router
router-user.js
export default [{
    path: "/user",
    component: "layout/index",						// 配置vue的文件名称
    redirect: "/user/set",
    hidden: false,
    name: "个人管理",
    children: [
        {
            path: "set",
            name: "个人设置",
            component: "views/user/set/index",		// 配置vue的文件名称
            meta: { title: "个人设置", icon: "dashboard", affix: true },
        }
    ]
}]
router-async.js
import router from "./index";
// 导入默认的配置的静态路由
import { defaultRoutes } from "./index"
// 获取路由
export const getAsyncRoutes = arr => {
    return arr.map(({ path, name, redirect, hidden, component, meta, children }) => {
        const route = {
            path,
            name,
            hidden,
            meta: {
                ...meta
            },
            component: () => import(`@/${component}.vue`)	// 拼接
        };
        if(children) {
            // 如果存在 children,使用递归,将 children 也处理成我们需要的格式,并绑定给父级路由
            route.redirect = redirect;
            route.children = getAsyncRoutes(children);
        }
        return route;
    });
};
// 设置路由
export const setAsyncRoutes = menu => {
    const _menu = getAsyncRoutes(menu);
    let isRepeat = false
    router.options.routes.forEach((item) => {
        if (item.path == _menu[0].path){
            isRepeat = true
        }
    })
    if (!isRepeat) {
        router.addRoutes(_menu);
        router.options.routes = defaultRoutes.concat(_menu);	// 这里的options.routes不是响应式的,所以要手动赋值
    }
};
注意:
router.options.routes = defaultRoutes.concat(_menu);
如果不加这一行的话,路由是不会生效的,因为router.options.routes不是响应式的
views-stage-index.vue
<template>
    <div class="stage">
        <header-bar></header-bar>
        <div class="stage-body">
            <div class="stage-body__title">系统中转页面</div>
            <div class="content">
                <div class="content__item" v-for="(item, index) in actvieSysList" :key="index" @click="changeStage(item.id, item.title)">
                    <div class="content__logo">
                        <img :src="item.logo" >
                    </div>
                    <div class="content__title">
                        {{ item.title }}
                    </div>
                </div>
            </div>
            <!-- 保留栅格布局, 项目完成后备用 -->
            <!-- <el-row class="content">
                <el-col :xs="24" :sm="24" :md="12" :lg="8" :xl="6" v-for="(item, index) in actvieSysList" :key="index">
                   <div class="item" @click="changeStage(item.id, item.title)">
                        <div class="item__logo">
                            <img :src="item.logo" >
                        </div>
                        <div class="item__title">
                            {{ item.title }}
                        </div>
                   </div>
                </el-col>
            </el-row> -->
        </div>
    </div>
</template>
<script>
import router from '@/router/index'
import Order from "@/router/order"
import User from "@/router/user"
import HeaderBar from "@/components/HeaderBar"
export default {
    name: "stage",
    components: {
        HeaderBar
    },
    data() {
        return {
            sysList: [
                {
                    id: 2,
                    logo: require("@/assets/img/stage/user.png"),
                    title: "用户中心",
                    hidden: false
                },
                {
                    id: 5,
                    logo: require("@/assets/img/stage/order.png"),
                    title: "xx系统",
                    hidden: false
                },
            ]
        }
    },
    computed: {
        actvieSysList() {
            return this.sysList.filter(i => !i.hidden)
        }
    },
    methods: {
        // 切换服务系统
        changeStage(id,title) {
            this.$store.dispatch('datacenter/setCommon');
            switch(id){
                case 1:
                    break;
                case 2:
                    this.$store.commit('router/SET_ROUTES', User);	// 配置动态路由
                    this.$router.replace({
                        path: "/user",
                    });
                    break;
                case 3:
                    break;
                case 4:
                    break;
                case 5:
                    break;
                case 6:
                    // xx系统
                    this.$store.commit('router/SET_ROUTES', Order);
                    this.$store.dispatch('order/setOrderData');		// 同步order公共数据
                    this.$router.replace({
                        path: "/order",
                    });
                    break;
                case 7:
                    break;
                case 8:
                    break;
                case 9:
                    break;
            }
            this.$store.dispatch('settings/changeNavbar', title)
        }
    }
}
</script>
<style lang="less" scoped>
@import "./index.less";
</style>
store-modules-router.js
import { setAsyncRoutes } from "@/router/async"
const state = {
    routes: [],          // 路由
}

const mutations = {
    SET_ROUTES(state, routes) {
        // 动态配置路由
        setAsyncRoutes(routes);
        // 为了防止用户刷新页面导致动态创建的路由失效,将其存储在本地中
        sessionStorage.setItem("router", JSON.stringify(routes));
        // 将路由存储在 store 中
        state.routes = routes;
    }
}

const actions = {
}

export default {
    namespaced: true,	// 命名空间为true,所以在调用的时候,commit要加上当前的文件名this.$store.commit('router/SET_ROUTES', Order);
    state,
    mutations,
    actions
}
src-permission.js
vuex状态管理模式在页面刷新后就没有了记录,所以在全局前置守卫中进行配置。通过sessionStorage中获取数据存入的数据。
注意:这边是没有进行权限判断的情况下,直接读取之前在store-moudules-router中存入到sessionStorage中的数据。
import router from "@/router"
import store from "@/store"
import lodash from "lodash";
import { hasToken, asyncSystemData } from "@/utils/common"

router.beforeEach(async(to, from, next) => {
    const isHasToken = hasToken();
    if (to.meta.title) {
        document.title = to.meta.title
    }
    if (to.path === "/") {
        next()
    } else if (to.path === "/login") {
        next()
    } else {
        if (isHasToken) {
            const hasRoutes = store.getters.routes && store.getters.routes.length > 0;
            if (to.path === "/stage" || hasRoutes) {
                next()
            } else {
                try {
                    let routes = JSON.parse(sessionStorage.getItem("router"))
                    let navbar = sessionStorage.getItem("navbar")
                    store.commit("router/SET_ROUTES", routes)
                    store.dispatch('settings/changeNavbar', navbar)
                    next({ ...to, replace: true })
                    asyncSystemData(lodash.cloneDeep(to.fullPath))
                } catch (error) {
                    next({ path: "/login" })
                }
            }
        } else {

            next({ path: "/login" })
        }
    }

})
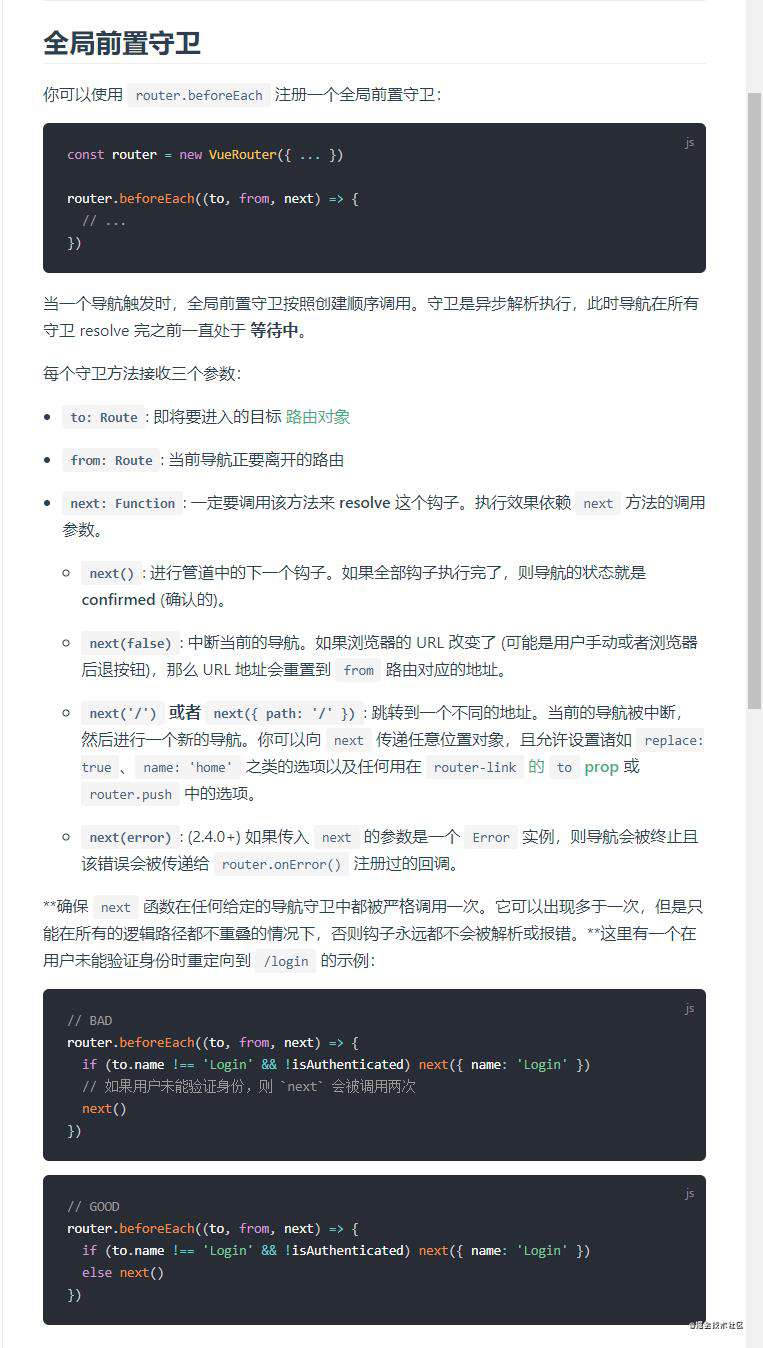
注意:router.beforeEach如果没有设置好就会出现无限循环的问题。下边是vue-router教程原文。
总结
个人心得,动态路由在哪里都能找的写法和实现方式,但是坑还是要自己慢慢踩过去的,我在开发这个动态路由的时候,就遇到了beforeEach无限循环与router.options.routes不是响应式的问题。coder就是一个坑一个坑踩过去的,加油,你是最胖的!
常见问题FAQ
- 免费下载或者VIP会员专享资源能否直接商用?
- 本站所有资源版权均属于原作者所有,这里所提供资源均只能用于参考学习用,请勿直接商用。若由于商用引起版权纠纷,一切责任均由使用者承担。更多说明请参考 VIP介绍。
- 提示下载完但解压或打开不了?
- 找不到素材资源介绍文章里的示例图片?
- 模板不会安装或需要功能定制以及二次开发?


发表评论
还没有评论,快来抢沙发吧!