前言
自 vue3.0 的正式发布以来,关注度一直很高,同时被带火的还有一款尤大打造的工具 vite ,声称能让页面及时响应我们修改的代码效果,而不需要过长的等待时间,苦 webpack 久已的我们可能将要迎来开发环境 runtime 的时代了!
Vite 是什么?
在深入了解 vite 的运行机制之前,老生常谈先来聊聊 vite 到底是个什么东西,官方 对vite的说明为
大意是说 vite 是一个基于浏览器原生 esmodule 的特性来工作的前端开发构建工具,并且通过 rollup 来实现生产打包,也就是说,本身 vite 是不需要将 import/export 等es语法转成 AMD 规范让浏览器去读取,而靠浏览器原生的引模块的能力去引入,这和 webpack 先在内存编译再发送给浏览器读取是有本质区别的,带来的好处是显而易见的,少了编译这一环节,浏览器的响应时间会大大缩短!要知道项目一大,每次改完代码等待编译的时间,emmm,懂的都懂。
下图为 vite 的组成主体
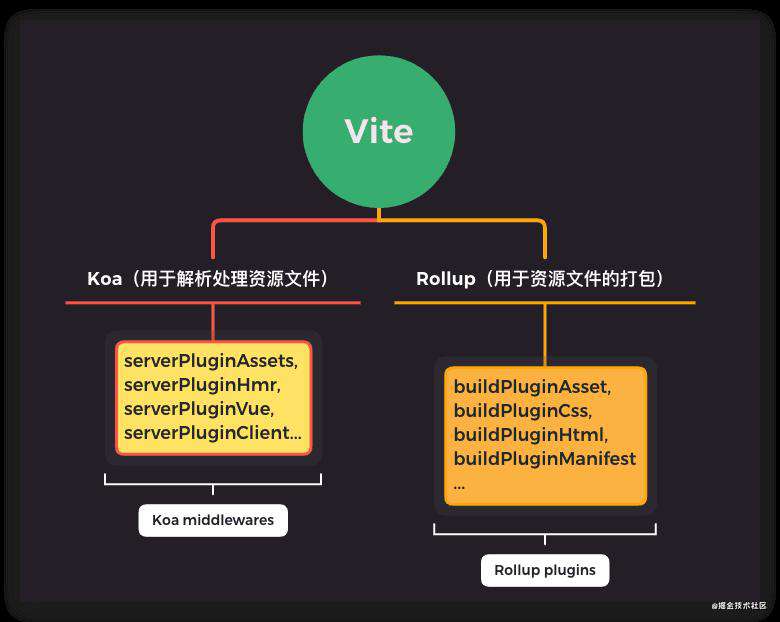
可以看到 vite 本身并不提供 服务器能力 和 打包能力,而是借助第三方包 koa 和 rollup 来实现,而真正核心的关键点,也是vite真正在做的是一整套中间件和插件系统,我想尤大肯定是看中了 koa 洋葱圈模型的灵活性和 rollup 的轻量。
Vite 是怎么处理不同文件的?
针对日常前端开发的文件类型可分为 静态资源文件、html文件、js文件、css文件,又因为不同的开发需求,js文件 和 css文件 都有各自的变体,那么 vite 是怎么处理这些引入的文件?别着急,接下来让我们从源码角度来分析具体实现。
中间件的执行顺序
在返回给浏览器之前 vite 会先对文件类型做不同的 处理
 const resolvedPlugins = [
     /**
     * sourceMap 中间件和重写文件的中间件,为了等待其他中间件完成工作之后,返回给浏览器之前做处理
     */
    sourceMapPlugin,
    moduleRewritePlugin,
    htmlRewritePlugin,
    // user plugins
    ...toArray(configureServer),
    envPlugin,
    ...省略其他中间件
  ]
其中 moduleRewritePlugin 为重写 js 模块的 核心中间件,在所有中间件执行完毕之后,为所有 import 的模块打上标记和处理 模块路径 。vite 采用 es-module-lexer 来解析 es 模块 import 信息。
  /**== moduleRewritePlugin ==**/
  //解析 es 模块 import 信息
  import {
    init as initLexer,
    parse as parseImports,
    ImportSpecifier
  } from 'es-module-lexer'

  imports = parseImports(source)[0] //获取所有 import 信息列表
  //...省略部分兼容代码
  for (let i = 0; i < imports.length; i++) {
     const { s: start, e: end, d: dynamicIndex } = imports[i]
     //截取实际引入的资源名称,如 import { createApp } from 'vue',id即为 vue
     let id = source.substring(start, end)
     //...省略部分兼容代码
     //重写引入路径,即 id
     const resolved = resolveImport(
            root,
            importer,
            id,
            resolver,
            timestamp
          )
    //重写 import 路径
   export const resolveImport = (
        root: string,
        importer: string,
        id: string,
        resolver: InternalResolver,
        timestamp?: string
        ): string => {
        id = resolver.alias(id) || id
        if (bareImportRE.test(id)) {
         //将裸模块的路径重定向到 /@modules/,以便 moduleResolvePlugin 中间件捕获进行实际的路径解析
          id = `/@modules/${resolveBareModuleRequest(root, id, importer, resolver)}`
        } else {
          //将相对路径解析为绝对路径
          let { pathname, query } = resolver.resolveRelativeRequest(importer, id)
          pathname = resolver.normalizePublicPath(pathname)
          //将不是通过 src 的 import 加上标记
          if (!query && path.extname(pathname) && !jsSrcRE.test(pathname)) {
            query += `?import`
          }

          id = pathname + query
        }

        //通过改变时间戳强制刷新 import 的缓存
        if (timestamp) {
          const dirtyFiles = hmrDirtyFilesMap.get(timestamp)
          const cleanId = cleanUrl(id)
          // only rewrite if:
          if (dirtyFiles && dirtyFiles.has(cleanId)) {
            // 1. this is a marked dirty file (in the import chain of the changed file)
            id += `${id.includes(`?`) ? `&` : `?`}t=${timestamp}`
          } else if (latestVersionsMap.has(cleanId)) {
            // 2. this file was previously hot-updated and has an updated version
            id += `${id.includes(`?`) ? `&` : `?`}t=${latestVersionsMap.get(cleanId)}`
          }
        }
        return id
    }
  }
这样我们原来的 模块,比如
/**== main.js ==**/
import { createApp } from 'vue'
import App from './App.vue'
import './index.css'
import './assets/logo.png'

createApp(App).mount('#app')
经过 moduleRewritePlugin 处理后返回给客户端就变成了
/**== main.js ==**/
import { createApp } from '/@modules/vue.js'
import App from '/src/App.vue'
import '/src/index.css?import'
import '/src/assets/logo.png?import'

createApp(App).mount('#app')
当代码执行到第一句时,发送一个请求去服务器拿 '/@modules/vue.js',返回给客户端之前,通过 moduleResolvePlugin 进行实际路径的解析,读取资源,返回给客户端,整个流程如下所示
 那
那 vite 是怎么解析不同的文件为 js 模块 返回给客户端执行的呢?让我们继续往下看
静态资源
之前介绍过 vite 服务器端是通过 koa 实现的,所有文件的处理其实都是通过 koa 中间件来做的,源码中对应处理 静态资源 的中间件为 assetPathPlugin 如下
/**== 处理静态资源中间件 ==**/
export const assetPathPlugin: ServerPlugin = ({ app, resolver }) => {
  app.use(async (ctx, next) => {
    /**
     * isAssetRequest 判断请求路径是否为静态资源
     * isImportRequest 判断是否为 import 引入的(`import('/style.css')`),
     * 而不是由本地资源引入(`<link rel="stylesheet" href="/style.css">`)
     * 实现就是通过判断是否 query 有?import 来实现,这个一开始通过 moduleRewritePlugin 已经完成重写
     */
    if (resolver.isAssetRequest(ctx.path) && isImportRequest(ctx)) {
      ctx.type = 'js'
      ctx.body = `export default ${JSON.stringify(ctx.path)}`
      return
    }
    return next()
  })
}
静态资源通过路径的解析,直接返回资源绝对路径
//代码中写
import './assets/logo.png'
//实际请求 url
/src/assets/logo.png?import
实际返回
export default "/src/assets/logo.png"
html 文件
处理 html 文件用的中间件为 rewriteHtml,逻辑很简单就做了三件事:
- 按
moduleRewritePlugin的逻辑转换script标签里可能存在的import语句
/**=== rewriteHtml ===**/
//...省略部分代码
  html = html.replace(scriptRE, (matched, openTag, script) => {
  if (script) {
  // 代表 script 标签内有内容
    return `${openTag}${rewriteImports(
      root,
      script,
      importer,
      resolver
    )}</script>`
  }
- 为
hmr热更新注册脚本,将script的src属性 注册进importerMap
/**=== rewriteHtml ===**/
//...省略部分代码
  const srcAttr = openTag.match(srcRE)
  if (srcAttr) {
    const importee = resolver.normalizePublicPath(
      cleanUrl(path.posix.resolve('/', srcAttr[1] || srcAttr[2]))
    )
    debugHmr(`        ${importer} imports ${importee}`)
    //将处理过的 src 属性 写入 importerMap
    ensureMapEntry(importerMap, importee).add(importer)
  }
  return matched
}
- 为
hmr热更新添加客户端脚本,这个将在热更新章节详细讲解
 /**=== rewriteHtml ===**/
 //为了和服务器端进行 ws 连接,注入的客户端脚本
 const devInjectionCode = `\n<script type="module">import "${clientPublicPath}"</script>\n`
 const processedHtml = injectScriptToHtml(html, devInjectionCode)
 return await transformIndexHtml(
    processedHtml,
    config.indexHtmlTransforms,
    'post',
    false
  )
js 文件
正常的js文件本身并不需要特殊的处理,这里主要着重在 .vue 文件的解析,毕竟 vite 一开始就是为 vue3 保驾护航的,解析 .vue 文件主要用到了中间件 vuePlugin。当 .vue 文件到达服务器,vite 首先会解析 SFC 的内容
  //解析 sfc 中的内容
  const descriptor = await parseSFC(root, filePath, ctx.body)
然后通过 compileSFCMain 这个解析函数,将 .vue 文件中的 script标签,解析成对应的 js 模块,当初次解析 .vue 文件时,会对 style、template 进行 query 标记
/**=== compileSFCMain ===**/
  //...省略部分代码
  //解析 script
  const { code, map } = await compileSFCMain(
      descriptor,
      filePath,
      publicPath,
      root
    )
  //...省略部分代码
  if (descriptor.styles) {
   descriptor.styles.forEach((s, i) => {
   //标记 style 标签
   const styleRequest = publicPath + `?type=style&index=${i}`
 if (descriptor.template) {
   //标记 template 标签
   const templateRequest = publicPath + `?type=template`
客户端通过重写过的 .vue 文件,再去向服务端请求对应的 style、template 模块
import "/src/App.vue?type=style&index=0"
import { render as __render } from "/src/App.vue?type=template"
由于有 query 标记,通过 compileSFCStyle解析 style 标签,compileSFCTemplate 解析 template 标签
//解析 template
  const { code, map } = compileSFCTemplate(
    root,
    templateBlock,
    filePath,
    publicPath,
    descriptor.styles.some((s) => s.scoped),
    bindingMetadata,
    vueSpecifier,
    config
  )
 //解析 style
 const result = await compileSFCStyle(
      root,
      styleBlock,
      index,
      filePath,
      publicPath,
      config
    )
至此完成了对 vue 文件的解析。
style 文件
style 文件通过 cssPlugin 中间件来解析,通过 processCss 方法来解析 css ,通过 codegenCss 方法来重写 css 文件为 esmodule。
/**=== cssPlugin ===**/
//...省略部分代码
 if (isImportRequest(ctx)) {
        //解析 css
        const { css, modules } = await processCss(root, ctx)
        ctx.type = 'js'
        //重写 css 样式文件为 esmodule,并且通过 updateStyle 插入到页面中
        ctx.body = codegenCss(id, css, modules)
      }
    }
 /**=== processCss ===**/
  //...省略部分代码
  const cssPreprocessLangRE = /\.(less|sass|scss|styl|stylus|postcss)$/
  const css = (await readBody(ctx.body))!
  const filePath = resolver.requestToFile(ctx.path)
  //获取 css 预处理语言
  const preprocessLang = (ctx.path.match(cssPreprocessLangRE) || [])[1]
  //核心编译 css 方法
  const result = await compileCss(root, ctx.path, {
    id: '',
    source: css,
    filename: filePath,
    scoped: false,
    modules: ctx.path.includes('.module'),
    preprocessLang,
    preprocessOptions: ctx.config.cssPreprocessOptions,
    modulesOptions: ctx.config.cssModuleOptions
  })
  //如果解析是单纯的字符串,也就没有 css-module 的情况,直接返回解析的 css字符串文本
  if (typeof result === 'string') {
      const res = { css: await rewriteCssUrls(css, ctx.path) }
      processedCSS.set(ctx.path, res)
      return res
    }
  //是对象的情况,也就是有 css-module 的情况,返回解析的 css字符串文本 和 modules 对象
  const res = {
    css: await rewriteCssUrls(result.code, ctx.path),
    modules: result.modules
  }
 /**=== codegenCss ===**/
 //...省略部分代码
  let code =
    `import { updateStyle } from "${clientPublicPath}"\n` +
    // css 文本字符串
    `const css = ${JSON.stringify(css)}\n` +
    // 插入到页面中
    `updateStyle(${JSON.stringify(id)}, css)\n`
  if (modules) {
  //如果是 css-module,导出为 key-value 对象,为了style[class]取样式类名
    code += dataToEsm(modules, { namedExports: true })
  } else {
    code += `export default css`
  }
  return code
最终返回给浏览器如下结果
import { updateStyle } from "/vite/client"
const css = "#app {\n  font-family: Avenir, Helvetica, Arial, sans-serif;\n  -webkit-font-smoothing: antialiased;\n  -moz-osx-font-smoothing: grayscale;\n  text-align: center;\n  color: #2c3e50;\n  margin-top: 60px;\n}\n"
updateStyle("\"2418ba23\"", css)
export default css
至此 css 文件的解析也已完成
Vite 的热更新机制
vite 的热更新可以实现代码效果的 毫秒级 响应,告别痛苦的等编译时间,实现真正意义上的 热更新,接下来让我一起来探究其 热更新 的实现原理~
热更新是什么?
热更新(hot module replacement),简称 hmr ,是一种无需刷新浏览器即可更新代码效果的技术,实现该技术的关键点是要建立 浏览器 和 服务器 之间的联系,还好我们现成就有一种技术可以实现:websocket 协议,普通的 http 协议为短连接,一次会话结束就会关闭,这显然没法满足我们时刻都需要关联 浏览器 和 服务器 的需求,而websocket 为长连接,可以一直保持 浏览器 和 服务器 之间的会话不中断,通过事件来互相传送数据,vite 也用了 websocket 来实现 热更新。
websocket 连接方式
之前说过 vite 通过 websocket 来实现 浏览器 和 服务器 之间的链接,具体到源码里,服务端在 hmrPlugin 中间件里
/**=== hmrPlugin ===**/
//...省略部分代码
// 创建 WebSocket 服务
const wss = new WebSocket.Server({ noServer: true })
// WebSocket 和客户端连接成功的事件
wss.on('connection', (socket) => {
  debugHmr('ws client connected')
  socket.send(JSON.stringify({ type: 'connected' }))
})
// WebSocket 异常事件
wss.on('error', (e: Error & { code: string }) => {
  if (e.code !== 'EADDRINUSE') {
    console.error(chalk.red(`[vite] WebSocket server error:`))
    console.error(e)
  }
})
客户端在 client.ts 文件中
/**=== client.ts ===**/
//...省略部分代码
const socketProtocol =
  __HMR_PROTOCOL__ || (location.protocol === 'https:' ? 'wss' : 'ws')
const socketHost = `${__HMR_HOSTNAME__ || location.hostname}:${__HMR_PORT__}`
// 创建 WebSocket 服务
const socket = new WebSocket(`${socketProtocol}://${socketHost}`, 'vite-hmr')
// 监听服务端发送的消息请求
socket.addEventListener('message', async ({ data }) => {
  const payload = JSON.parse(data) as HMRPayload | MultiUpdatePayload
  if (payload.type === 'multi') {
    //如果有多个请求,就循环处理  payload.updates 更新队列
    payload.updates.forEach(handleMessage)
  } else {
    //单个请求就直接处理
    handleMessage(payload)
  }
})
//监听是否关闭了连接
socket.addEventListener('close', () => {
  console.log(`[vite] server connection lost. polling for restart...`)
  setInterval(() => {
    fetch('/')
      .then(() => {
       //关闭之后一秒,重新刷新页面,再次进行重连接
        location.reload()
      })
      .catch((e) => {
        /* ignore */
      })
  }, 1000)
})
值得一提的是,我们写的代码里并没有写 WebSocket 的初始化代码,vite 是怎么注入到客户端的呢?秘密在之前我们提到的 rewriteHtml 中间件中,它在 html 文件里注入了请求脚本,请求 /vite/client 地址
<script type="module">import "/vite/client"</script>
地址经过 clientPlugin 中间件解析之后,返回 client.ts 的内容
/**=== clientPlugin ===**/
//客户端请求地址
const clientPublicPath = `/vite/client`
//真实文件地址
const clientFilePath = path.resolve(__dirname, '../../client/client.js')
//处理文件内容
const clientCode = fs
  .readFileSync(clientFilePath, 'utf-8')
  .replace(`__MODE__`, JSON.stringify(config.mode || 'development'))
  .replace(
    `__DEFINES__`,
    JSON.stringify({
      ...defaultDefines,
      ...config.define
    })
  )
app.use(async (ctx, next) => {
  if (ctx.path === clientPublicPath) {
    let socketPort: number | string = ctx.port
    // infer on client by default
    let socketProtocol = null
    let socketHostname = null
    if (config.hmr && typeof config.hmr === 'object') {
      // hmr option has highest priory
      socketProtocol = config.hmr.protocol || null
      socketHostname = config.hmr.hostname || null
      socketPort = config.hmr.port || ctx.port
      if (config.hmr.path) {
        socketPort = `${socketPort}/${config.hmr.path}`
      }
    }
    ctx.type = 'js'
    ctx.status = 200
    //处理返回的文件内容
    ctx.body = clientCode
      .replace(`__HMR_PROTOCOL__`, JSON.stringify(socketProtocol))
      .replace(`__HMR_HOSTNAME__`, JSON.stringify(socketHostname))
      .replace(`__HMR_PORT__`, JSON.stringify(socketPort))
至此完成了 客户端 于 服务端 之间的链接。
Vite 怎么监听文件变化?
既然要 热更新 ,光有 websocket 是不够的,因为我们需要一个 action ,也就是触发时机去触发事件,才能达到更新的目的。vite 选用了和 webpack 一样的解决方案 chokidar,为啥用这个呢?我们知道 nodejs 本身有 fs 模块的 api 来实现文件监听的功能,但是因为缺少一系列的优化,会带来一系列的问题,chokidar 的出现就为了解决这个问题,保证原来功能的基础上做了一系列的优化,可以更快的响应,兼容性也刚好。
在 vite 源码里,通过 chokidar 初始化了一个监听对象
/**=== server/index.ts ===**/
//...省略部分代码
const watcher = chokidar.watch(root, {
  ignored: [/node_modules/, /\.git/],
  // #610
  awaitWriteFinish: {
    stabilityThreshold: 100,
    pollInterval: 10
  }
}) as HMRWatcher

const context: ServerPluginContext = {
  root,
  app,
  server,
  watcher,
  resolver,
  config,
  port: config.port || 3000
}
app.use((ctx, next) => {
  //将 ServerPluginContext 注入到 koa 上下文对象中
  Object.assign(ctx, context)
  ctx.read = cachedRead.bind(null, ctx)
  return next()
})
然后在处理不同的中间件里,注入 watcher 的监控代码
/**=== rewriteHtml ===**/
watcher.on('change', (file) => {
const path = resolver.fileToRequest(file)
if (path.endsWith('.html')) {
  debug(`${path}: cache busted`)
  // html 文件 直接重新加载页面
  watcher.send({
    type: 'full-reload',
    path
  })
  console.log(chalk.green(`[vite] `) + ` ${path} page reloaded.`)
}
})
/**=== vuePlugin ===**/
watcher.on('change', (file) => {
  if (file.endsWith('.vue')) {
    handleVueReload(file)
  }
})
//etc
看到这里有小伙伴肯定会疑惑,和 客户端 进行链接是 websocket ,为啥发送事件变成 watcher 了?其实这边的 send 方法就是 websocket 的 send 方法,在 hmrPlugin 中做了一层封装
/**=== hmrPlugin ===**/
const send = (watcher.send = (payload: HMRPayload) => {
  const stringified = JSON.stringify(payload, null, 2)
  debugHmr(`update: ${stringified}`)

  wss.clients.forEach((client) => {
    if (client.readyState === WebSocket.OPEN) {
      client.send(stringified)
    }
  })
})
然后 客户端 接收事件之后进行处理
/**=== client.ts ===**/
socket.addEventListener('message', async ({ data }) => {
  const payload = JSON.parse(data) as HMRPayload | MultiUpdatePayload
  if (payload.type === 'multi') {
    payload.updates.forEach(handleMessage)
  } else {
    handleMessage(payload)
  }
})
//处理消息的函数(代码写的很通俗易懂就不过多解释了)
async function handleMessage(payload: HMRPayload) {
  const { path, changeSrcPath, timestamp } = payload as UpdatePayload
  switch (payload.type) {
    case 'connected':
      console.log(`[vite] connected.`)
      break
    case 'vue-reload':
      queueUpdate(
        import(`${path}?t=${timestamp}`)
          .catch((err) => warnFailedFetch(err, path))
          .then((m) => () => {
            __VUE_HMR_RUNTIME__.reload(path, m.default)
            console.log(`[vite] ${path} reloaded.`)
          })
      )
      break
    case 'vue-rerender':
      const templatePath = `${path}?type=template`
      import(`${templatePath}&t=${timestamp}`).then((m) => {
        __VUE_HMR_RUNTIME__.rerender(path, m.render)
        console.log(`[vite] ${path} template updated.`)
      })
      break
    case 'style-update':
      // check if this is referenced in html via <link>
      const el = document.querySelector(`link[href*='${path}']`)
      if (el) {
        el.setAttribute(
          'href',
          `${path}${path.includes('?') ? '&' : '?'}t=${timestamp}`
        )
        break
      }
      // imported CSS
      const importQuery = path.includes('?') ? '&import' : '?import'
      await import(`${path}${importQuery}&t=${timestamp}`)
      console.log(`[vite] ${path} updated.`)
      break
    case 'style-remove':
      removeStyle(payload.id)
      break
    case 'js-update':
      queueUpdate(updateModule(path, changeSrcPath, timestamp))
      break
    case 'custom':
      const cbs = customUpdateMap.get(payload.id)
      if (cbs) {
        cbs.forEach((cb) => cb(payload.customData))
      }
      break
    case 'full-reload':
      if (path.endsWith('.html')) {
        // if html file is edited, only reload the page if the browser is
        // currently on that page.
        const pagePath = location.pathname
        if (
          pagePath === path ||
          (pagePath.endsWith('/') && pagePath + 'index.html' === path)
        ) {
          location.reload()
        }
        return
      } else {
        location.reload()
      }
  }
}
至此就完成了整一套 热更新 的流程
总结
vite 作为面向未来的前端构建工具,对前端开发体验是一次质的飞越!虽然现在还在起步阶段,也有不少 bug ,但相信社区的力量可以让它越来越好,加油!ヾ(◍°∇°◍)ノ゙
常见问题FAQ
- 免费下载或者VIP会员专享资源能否直接商用?
- 本站所有资源版权均属于原作者所有,这里所提供资源均只能用于参考学习用,请勿直接商用。若由于商用引起版权纠纷,一切责任均由使用者承担。更多说明请参考 VIP介绍。
- 提示下载完但解压或打开不了?
- 找不到素材资源介绍文章里的示例图片?
- 模板不会安装或需要功能定制以及二次开发?


发表评论
还没有评论,快来抢沙发吧!