最近在研究一个element组件,很有意思,经常会碰到,那就是滚动组件,el-scrollbar组件
该组件位于packages/scrollbar目录下,下面给大家一一介绍下源码
main.js
data() {
  return {
    //滚动条宽度高度
    sizeWidth: "0",
    sizeHeight: "0",
    //滚蛋条距离
    moveX: 0,
    moveY: 0,
  };
},
上面这是组件全局变量
1.render函数
在介绍render代码之前先讲解下要用到的scrollbarWidth函数该函数获取滚动条的宽度
import Vue from 'vue';
let scrollBarWidth;

/**
 * 该函数过程是这样
 * 1.先在body元素创建名为el-scrollbar__wrap元素并设置宽度
 * 2.设置el-scrollbar__wrap元素为滚动 overflow:scroll
 * 3.在el-scrollbar__wrap元素里创建1个div并设置宽度100%
 * 4.el-scrollbar__wrap的offsetWidth-子元素的offsetWidth的offsetWidth得到滚动条宽度(因为el-scrollbar__wrap元素设置overflow:scroll所以子元素实际宽度其实是父元素宽度-原生滚动条宽度)
 * @returns {number|*}
 */
export default function() {
  if (Vue.prototype.$isServer) return 0;
  if (scrollBarWidth !== undefined) return scrollBarWidth;

  const outer = document.createElement('div');
  outer.className = 'el-scrollbar__wrap';
  outer.style.visibility = 'hidden';
  outer.style.width = '100px';
  outer.style.position = 'absolute';
  outer.style.top = '-9999px';
  document.body.appendChild(outer);

  /**
   * offsetWidth 获取宽
   * @type {number}
   */
  const widthNoScroll = outer.offsetWidth; // 父元素宽
  outer.style.overflow = 'scroll';

  const inner = document.createElement('div');
  inner.style.width = '100%';
  outer.appendChild(inner);

  const widthWithScroll = inner.offsetWidth; // 子元素宽
  outer.parentNode.removeChild(outer);
  // 父元素 - 子元素 = 滚动条宽(父元素宽还包含滚动条宽)
  scrollBarWidth = widthNoScroll - widthWithScroll;

  return scrollBarWidth;
}
下面是render函数
let gutter = scrollbarWidth(); //滚动条宽度
let style = this.wrapStyle;//父组件传递的样式
if (gutter) {
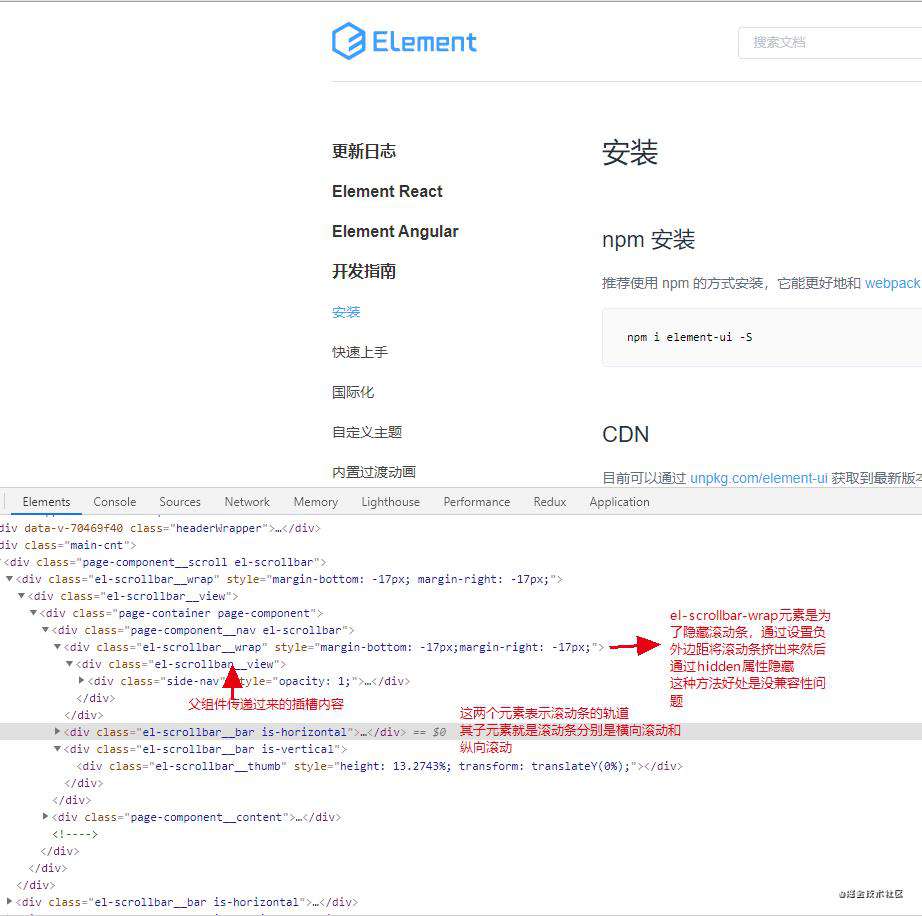
const gutterWith = `-${gutter}px`;
const gutterStyle = `margin-bottom: ${gutterWith}; margin-right: ${gutterWith};`; //为什么这么做,目的是将滚动条区域往下/右挤然后超出区域使用overflow:hidden进行隐藏,稍后会有图解释
// 下面是样式组合
if (Array.isArray(this.wrapStyle)) {
style = toObject(this.wrapStyle);
style.marginRight = style.marginBottom = gutterWith;
} else if (typeof this.wrapStyle === "string") {
style += gutterStyle;
} else {
style = gutterStyle;
}
}
//创建元素 class名为el-scrollbar__view等并将用户传进来的内容放在该元素里
const view = h(
this.tag,
{
class: ["el-scrollbar__view", this.viewClass],
style: this.viewStyle,
ref: "resize",
},
this.$slots.default
);
//创建元素名为el-scrollbar__wrap容器作用是产生原生滚动条,然后后面进行隐藏
const wrap = (
<div
ref="wrap"
style={style}
onScroll={this.handleScroll}
class={[
this.wrapClass,
"el-scrollbar__wrap",
gutter ? "" : "el-scrollbar__wrap--hidden-default",
]}
>
{[view]}
</div>
);
let nodes;
//判断是否显示组件本身滚动条
if (!this.native) {
nodes = [
wrap,
<Bar move={this.moveX} size={this.sizeWidth} />,
<Bar vertical move={this.moveY} size={this.sizeHeight} />,
];
} else {
nodes = [
<div
ref="wrap"
class={[this.wrapClass, "el-scrollbar__wrap"]}
style={style}
>
{[view]}
</div>,
];
}
return h("div", { class: "el-scrollbar" }, nodes);
这个逻辑是这样的
1.首先获取滚动条宽度
2.样式组合(不多说没什么好说的~)
3.创建组件的结构
4.直接通过native判断是否展示滚动条
2.js函数逻辑
  methods: {
  	//在wrapper标签绑定了scroll监听事件
    handleScroll() {
      const wrap = this.wrap;
      //clientHeight 页面看到的可视高度 clientWidth页面看到的可视宽度(后续滚动条的位置)
      this.moveY = (wrap.scrollTop * 100) / wrap.clientHeight;
      this.moveX = (wrap.scrollLeft * 100) / wrap.clientWidth;
    },
	//当滚动条改变的时候重新计算
    update() {
      let heightPercentage, widthPercentage;
      const wrap = this.wrap;
      if (!wrap) return;

      heightPercentage = (wrap.clientHeight * 100) / wrap.scrollHeight;
      widthPercentage = (wrap.clientWidth * 100) / wrap.scrollWidth;
	  //重新计算滚动条宽度高度
      this.sizeHeight = heightPercentage < 100 ? heightPercentage + "%" : "";
      this.sizeWidth = widthPercentage < 100 ? widthPercentage + "%" : "";
    },
  },

  mounted() {
    if (this.native) return;
    this.$nextTick(this.update);//初始化滚动条长度
    //为div.el-scrollbar__view添加resize事件监听,只要其中的内容改变引起高度变化,则更新滚动条高度
    //这里的事件监听是指元素发生改变用的是resize-observer-polyfill包
    !this.noresize && addResizeListener(this.$refs.resize, this.update);
  },

  beforeDestroy() {
    if (this.native) return;
    !this.noresize && removeResizeListener(this.$refs.resize, this.update);//移除
  },
};
上面就是main.js中的内容其实那么还剩下滚动条相关内容
3.bar.js解析
首先介绍下导入的utils.js内容
export const BAR_MAP = {
  vertical: {
    offset: 'offsetHeight',
    scroll: 'scrollTop',
    scrollSize: 'scrollHeight',
    size: 'height',
    key: 'vertical',
    axis: 'Y',
    client: 'clientY',
    direction: 'top'
  },
  horizontal: {
    offset: 'offsetWidth',
    scroll: 'scrollLeft',
    scrollSize: 'scrollWidth',
    size: 'width',
    key: 'horizontal',
    axis: 'X',
    client: 'clientX',
    direction: 'left'
  }
};
//添加样式并返回
export function renderThumbStyle({ move, size, bar }) {
  const style = {};
  const translate = `translate${bar.axis}(${ move }%)`;

  style[bar.size] = size;
  style.transform = translate;
  style.msTransform = translate;
  style.webkitTransform = translate;

  return style;
};
下面是bar.js中代码
export default {
  name: 'Bar',

  props: {
    vertical: Boolean, //类型 水平还是垂直
    size: String, //大小
    move: Number //坐标
  },

  computed: {
    bar() {
      return BAR_MAP[this.vertical ? 'vertical' : 'horizontal']; //在util.js取对象值
    },
    //取虚拟DOM元素
    wrap() {
      return this.$parent.wrap;
    }
  },

  render(h) {
    const { size, move, bar } = this;
    //通过renderThumbStyle来生成thumb,并且给track和thumb分别绑定了onMousedown事件。
    //点击滚动条轨道
    //拖拽滚动条
    return (
      <div
        class={ ['el-scrollbar__bar', 'is-' + bar.key] }
        onMousedown={ this.clickTrackHandler } >
        <div
          ref="thumb"
          class="el-scrollbar__thumb"
          onMousedown={ this.clickThumbHandler }
          style={ renderThumbStyle({ size, move, bar }) }>
        </div>
      </div>
    );
  },

  methods: {
    //拖拽滑块
    clickThumbHandler(e) {
      // prevent click event of right button 右键点击
      if (e.ctrlKey || e.button === 2) {
        return;
      }
      this.startDrag(e);
      /**
       * currentTarget: 当前组件属性集
       */
      //记录点击滑块时的位置距滚动块底部的距离( 滑块的高度 - (鼠标点击滑块的位置距离顶部距离- 滑块元素距离顶部的位置))
      console.log(e.currentTarget[this.bar.offset]);
      console.log(e[this.bar.client]);
      console.log(e.currentTarget.getBoundingClientRect()[this.bar.direction]);
      this[this.bar.axis] = (e.currentTarget[this.bar.offset] - (e[this.bar.client] - e.currentTarget.getBoundingClientRect()[this.bar.direction]));
      console.log(this[this.bar.axis]);
    },
    //点击滚动条滚动
    clickTrackHandler(e) {
      //偏移量            绝对值 (当前元素距离浏览器窗口的 顶部/左侧 距离     减去    当前点击的位置距离浏览器窗口的 顶部/左侧 距离)
      const offset = Math.abs(e.target.getBoundingClientRect()[this.bar.direction] - e[this.bar.client]);
      //滑动块一半高度
      const thumbHalf = (this.$refs.thumb[this.bar.offset] / 2);
      //计算点击后,根据 偏移量 计算在 滚动条区域的总高度 中的占比,也就是 滚动块 所处的位置 (其实得出是滚动比例 滑块的中心总会在我们的落点位置所以减去滑块一半高度)
      const thumbPositionPercentage = ((offset - thumbHalf) * 100 / this.$el[this.bar.offset]);
      //设置外壳的 scrollHeight 或 scrollWidth 新值。达到滚动内容的效果
      this.wrap[this.bar.scroll] = (thumbPositionPercentage * this.wrap[this.bar.scrollSize] / 100);
    },
    //拖拽函数
    startDrag(e) {
      // 仅阻止事件继续分发到其他document,还会将事件分发就地停止,在当前事件之后注册的其他事件,都不会执行
      e.stopImmediatePropagation();
      this.cursorDown = true;

      on(document, 'mousemove', this.mouseMoveDocumentHandler);
      on(document, 'mouseup', this.mouseUpDocumentHandler);
      // 解决拖动过程中页面内容选中的bug
      document.onselectstart = () => false;
    },

    mouseMoveDocumentHandler(e) {
      if (this.cursorDown === false) return;
      const prevPage = this[this.bar.axis];
      console.log(this);
      if (!prevPage) return;

      const offset = ((this.$el.getBoundingClientRect()[this.bar.direction] - e[this.bar.client]) * -1);

      const thumbClickPosition = (this.$refs.thumb[this.bar.offset] - prevPage);
      const thumbPositionPercentage = ((offset - thumbClickPosition) * 100 / this.$el[this.bar.offset]);
      //上面两句代码得出比例
      this.wrap[this.bar.scroll] = (thumbPositionPercentage * this.wrap[this.bar.scrollSize] / 100);
    },
    //重置结束操作
    mouseUpDocumentHandler(e) {
      this.cursorDown = false;
      this[this.bar.axis] = 0;
      off(document, 'mousemove', this.mouseMoveDocumentHandler);
      document.onselectstart = null;
    }
  },

  destroyed() {
    off(document, 'mouseup', this.mouseUpDocumentHandler);
  }
};
以上就是el-scrollbar组件,如果不是很懂只有运行代码一步步看看哪里不懂有点难度但是也不是太难加油!
常见问题FAQ
- 免费下载或者VIP会员专享资源能否直接商用?
- 本站所有资源版权均属于原作者所有,这里所提供资源均只能用于参考学习用,请勿直接商用。若由于商用引起版权纠纷,一切责任均由使用者承担。更多说明请参考 VIP介绍。
- 提示下载完但解压或打开不了?
- 找不到素材资源介绍文章里的示例图片?
- 模板不会安装或需要功能定制以及二次开发?


发表评论
还没有评论,快来抢沙发吧!