一、搭建框架
二、组件拖拽渲染
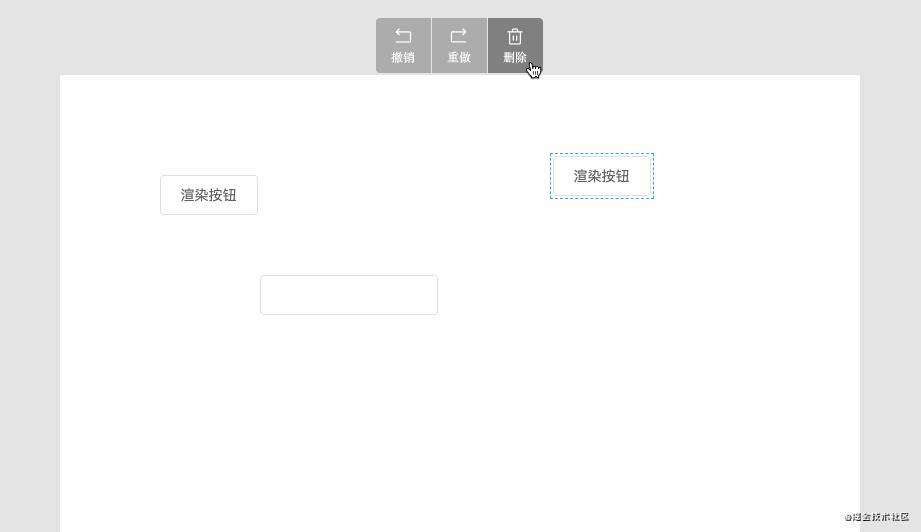
七、工具栏-删除功能
- 工具栏的逻辑比较复杂,放在最后实现,我们先实现简单的删除功能
- 引入iconfont,让工具栏按钮更美观一点
// visual-editor.scss
@import "./lib/iconfont/iconfont.css";
- 定义操作按钮,标题、图标、快捷键提示、处理函数
- 实现删除功能,点击删除时 将
unfocus的block数据赋值给dataModel
const toolButtons = [
      {
        label: "撤销",
        icon: "icon-back",
        tip: "ctrl+z",
      },
      {
        label: "重做",
        icon: "icon-forward",
        tip: "ctrl+y, ctrl+shift+z",
      },
      {
        label: "删除",
        icon: "icon-delete",
        handler: () => {
          // 删除选中状态的 block
          dataModel.value!.blocks = [
            ...focusData.value.unfocus,
          ] as VisualEditorBlockData[];
        },
        tip: "ctrl+d, backspance, delete,",
      },
    ];
- map一下
toolButtons并编写对应样式
	<div class="head">
          {toolButtons.map((btn, index) => (
            <div key={index} class="head-btn" onClick={btn.handler}>
              <i class={`iconfont ${btn.icon}`}></i>
              <span>{btn.label}</span>
            </div>
          ))}
        </div>
实现效果
commit代码
八、给选中组件添加拖拽点
水平、垂直拖拽
- 按下shift键拖拽组件时,组件只能横向或纵向移动
- 修改
blockDragger中的mousemove函数 - 当鼠标横向移动的距离 大于 纵向移动的距离,将纵向的偏移置为0
- 当鼠标横向移动的距离 小于 纵向移动的距离,将横向的偏移置为0
    const mousemove = (e: MouseEvent) => {
        let durX = e.clientX - dragState.startX;
        let durY = e.clientY - dragState.startY;

        // 按下shift键时,组件只能横向或纵向移动
        if (e.shiftKey) {
          // 当鼠标横向移动的距离 大于 纵向移动的距离,将纵向的偏移置为0
          if (Math.abs(durX) > Math.abs(durY)) {
            durY = 0;
          } else {
            durX = 0;
          }
        }
        focusData.value.focus.forEach((block, i) => {
          block.top = dragState.startPos[i].top + durY;
          block.left = dragState.startPos[i].left + durX;
        });
      };
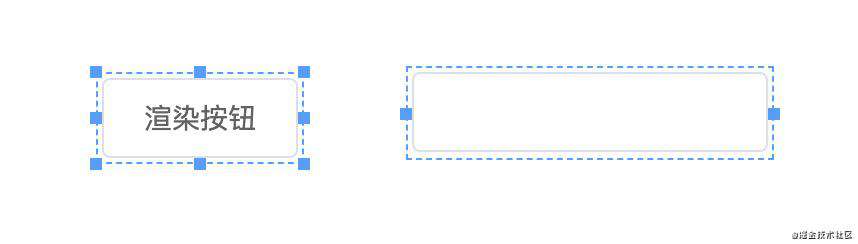
给组件添加拖拽点
数据准备
- 给声明的数据结构
VisualEditorComponent添加resize属性,控制组件是否可以调整宽度或者高度
export interface VisualEditorComponent {
  key: string;
  label: string;
  preview: () => JSX.Element;
  render: () => JSX.Element;
+  resize?: { width?: boolean; height?: boolean };
}
- 在
visual.config中给注册的buttoninput组件添加resize属性
visualConfig.registry("button", {
  label: "按钮",
  preview: () => <ElButton>按钮</ElButton>,
  render: () => <ElButton>渲染按钮</ElButton>,
  resize: { width: true, height: true }, // 可以调整宽度和高度
});

visualConfig.registry("input", {
  label: "输入框",
  preview: () => <ElInput />,
  render: () => <ElInput />,
  resize: { width: true }, // 只能调整宽度
});
新建 block-resizer组件,负责拖拽点的显示和拖拽拉伸
- 接受
block和component(在config中注册的组件对象)两个属性 - 通过
width和height控制拖拽点的显示
import {
  VisualEditorBlockData,
  VisualEditorComponent,
  VisualEditorConfig,
} from "@/packages/visual-editor.utils";
import { defineComponent, PropType } from "vue";
import "./style.scss";

export const BlockResizer = defineComponent({
  props: {
    block: { type: Object as PropType<VisualEditorBlockData>, required: true },
    component: {
      type: Object as PropType<VisualEditorComponent>,
      required: true,
    },
  },
  setup(props) {
    const { width, height } = props.component.resize || {};

    return () => (
      <>
        {/* 显示上下中间的两个点 */}
        {height && (
          <>
            <div class="block-resize block-resize-top"></div>
            <div class="block-resize block-resize-bottom"></div>
          </>
        )}
        {/* 显示左右中间的两个点 */}
        {width && (
          <>
            <div class="block-resize block-resize-left"></div>
            <div class="block-resize block-resize-right"></div>
          </>
        )}
        {/* 显示组件的四个端点 */}
        {width && height && (
          <>
            <div class="block-resize block-resize-top-left"></div>
            <div class="block-resize block-resize-top-right"></div>

            <div class="block-resize block-resize-bottom-left"></div>
            <div class="block-resize block-resize-bottom-right"></div>
          </>
        )}
      </>
    );
  },
});
block-resizer样式
$space: 6px;
$size: 6px;
$primary: #409eff;

.block-resize {
  position: absolute;
  top: -$space;
  left: -$space;
  right: -$space;
  bottom: -$space;
  width: $size;
  height: $size;
  background-color: $primary;
  &.block-resize-top {
    left: calc(50% - #{$size / 2});
    right: initial;
    bottom: initial;
  }

  &.block-resize-bottom {
    left: calc(50% - #{$size / 2});
    right: initial;
    top: initial;
  }

  &.block-resize-left {
    top: calc(50% - #{$size / 2});
    bottom: initial;
    right: initial;
  }

  &.block-resize-right {
    top: calc(50% - #{$size / 2});
    left: initial;
    bottom: initial;
  }

  &.block-resize-top-left {
    right: initial;
    bottom: initial;
  }

  &.block-resize-top-right {
    left: initial;
    bottom: initial;
  }

  &.block-resize-bottom-left {
    top: initial;
    right: initial;
  }

  &.block-resize-bottom-right {
    left: initial;
    top: initial;
  }
}
commit代码
- 在
visual-editor-block中引用 - 组件选中状态,且可以调整宽高状态下才显示 拖拽点
      <div class={classes.value} style={styles.value} ref={el}>
          {Render}
          {props.block?.focus && (width || height) && (
            <BlockResizer
              block={props.block!}
              component={component!}
            ></BlockResizer>
          )}
        </div>
九、调整组件宽高大小
数据准备
1、数据类型补充
- 给
VisualEditorBlockData添加 宽高 和 是否调整过宽高 的属性 - 给
VisualEditorComponent的render方法添加回调参数size
export interface VisualEditorBlockData {
  top: number;
  left: number;
  componentKey: string;
  adjustPosition: boolean; // 是否需要调整位置
  focus: boolean; // 是否是选中状态
+  width: number;
+  height: number;
+  hasResize: boolean; // 是否调整过宽高
}

export interface VisualEditorComponent {
  key: string;
  label: string;
  preview: () => JSX.Element;
+  render: (data: { size: { width?: number; height?: number } }) => JSX.Element;
  resize?: { width?: boolean; height?: boolean };
}
2、visual-editor-block 渲染组件时将 block的size属性传给render函数
    const renderProps = {
        size: props.block?.hasResize
          ? {
              width: props.block.width,
              height: props.block.height,
            }
          : {},
      };
      const Render = component?.render(renderProps);
3、visual.config 在组件的渲染函数中使用传进来的 size数据
visualConfig.registry("button", {
  label: "按钮",
  preview: () => <ElButton>按钮</ElButton>,
+  render: ({ size }) => (
    <ElButton style={{ width: `${size.width}px`, height: `${size.height}px` }}>
      渲染按钮
    </ElButton>
  ),
  resize: { width: true, height: true },
});

visualConfig.registry("input", {
  label: "输入框",
  preview: () => <ElInput />,
+  render: ({ size }) => <ElInput style={{ width: `${size.width}px` }} />,
  resize: { width: true },
});
监听拉伸节点事件,调整组件大小
-
声明
Direction枚举,在mousemove时判断是哪个节点发生的事件,做不同操作 -
实现
onMousedown方法,并监听每个节点的onMousedown事件 -
当鼠标在节点按下的时候,触发
mousedown事件,在该事件中记录初始值,并监听mousemove和mouseup事件 -
鼠标点击节点移动时,执行
mousemove事件,在这里来计算组件的宽高 (核心点,有兴趣可以深入研究,内含彩蛋),修改block的width和height,重新进行渲染。
import {
  VisualEditorBlockData,
  VisualEditorComponent,
  VisualEditorConfig,
} from "@/packages/visual-editor.utils";
import { defineComponent, PropType } from "vue";
import "./style.scss";

enum Direction {
  start = "start",
  center = "center",
  end = "end",
}

export const BlockResizer = defineComponent({
  props: {
    block: { type: Object as PropType<VisualEditorBlockData>, required: true },
    component: {
      type: Object as PropType<VisualEditorComponent>,
      required: true,
    },
  },
  setup(props) {
    const { width, height } = props.component.resize || {};

    const onMousedown = (() => {
      let data = {
        startX: 0,
        startY: 0,
        startWidth: 0,
        startHeight: 0,
        startLeft: 0,
        startTop: 0,
        direction: {} as { horizontal: Direction; vertical: Direction },
      };

      const mousemove = (e: MouseEvent) => {
        const {
          startX,
          startY,
          startWidth,
          startHeight,
          direction,
          startLeft,
          startTop,
        } = data;
        let { clientX: moveX, clientY: moveY } = e;
        if (direction.horizontal === Direction.center) {
          moveX = startX;
        }
        if (direction.vertical === Direction.center) {
          moveY = startY;
        }

        let durX = moveX - startX;
        let durY = moveY - startY;
        const block = props.block as VisualEditorBlockData;

        if (direction.vertical === Direction.start) {
          durY = -durY;
          block.top = startTop - durY;
        }
        if (direction.horizontal === Direction.start) {
          durX = -durX;
          block.left = startLeft - durX;
        }

        const width = startWidth + durX;
        const height = startHeight + durY;

        block.width = width;
        block.height = height;
        block.hasResize = true;
      };

      const mouseup = (e: MouseEvent) => {
        console.log(e);
        document.body.removeEventListener("mousemove", mousemove);
        document.body.removeEventListener("mouseup", mouseup);
      };
      const mousedown = (
        e: MouseEvent,
        direction: { horizontal: Direction; vertical: Direction }
      ) => {
        e.stopPropagation();
        document.body.addEventListener("mousemove", mousemove);
        document.body.addEventListener("mouseup", mouseup);
        data = {
          startX: e.clientX,
          startY: e.clientY,
          direction,
          startWidth: props.block.width,
          startHeight: props.block.height,
          startLeft: props.block.left,
          startTop: props.block.top,
        };
      };

      return mousedown;
    })();

    return () => (
      <>
        {height && (
          <>
            <div
              class="block-resize block-resize-top"
              onMousedown={(e) =>
                onMousedown(e, {
                  horizontal: Direction.center,
                  vertical: Direction.start,
                })
              }
            ></div>
            <div
              class="block-resize block-resize-bottom"
              onMousedown={(e) =>
                onMousedown(e, {
                  horizontal: Direction.center,
                  vertical: Direction.end,
                })
              }
            ></div>
          </>
        )}

        {width && (
          <>
            <div
              class="block-resize block-resize-left"
              onMousedown={(e) =>
                onMousedown(e, {
                  horizontal: Direction.start,
                  vertical: Direction.center,
                })
              }
            ></div>
            <div
              class="block-resize block-resize-right"
              onMousedown={(e) =>
                onMousedown(e, {
                  horizontal: Direction.end,
                  vertical: Direction.center,
                })
              }
            ></div>
          </>
        )}

        {width && height && (
          <>
            <div
              class="block-resize block-resize-top-left"
              onMousedown={(e) =>
                onMousedown(e, {
                  horizontal: Direction.start,
                  vertical: Direction.start,
                })
              }
            ></div>
            <div
              class="block-resize block-resize-top-right"
              onMousedown={(e) =>
                onMousedown(e, {
                  horizontal: Direction.end,
                  vertical: Direction.start,
                })
              }
            ></div>

            <div
              class="block-resize block-resize-bottom-left"
              onMousedown={(e) =>
                onMousedown(e, {
                  horizontal: Direction.start,
                  vertical: Direction.end,
                })
              }
            ></div>
            <div
              class="block-resize block-resize-bottom-right"
              onMousedown={(e) =>
                onMousedown(e, {
                  horizontal: Direction.end,
                  vertical: Direction.end,
                })
              }
            ></div>
          </>
        )}
      </>
    );
  },
});
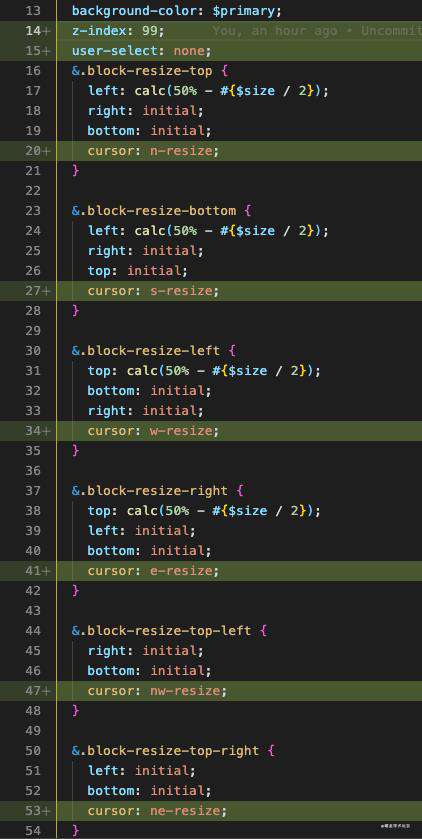
拖拽时的鼠标效果,需要给每个节点添加 cursor属性
- 英文 东西南北 首字母来表示 上下左右
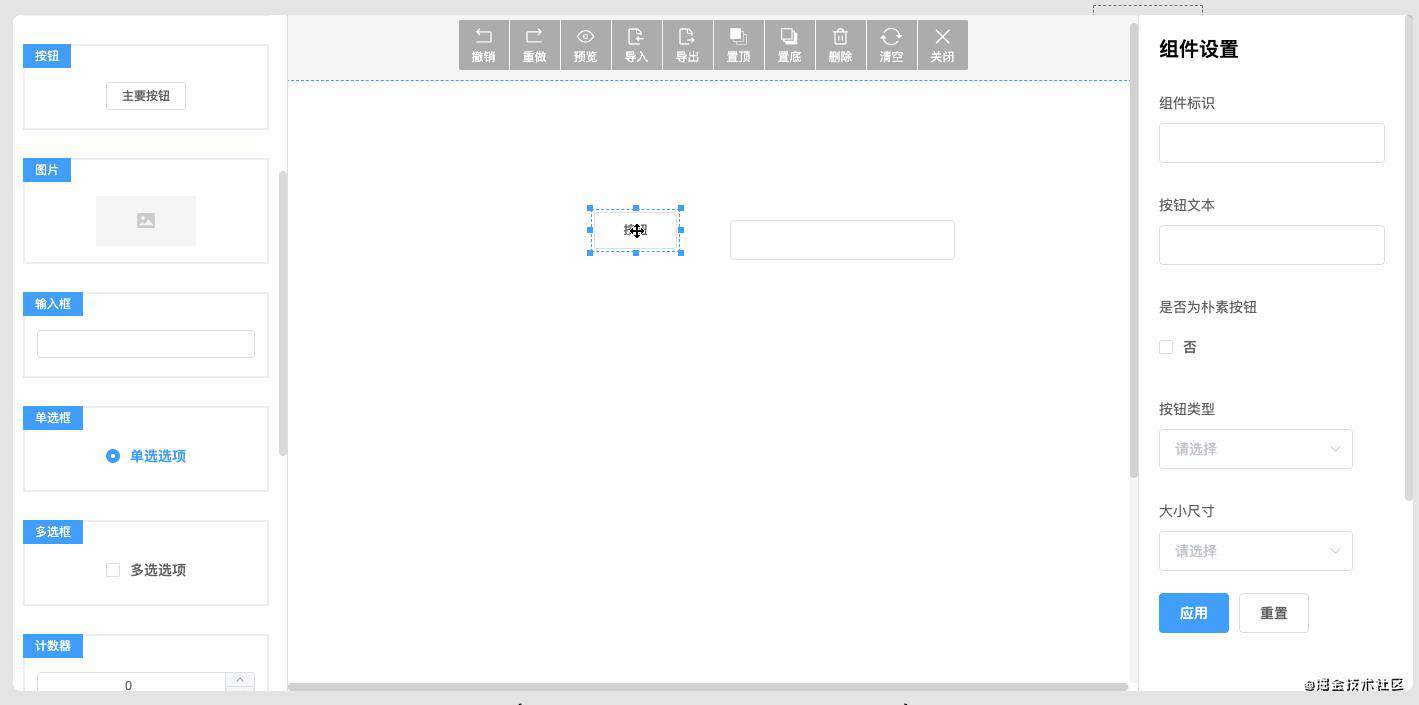
实现效果
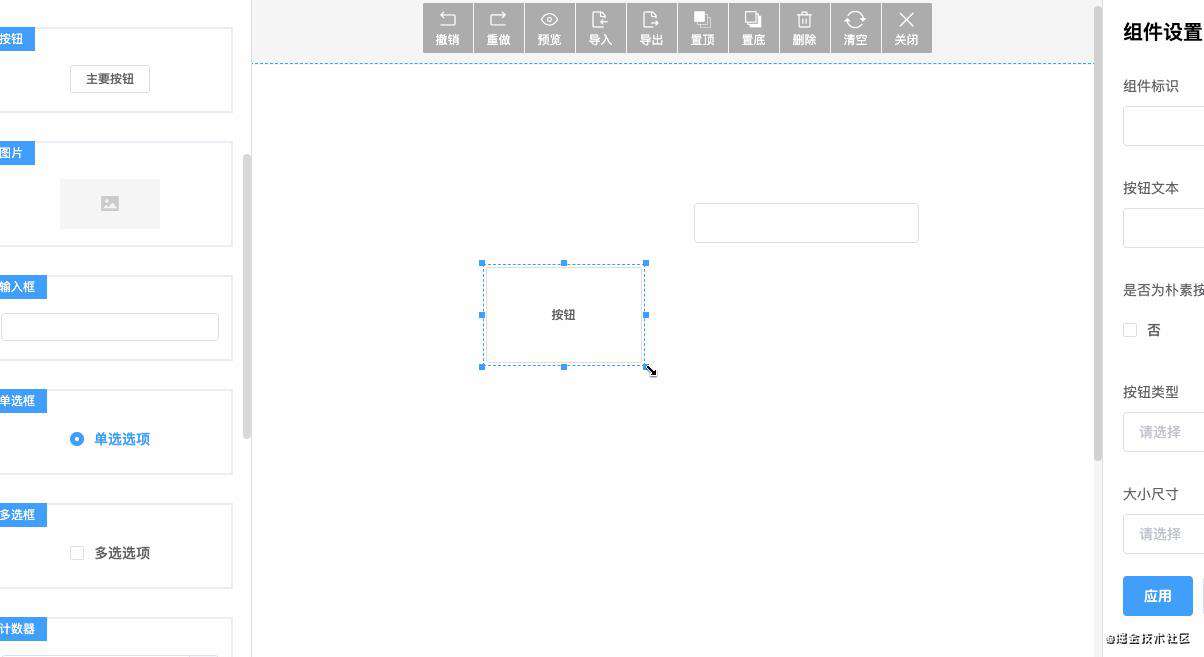
commit代码
完整代码 GitHub
未完待续
下一节 组件拖拽辅助线对齐与组件属性设置
常见问题FAQ
- 免费下载或者VIP会员专享资源能否直接商用?
- 本站所有资源版权均属于原作者所有,这里所提供资源均只能用于参考学习用,请勿直接商用。若由于商用引起版权纠纷,一切责任均由使用者承担。更多说明请参考 VIP介绍。
- 提示下载完但解压或打开不了?
- 找不到素材资源介绍文章里的示例图片?
- 模板不会安装或需要功能定制以及二次开发?


发表评论
还没有评论,快来抢沙发吧!