作者: 徐จุ๊บ,未经授权禁止转载。
前言
上一篇文章《Vue3源码(一)》简单介绍了Vue3源码结构,也通过源码学习了解Vue3基础也是核心响应式。这一次咱们接着了解另一核心组件,学一学Vue3组件初始化及其渲染过程。如有不对之处、遗漏之处,还望指正、补充。
正文
还记得上一篇文章中提到的Vue3应用初始吗?
createApp(App).mount('#app')
上次我们了解了 createApp(App) 的过程,通过闭包、柯里化可以应对不同场景、平台,创建并返回特定的app应用实例,那么这次咱们的学习从 mount('#app') 开始,了解初次渲染的过程。
mount方法
回顾上一篇的内容,我们发现源码中主要有两处定义了 mount 方法,分别是:
- runtime-dom/src/index.ts 针对浏览器Web平台重写
mount方法
  const { mount } = app
  app.mount = (containerOrSelector: Element | string): any => {
    // normallizeContainer 这个方法顾名思义统一容器,mount参数可能是DOM对象或者选择器
    // 如果是选择器就取到对应DOM
    const container = normalizeContainer(containerOrSelector)
    if (!container) return

    // 这里app._component就是我们通过 rootComponent 参数,传入打包编译过的 App 组件(图1)
    const component = app._component

    // 如果我们传入的组件没有定义render,没有模版,那就取DOM里面原本内容当作模版
    if (!isFunction(component) && !component.render && !component.template) {
      component.template = container.innerHTML
    }

    // 这里会清除DOM里原有的内容
    container.innerHTML = ''

    // 执行之前暂存的基础的 mount 方法
    const proxy = mount(container)
    container.removeAttribute('v-cloak')
    container.setAttribute('data-v-app', '')
    return proxy
  }
图1:
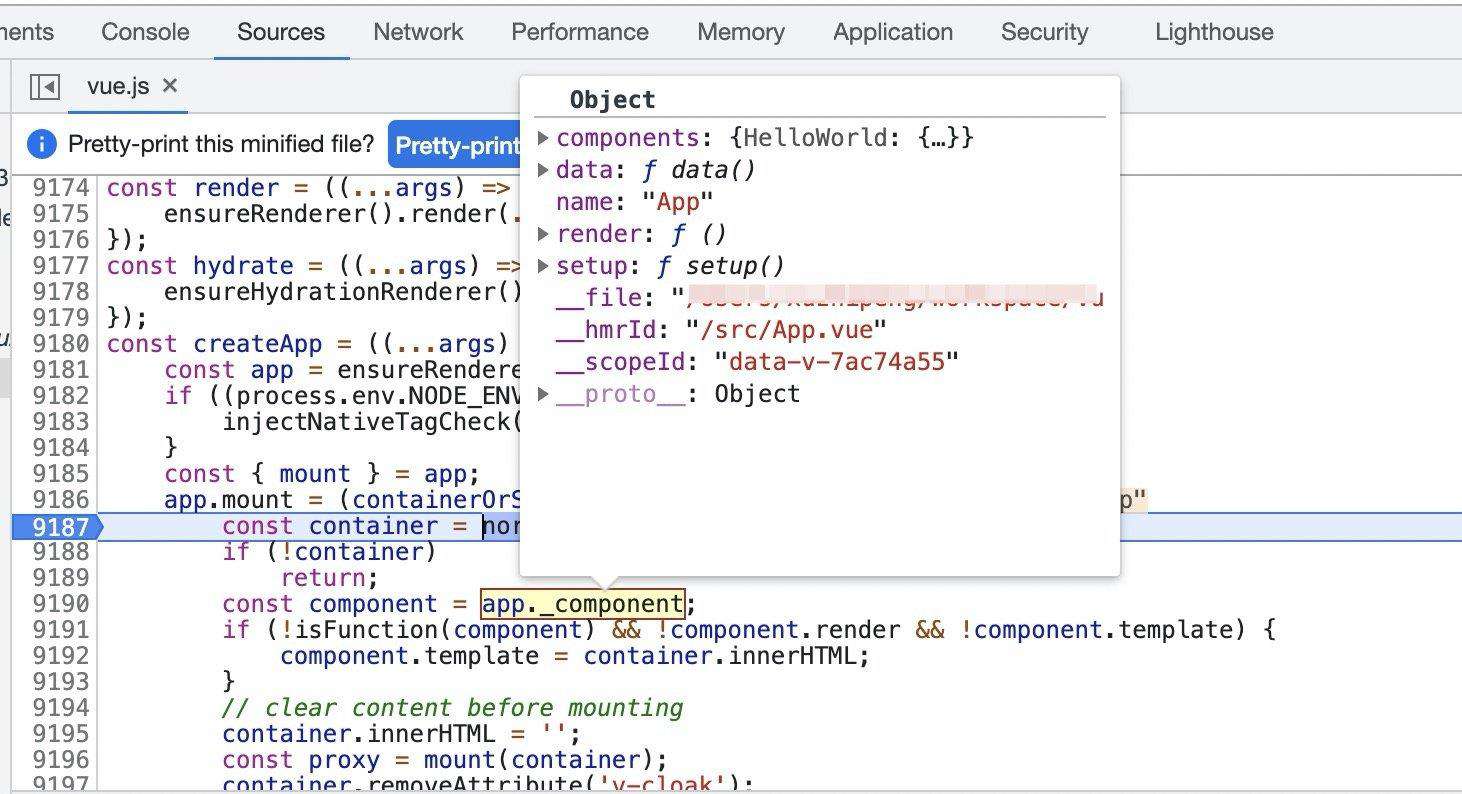
通过代码以及里面注释,可以把重写方法分为几步: 1. 取到DOM容器; 2. 判断传入的根组件App; 3. 执行标准的 mount 方法。
- runtime-core/src/apiCreateApp.ts,这是在app实例里, 标准的、可跨平台的组件
mount方法
 mount(rootContainer: HostElement, isHydrate?: boolean): any {
   // app应用是否已经被挂载
   if (!isMounted) {
     // 1. 创建VNode 这里 rootComponent 就是 createApp(App) 传入的 App 组件
     const vnode = createVNode(
       rootComponent as ConcreteComponent,
       rootProps
     )

     // app应用实例存储上下文,主要有 app应用实例本身,各类设置项,配置项
     vnode.appContext = context

     if (isHydrate && hydrate) {
       // 服务端渲染相关
       hydrate(vnode as VNode<Node, Element>, rootContainer as any)
     } else {
       // 2. render 渲染 VNode
       // 这里的render再上一篇文章有提到 ensureRenderer 创建出来的
       render(vnode, rootContainer)
     }
     isMounted = true

     // 存储DOM容器
     app._container = rootContainer
     // for devtools and telemetry
     ;(rootContainer as any).__vue_app__ = app
     // ...
     return vnode.component!.proxy
   } else if (__DEV__) {
     // ...
   }
 },
可以看到标准mount 方法主要有如下几步: 1. 创建VNode; 2. 渲染VNode为真实DOM
小结
至此,我们知道 mount 方法大致做了哪些事情。
- normalizeContainer 得到DOM容器
- createVNode,根据传入App组件,创建VNode
- render VNode,并挂载到DOM容器上
- 返回 VNode.component 的代理
咱们接着看看VNode相关的。
创建&渲染VNode
相信大家对VNode都不陌生,简单说是通过JavaScript对象抽象描述DOM、事物。面试中问起有什么好处的话,肯定会说到这几点,1. 不用频繁更改DOM,2. 抽象化带来的跨平台能力,3. VNode操作JS对比直接操作DOM产生的性能优势。但最近阅读一些文章,让我认为第三条优点也不是绝对性,对于数据量会很大的组件如Tree,Table,循环遍历render子VNode过程耗时也很长,最终也还是要操作DOM,页面甚至可以感觉到卡顿。
回归正题,来看下面例子
App.vue
<template>
  <HelloWorld msg="Hello Vue 3.0 + Vite" />
  <p>{{ showText }}</p>
</template>

HelloWorld.vue
<template>
  <div>{{ msg }}</div>
</template>
创建VNode
在 Vue3 中,有很多代表不同类别的VNode,例如上例中的 HelloWorld 组件 VNode,普通元素 VNode p。
具体我们来看看生成 VNode 的方法 createVNode,代码略长,老办法注释掉本次流程不关心的内容。
function _createVNode(
  type: VNodeTypes | ClassComponent | typeof NULL_DYNAMIC_COMPONENT,
  props: (Data & VNodeProps) | null = null,
  children: unknown = null,
  patchFlag: number = 0,
  dynamicProps: string[] | null = null,
  isBlockNode = false
): VNode {
  if (!type || type === NULL_DYNAMIC_COMPONENT) {
    type = Comment
  }

  if (isVNode(type)) { // 如果是VNode,直接clone,这里就是通过type的__v_isVNode属性判断的
    // createVNode receiving an existing vnode. This happens in cases like
    // <component :is="vnode"/>
    // #2078 make sure to merge refs during the clone instead of overwriting it
    const cloned = cloneVNode(type, props, true /* mergeRef: true */)
    if (children) {
      normalizeChildren(cloned, children)
    }
    return cloned
  }

  // class component normalization.
  if (isClassComponent(type)) { // class组件
    type = type.__vccOpts
  }

  // class & style normalization.
  if (props) {
    // ...
  }

  // 给组件类型增加一个编码标示
  const shapeFlag = isString(type)
    ? ShapeFlags.ELEMENT // 1 dom element
    : __FEATURE_SUSPENSE__ && isSuspense(type)
      ? ShapeFlags.SUSPENSE //128 suspense vue3中新增的组件
      : isTeleport(type)
        ? ShapeFlags.TELEPORT // 64 teleport 也是vue3中新增
        : isObject(type)
          ? ShapeFlags.STATEFUL_COMPONENT // 4 状态组件
          : isFunction(type)
            ? ShapeFlags.FUNCTIONAL_COMPONENT // 2 函数组件
            : 0
  // ...
  const vnode: VNode = {
    __v_isVNode: true,
    [ReactiveFlags.SKIP]: true,
    type,
    props,
    key: props && normalizeKey(props),
    ref: props && normalizeRef(props),
    scopeId: currentScopeId,
    children: null,
    component: null,
    shapeFlag
    // ...
  }

  /** 标准化子节点
    * 这里会给不同类型的children编码标示type 8: 文本; 16:数组; 32:slots;同时也转成对应类型。
    * 同时会因children类型不同,修改VNode的 shapeFlag,为之后挂载使用
    **/
  normalizeChildren(vnode, children)

  // normalize suspense children
  //...

  return vnode
}
通过本例来看上面代码执行过程
- 判断是否为VNode,Class组件,有props则进行class、style标准化转换
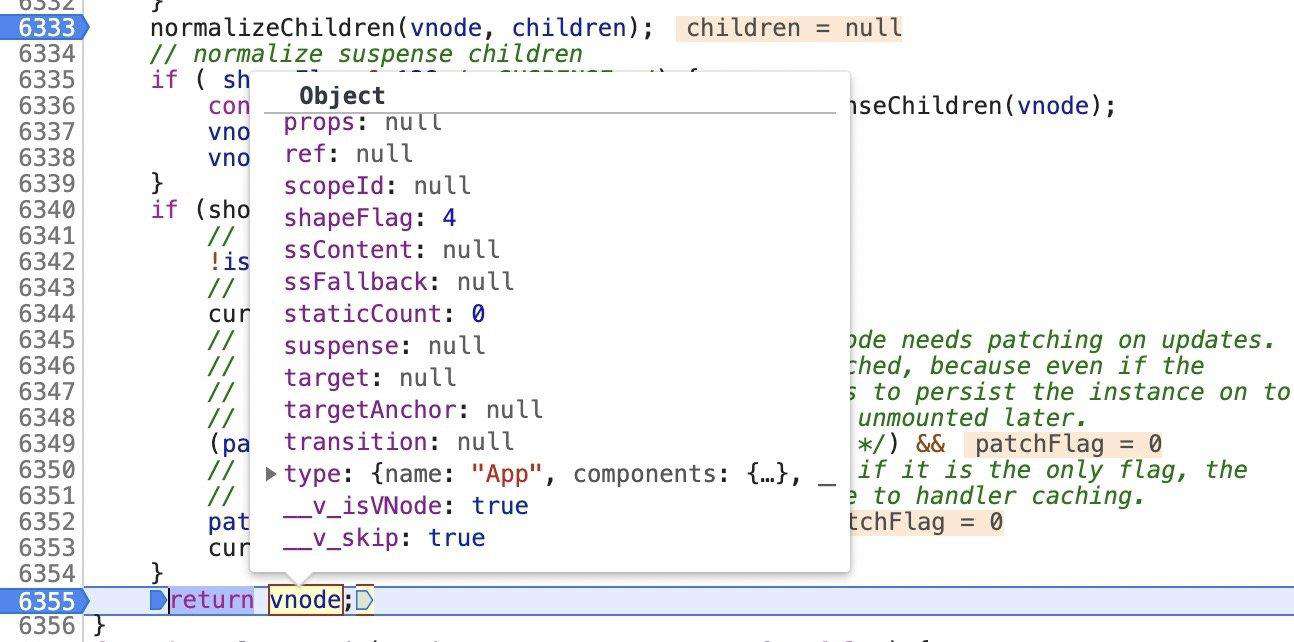
- 判断组件类型,并计算出标示,得出 4
- 创建VNode
- 标准化子节点,这里传入App组件时,children 为null
- 返回VNode
至此我们以及拿到由App组件创建的VNode:
渲染VNode
接着我们来看看 render(vnode, rootContainer) , 怎么渲染VNode。
上一篇文章我们也有了解到 render 方法, baseCreateRenderer 通过传入不同平台的 endererOptions,可生成应对不同平台的render。
render
// runtime-core/src/renderer.ts
const render: RootRenderFunction = (vnode, container) => {
  if (vnode == null) {
    if (container._vnode) {
      unmount(container._vnode, null, null, true)
    }
  } else {
    patch(container._vnode || null, vnode, container)
  }
  flushPostFlushCbs()
  // 存下 vnode于dom容器上
  container._vnode = vnode
}
可以看到如果传入VNode为空,且当前DOM容器有VNode则执行 unmount 销毁组件,否则 patch 传入的VNode。接着我们了解下 patch 的实现。
patch
  const patch: PatchFn = (
    n1, // n1 代表旧节点
    n2, // n2 代表新节点
    container,
    anchor = null,
    parentComponent = null,parentSuspense = null,isSVG = false,optimized = false
  ) => {
    // 如果有旧VNode,且不一样,umount销毁旧节点
    if (n1 && !isSameVNodeType(n1, n2)) {
      anchor = getNextHostNode(n1)
      unmount(n1, parentComponent, parentSuspense, true)
      n1 = null
    }

    if (n2.patchFlag === PatchFlags.BAIL) {
      optimized = false
      n2.dynamicChildren = null
    }

    const { type, ref, shapeFlag } = n2
    // 先通过type来判断选择处理方法
    switch (type) {
      case Text:
        // 文本
        processText(n1, n2, container, anchor)
        break
      case Comment:
        // 注释
        processCommentNode(n1, n2, container, anchor)
        break
      case Static:
        // 静态
        if (n1 == null) {
          mountStaticNode(n2, container, anchor, isSVG)
        } else if (__DEV__) {
          patchStaticNode(n1, n2, container, isSVG)
        }
        break
      case Fragment:
        // 碎片化,这也是Vue3新支持的多根节点
        processFragment(/** ... **/)
        break
      default:
        // 如果type都不满足,使用shapeFlag 编码判断
        if (shapeFlag & ShapeFlags.ELEMENT) {
          // dom元素
          processElement(/** ... **/)
        } else if (shapeFlag & ShapeFlags.COMPONENT) {
          // 组件本次初次渲染会走到这里
          processComponent(
            n1,
            n2,
            container,
            anchor,
            parentComponent,
            parentSuspense,
            isSVG,
            optimized
          )
          // 之后都是Vue3 里面新增两种组件
        } else if (shapeFlag & ShapeFlags.TELEPORT) {
          //
        } else if (__FEATURE_SUSPENSE__ && shapeFlag & ShapeFlags.SUSPENSE) {
        }
    }

    // set ref
    if (ref != null && parentComponent) {
      setRef(ref, n1 && n1.ref, parentComponent, parentSuspense, n2)
    }
  }
其实 patch 最重要的逻辑是通过vnode的 type、shapeFlag来选择怎么处理组件。
由于我们是首次渲染,n1是空,且又App组件创建 VNode 的 shapeFlag 为 4 ShapeFlags.STATEFUL_COMPONENT ,所以会走到 ShapeFlags.COMPONENT 条件下,执行 processComponent 方法。那么接着看一看这个方法。
processComponent
  const processComponent = (
    n1: VNode | null,
    n2: VNode,
    container: RendererElement,
    anchor: RendererNode | null,
    parentComponent: ComponentInternalInstance | null,
    parentSuspense: SuspenseBoundary | null,
    isSVG: boolean,
    optimized: boolean
  ) => {
    if (n1 == null) {
    // 如果没有旧节点
      if (n2.shapeFlag & ShapeFlags.COMPONENT_KEPT_ALIVE) { // 512
      // 如果是 keep-alive 组件
        ;(parentComponent!.ctx as KeepAliveContext).activate(
          n2,
          container,
          anchor,
          isSVG,
          optimized
        )
      } else {
        // 执行挂载组件
        mountComponent(
          n2,
          container,
          anchor,
          parentComponent,
          parentSuspense,
          isSVG,
          optimized
        )
      }
    } else {
      // 如果n1 n2 都有则执行更新
      updateComponent(n1, n2, optimized)
    }
  }
这个方法最主要逻辑通过有无新旧节点,来进行挂载组件mountComponent, 还是updateComponent 更新组件。
接着来看看 本次初次渲染执行到的 mountComponent
mountComponent
  const mountComponent: MountComponentFn = (
    initialVNode,   // 初始VNode 也就是App组件生成的VNode
    container,  // #app Dom容器
    anchor,
    parentComponent,
    parentSuspense,
    isSVG,
    optimized
  ) => {
    // 创建组件实例
    const instance: ComponentInternalInstance = (initialVNode.component =    createComponentInstance(
      initialVNode,
      parentComponent,
      parentSuspense
    ))


    // inject renderer internals for keepAlive
    if (isKeepAlive(initialVNode)) {
      ;(instance.ctx as KeepAliveContext).renderer = internals
    }

    // 设置实例 初始化 props,slots 还有Vue3新增的composition API
    setupComponent(instance)

    // ...

    // effect 上一篇说到的副作用函数
    setupRenderEffect(
      instance,
      initialVNode,
      container,
      anchor,
      parentSuspense,
      isSVG,
      optimized
    )
  }
挂载组件VNode主要逻辑就是 createComponentInstance 创建组件 instance 实例,setupComponent 设置组件,setupRenderEffect 执行带副作用渲染函数。
createComponentInstance 最主要就是创建并返回 instance 实例,我们先看看instance 是什么样子的。
  const instance: ComponentInternalInstance = {
    uid: uid++,
    vnode,
    type,
    parent,
    appContext,
    root: null!, // to be immediately set
    next: null,
    subTree: null!, // will be set synchronously right after creation
    update: null!, // will be set synchronously right after creation
    render: null,
    proxy: null,
    withProxy: null,
    effects: null,
    provides: parent ? parent.provides : Object.create(appContext.provides),
    accessCache: null!,
    renderCache: [],

    // local resovled assets
    components: null,
    directives: null,

    // resolved props and emits options
    //

    // emit
    emit: null as any, // to be set immediately
    emitted: null,

    // state
    ctx: EMPTY_OBJ,
    data: EMPTY_OBJ,
    props: EMPTY_OBJ,
    // ...

    // suspense related
    // ...

    // lifecycle hooks
    // 以下是 组件生命周期相关的属性
    isMounted: false,
    isUnmounted: false,
    isDeactivated: false,
    bc: null, // beforeCreate
    c: null, // created
    // ...
  }
instance 对象属性比较多,都会在特定场景中使用到,之后的 setupComponent 方法也是设置初始化 instance 中各个属性,例如初始化 props , slots 还有执行 Vue3 新增的 setup 函数。
因为涉及到 Vue3 中新增的composition API、setup 函数,可以挖坑单独学习这一块内容
实例创建完,设置完,最后一步设置运行 render 副作用函数 setupRenderEffect。
setupRenderEffect
  const setupRenderEffect: SetupRenderEffectFn = (
    instance,
    initialVNode,
    container,
    anchor,
    parentSuspense,
    isSVG,
    optimized
  ) => {
    // 创建响应式的副作用render函数
    instance.update = effect(function componentEffect() {
      if (!instance.isMounted) {
        let vnodeHook: VNodeHook | null | undefined
        const { el, props } = initialVNode
        const { bm, m, parent } = instance // 生命周期, beforemounted , mounted

        // bm 生命周期 及 hook 执行
        if (bm) {
          invokeArrayFns(bm)
        }
        // ..

       // 渲染组件生成 subTree VNode
       const subTree = (instance.subTree = renderComponentRoot(instance))

        if (el && hydrateNode) {
          // ...
        } else {
          // 把 subTree 挂载到Dom容器中
          patch(
            null,
            subTree,
            container,
            anchor,
            instance,
            parentSuspense,
            isSVG
          )

          initialVNode.el = subTree.el
        }

        // 生命周期 mounted hook 执行
        if (m) {
          queuePostRenderEffect(m, parentSuspense)
        }
        // ...

        instance.isMounted = true
      } else {
        // updateComponent
        // This is triggered by mutation of component's own state (next: null)
        // OR parent calling processComponent (next: VNode)

      }
    },  prodEffectOptions)
  }
回顾上一篇的内容 effect 函数想必大家不会陌生,运行 componentEffect 触发依赖收集,收集这个 effect 函数,当组件数据改变,会重新执行这个 effect 函数中的 componentEffect 方法。
componentEffect 主要逻辑就是生成 subTree VNode,再挂载这个subTree。
renderComponentRoot
export function renderComponentRoot(
  instance: ComponentInternalInstance
): VNode {
  const {
    type: Component,
    vnode,
    proxy,
    withProxy,
    props,
    propsOptions: [propsOptions],
    slots,
    attrs,
    emit,
    render,  // 这里render 是 .vue 编译后的render函数
    renderCache,
    data,
    setupState,
    ctx
  } = instance

  let result
  currentRenderingInstance = instance

  try {
    let fallthroughAttrs
    if (vnode.shapeFlag & ShapeFlags.STATEFUL_COMPONENT) {
      const proxyToUse = withProxy || proxy
      // 本次例子中 这里会循环创建 Helloworld, p标签 VNode
      result = normalizeVNode(
        render!.call(
          proxyToUse,
          proxyToUse!,
          renderCache,
          props,
          setupState,
          data,
          ctx
        )
      )
      fallthroughAttrs = attrs
    } else {
      // functional
  } catch (err) {
    // ...
  }
  currentRenderingInstance = null

  return result
}
subTree 是什么? 例如最开始的例子 App 组件为 initialVNode,subTree 就是 App组件模版里的结构生成的VNode,children 属性为 HelloWorld 组件VNode, p 标签VNode。
而App组件 initialVNode 的 chidren 里面,根据 HelloWorld 标签生成的 VNode, 对于 HelloWorld 组件内部DOM结构来说就是 initialVNode,而其内部DOM结构生成的VNode就是 subTree。

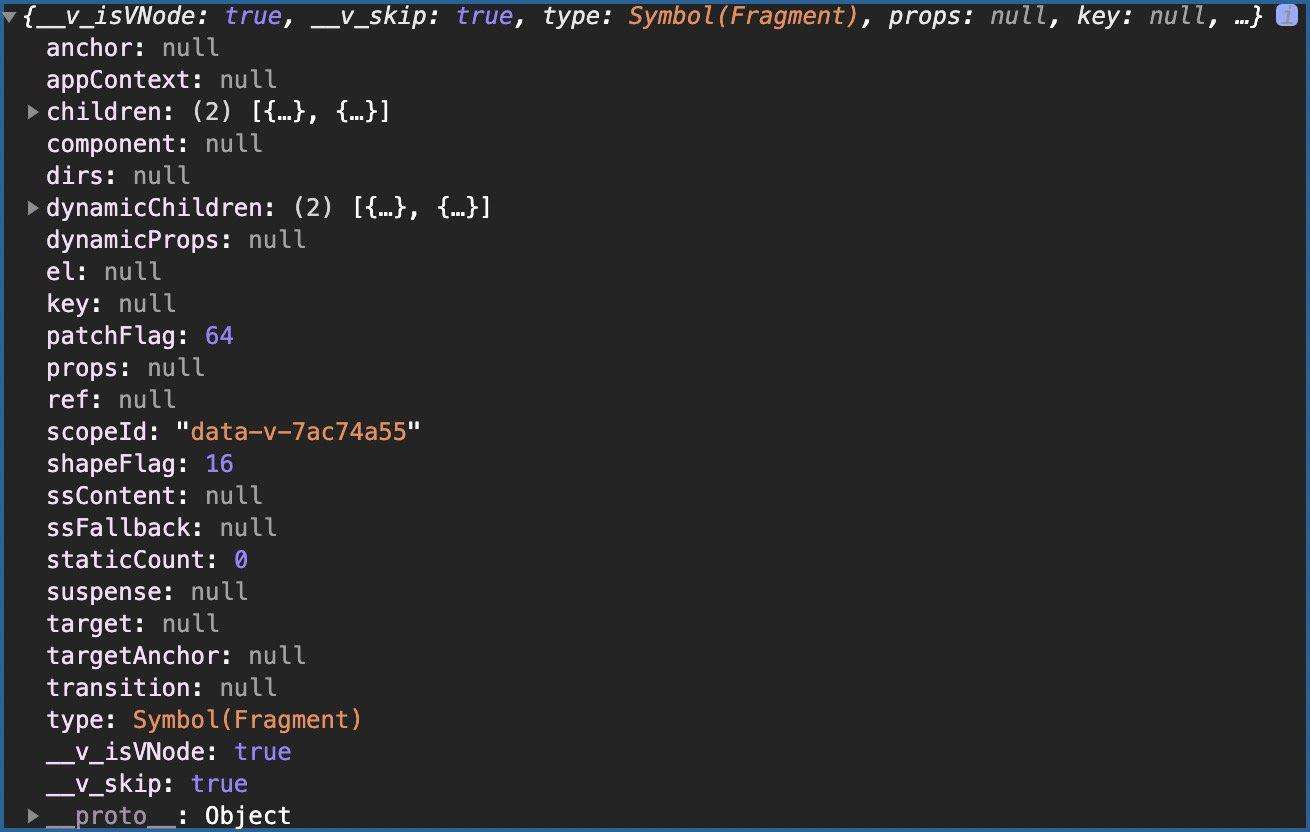
可以看到children里面有着 Helloworld, p 标签 VNode。
回到 setupRenderEffect 方法,生成 subTree 后,又回到我们之前patch流程,判断怎样处理传入的VNode,这样不停循环,直至 patch 真实DOM元素,注释等VNode。
不知道大家有没有注意到,开始例子中 App.vue 的模版中是没有根节点的,这也是 Vue3 中 新支持的功能,在Vue2 中肯定是需要一个 div 把 HelloWorld, p 标签包裹起来的。
所以咱们例子中APP组件的 subTree 被解析为 type 为Symbol(Fragment) 的VNode。
回到 patch 方法,看看 processFragment
  const processFragment = (
    n1: VNode | null,
    n2: VNode,
    container: RendererElement,
    anchor: RendererNode | null,
    parentComponent: ComponentInternalInstance | null,
    parentSuspense: SuspenseBoundary | null,
    isSVG: boolean,
    optimized: boolean
  ) => {
    // 没有根节点,要确认分配在何处
    const fragmentStartAnchor = (n2.el = n1 ? n1.el : hostCreateText(''))!
    const fragmentEndAnchor = (n2.anchor = n1 ? n1.anchor : hostCreateText(''))!
    // ...
    if (n1 == null) {
      hostInsert(fragmentStartAnchor, container, anchor)
      hostInsert(fragmentEndAnchor, container, anchor)
      // 走到这里children一定会是数组
      mountChildren(
        n2.children as VNodeArrayChildren,
        container,
        fragmentEndAnchor,
        parentComponent,
        parentSuspense,
        isSVG,
        optimized
      )
    } else {}
  }
上面 hostCreateText , hostInsert 都是咱上一篇说过的创建 render 时传入的 rendererOptions,这个 包含着浏览器的DOM API,props。例如 hostCreateText 其实就是 document.createTextNode,hostInsert 就是 parent.insertBefore(*child*, *anchor* || null)。
processFragment 在确定完位置后,便会执行 mountChildren 去处理 children VNode数组。
mountChildren
const mountChildren: MountChildrenFn = (
    children,
    container,
    anchor,
    parentComponent,
    parentSuspense,
    isSVG,
    optimized,
    start = 0
  ) => {
    for (let i = start; i < children.length; i++) {
      const child = (children[i] = optimized
        ? cloneIfMounted(children[i] as VNode)
        : normalizeVNode(children[i]))
      // patch每一个VNode
      patch(
        null,
        child,
        container,
        anchor,
        parentComponent,
        parentSuspense,
        isSVG,
        optimized
      )
    }
  }
可以看到 mountChildren 会遍历 children, patch 每一个VNode 至当前的 container 下。
又回到了 patch , 那接下来我们看看如果是一个DOM节点VNode,是怎样处理的。
  const processElement = (
    n1: VNode | null,
    n2: VNode,
    container: RendererElement,
    anchor: RendererNode | null,
    parentComponent: ComponentInternalInstance | null,
    parentSuspense: SuspenseBoundary | null,
    isSVG: boolean,
    optimized: boolean
  ) => {
    if (n1 == null) {
      mountElement(
        n2,
        container,
        anchor,
        parentComponent,
        parentSuspense,
        isSVG,
        optimized
      )
    } else {
      //
    }
  }
与处理组件的流程差不多都是通过有无旧节点,来判断执行 mount 还是 update。
mountElement
  const mountElement = (
    vnode: VNode,
    container: RendererElement,
    anchor: RendererNode | null,
    parentComponent: ComponentInternalInstance | null,
    parentSuspense: SuspenseBoundary | null,
    isSVG: boolean,
    optimized: boolean
  ) => {
    let el: RendererElement
    let vnodeHook: VNodeHook | undefined | null
    const {
      type,
      props,
      shapeFlag,
      transition,
      scopeId,
      patchFlag,
      dirs
    } = vnode
    // ...
      // 调用传入的API创建DOM元素
      el = vnode.el = hostCreateElement(
        vnode.type as string,
        isSVG,
        props && props.is
      )

      if (shapeFlag & ShapeFlags.TEXT_CHILDREN) { // 8
        // 如果是子节点文本 创建文本
        hostSetElementText(el, vnode.children as string)
      } else if (shapeFlag & ShapeFlags.ARRAY_CHILDREN) { // 16
        // 如果是数组,回到mountChildren遍历继续patch子节点
        // 注意这里传入的 container 已经是刚刚创建的 el DOM元素,这样就创建了父子关系
        mountChildren(
          vnode.children as VNodeArrayChildren,
          el,
          null,
          parentComponent,
          parentSuspense,
          isSVG && type !== 'foreignObject',
          optimized || !!vnode.dynamicChildren
        )
      }

      if (dirs) {
        // 调用指令相关的生命周期处理
        invokeDirectiveHook(vnode, null, parentComponent, 'created')
      }
      // 如果有DOM的 props,例如原生的class style,自定义的prop等
      if (props) {
        for (const key in props) {
          if (!isReservedProp(key)) {
            hostPatchProp(
              el,
              key,
              null,
              props[key],
              isSVG,
              vnode.children as VNode[],
              parentComponent,
              parentSuspense,
              unmountChildren
            )
          }
        }
        if ((vnodeHook = props.onVnodeBeforeMount)) {
          invokeVNodeHook(vnodeHook, parentComponent, vnode)
        }
      }
      // ...


    if (dirs) {
      invokeDirectiveHook(vnode, null, parentComponent, 'beforeMount')
    }

    /** 把创建的el DOM挂载到 contanier容器上
    *   初次渲染container是 #app 容器,但是之后就是对应的父级DOM容器了
    **/
    hostInsert(el, container, anchor)

    // ...
  }
可以看到处理挂载DOM节点主要逻辑是,首先调用 hostCreateElement 创建DOM,hostCreateElement其实就是调用浏览器的 document.createElement。 然后判断处理子节点是文本还是数组的情况。之后处理DOM的原生或者自定义属性。最后调用 insert 挂载到DOM容器上。
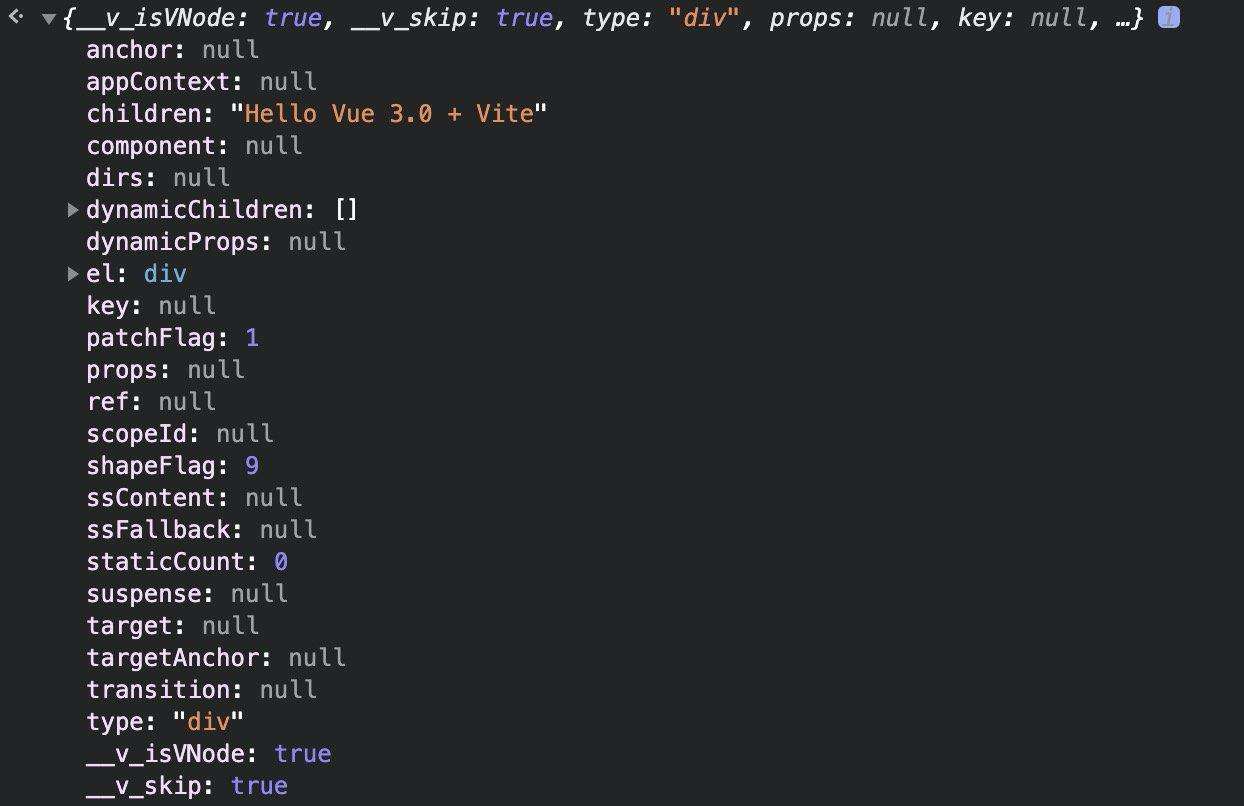
以HelloWorld组件内部 div 举例,它的 children 只是一段我们通过 prop 传入的文本,所以调用 hostSetElementText : el.textContent = *text*插入文本即可。
有人可能会有疑问 div VNode的 shapeFlag 怎么会是9, 还记得 createVNode 方法里面 normalizeChildren 操作吗? 它会根据children的类型是数组、文本或者是插槽修改 shapeFlag 的值。
小结
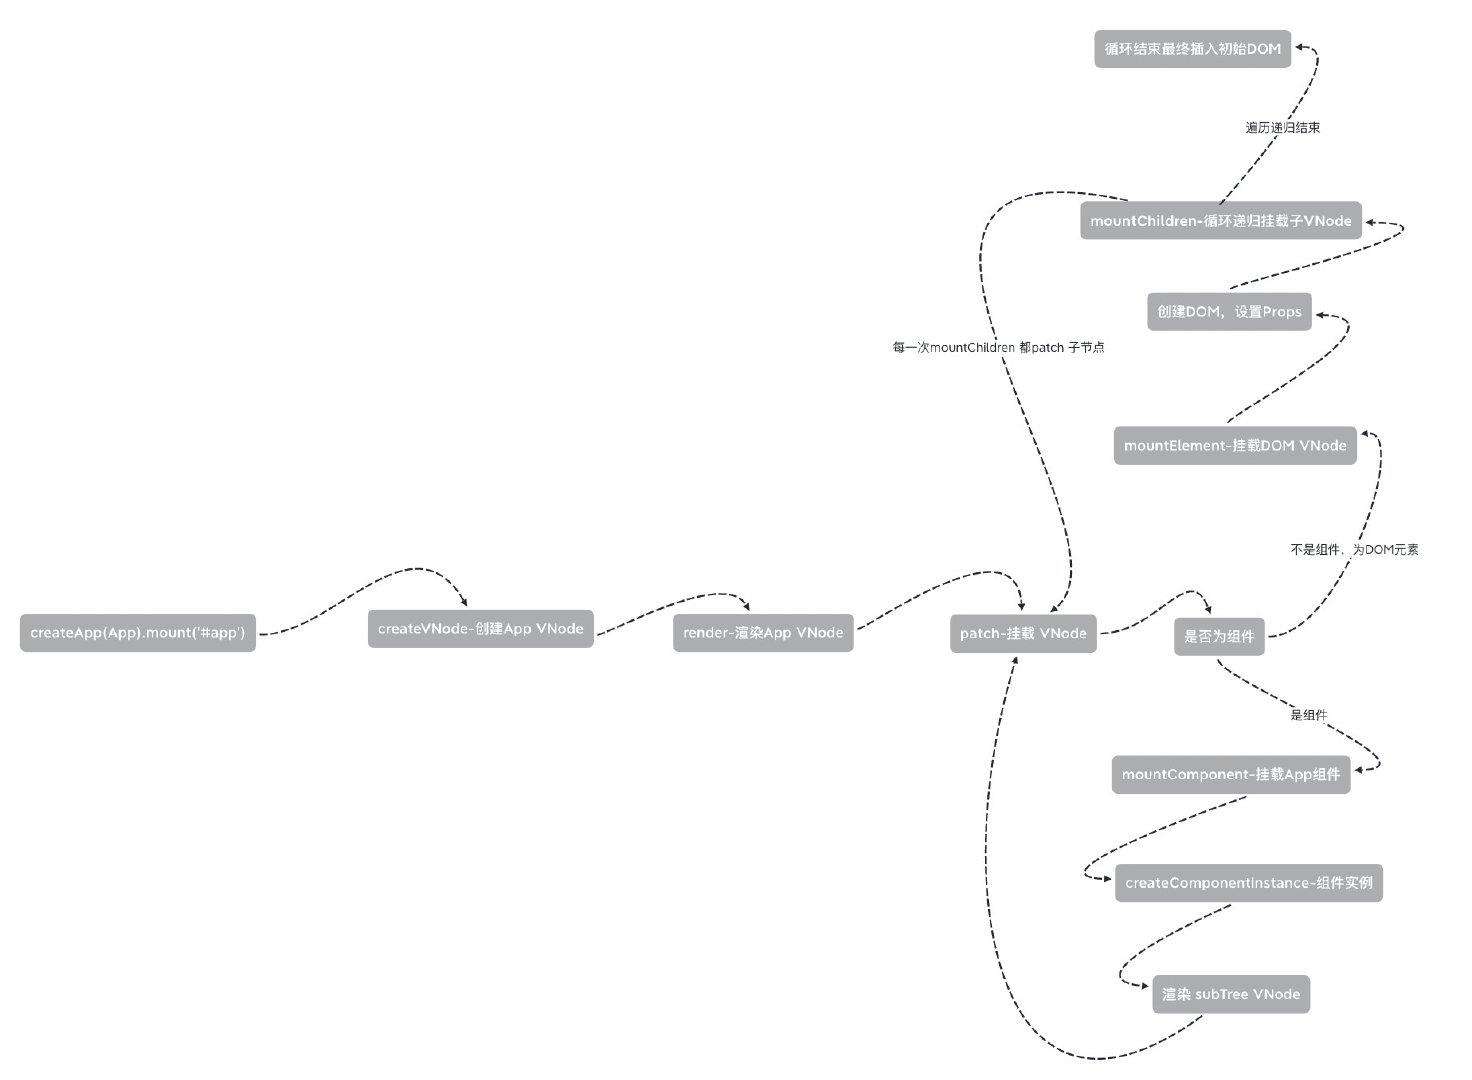
通过代码看渲染流程感觉是不是很绕,大家可以用流程图的方式去理解它。
结尾
感谢你的阅读,日前智云健康大前端团队正在参加掘金人气团队评选活动。如果你觉得不错的话,那就来 给我们投几票 吧!
今日总共可以投12票,网页4票,App4票,分享4票。感谢你的支持,2021我们还会创作更多的技术好文~~~
你的支持是是我们最大的动力~

常见问题FAQ
- 免费下载或者VIP会员专享资源能否直接商用?
- 本站所有资源版权均属于原作者所有,这里所提供资源均只能用于参考学习用,请勿直接商用。若由于商用引起版权纠纷,一切责任均由使用者承担。更多说明请参考 VIP介绍。
- 提示下载完但解压或打开不了?
- 找不到素材资源介绍文章里的示例图片?
- 模板不会安装或需要功能定制以及二次开发?


发表评论
还没有评论,快来抢沙发吧!