前言
vue-router官方使用说明文档vue-router源码地址- 本文主要讲
vue-router二种获取路径模式history和hash
- 路由守卫的实现原理(这里主要以beforeEach为例)
router-link和router-view实现原理- 大致实现的思想
- 将用户填写的路由表 变成扁平化的映射表
- 在根组件初始化响应劫持, 当前路径的映射表(用的是
Vue.util.defineReactive内部响应式API)
- 监听路径变化, 在
router-view去渲染当前路径的所有组件
项目的目录结构
* 基于vue2项目开发的vue-router
├── public
│   └── index.html
├── src
│   ├── router
│   │   └── index.js
│   ├── views
│   │   ├── About.vue
│   │   └── Home.vue
│   ├── vue-router
│   │   ├── components
│   │   │   ├── link.js
│   │   │   └── view.js
│   │   └── history
│   │   │   ├── base.js
│   │   │   ├── hash.js
│   │   │   └── html5.js
│   │   ├── create-matcher.js
│   │   ├── create-router-map.js
│   │   ├── index.js
│   │   └── install.js
├── App.vue
└── main.js
示例
src/router/index.js
import Vue from 'vue'
import VueRouter from '@/vue-router'
import Home from '../views/Home.vue'
import About from '../views/About.vue'
Vue.use(VueRouter)
const routes = [
{
path: '/',
name: 'Home',
component: Home
},
{
path: '/about',
name: 'About',
component: About,
children:[
{
path:'a',
component: {
render: (h) => <h1>about a page</h1>
}
},
{
path:'b',
component: {
render: (h) => <h1>about b page</h1>
}
}
]
}
]
/**
* @description hash 丑 兼容性好
* @description history 好看 但是需要服务端支持 在开发环境内部提供了historyFallback插件 所以不会出现404
*/
const router = new VueRouter({
mode:'history',
routes
})
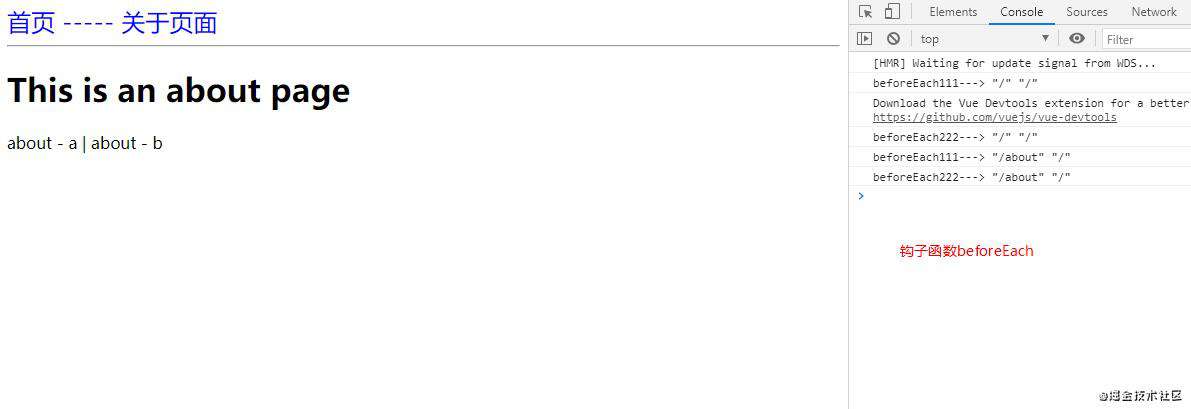
router.beforeEach((to, from, next)=>{
console.log('beforeEach111--->', JSON.stringify(to.path), JSON.stringify(from.path))
// 异步一秒之后 在执行下一个钩子函数
setTimeout(() => { next() }, 1000)
})
router.beforeEach((to, from, next) => {
console.log('beforeEach222--->', JSON.stringify(to.path), JSON.stringify(from.path))
next()
})
export default router
.vue文件
<template>
  <div id="app">
    <div id="nav">
      <router-link to="/">首页</router-link>
      -----
      <router-link to="/about">关于页面</router-link>
    </div>
    <hr>
    <!-- 匹配路径后对应的组件会显示到router-view中 -->
    <router-view />
  </div>
</template>

<style>
  #app #nav {
    color:blue;
    font-size: 24px;
  }
</style>
<template>
  <div class="about">
    <h1>This is an about page</h1>


    <router-link to="/about/a">about - a</router-link>  |
    <router-link to="/about/b">about - b</router-link>
    <router-view></router-view>

  </div>
</template>
<template>
  <div class="home">
   <h1>This is a home page</h1>
  </div>
</template>
正题
install和main文件
let vm = new Vue({
  name: 'root',
  router, // 注入了router实例
  render: h => h(App)
}).$mount('#app')
import RouterLink from './components/link'
import RouterView from './components/view'

export let Vue

/**
 * @description 给每个组件安装router, 前提是根组件有router
 * @description 在Vue实例链上挂载劫持的$router, $route
 * @description 给Vue全局注册router-view, router-link组件
 */
export default function install(_Vue) {
    Vue = _Vue

    Vue.mixin({
        beforeCreate() {
            if (this.$options.router) {
                // 只执行一次
                // 根组件
                this._router = this.$options.router
                this._routerRoot = this

                // 初始化路由逻辑
                this._router.init(this)

                // 将路径对应的映射表 变成响应式
                Vue.util.defineReactive(this, '_route', this._router.history.current)
            } else {
                // 子组件
                this._routerRoot = this.$parent && this.$parent._routerRoot
            }
        },
    })

    /**
     * @description VueRouter实例
     */
    Object.defineProperty(Vue.prototype, '$router', {
        get() {
            return this._routerRoot._router
        }
    })

    /**
     * @description 当前路径对应的映射表
     */
    Object.defineProperty(Vue.prototype, '$route', {
        get() {
            return this._routerRoot._route
        }
    })

    Vue.component('router-link', RouterLink)
    Vue.component('router-view', RouterView)
}
创建VueRouter实例
import install, { Vue } from './install'
import { createMatcher } from './create-matcher'
import Hash from './history/hash'
import HTML5History from './history/html5'

class VueRouter {
    constructor(options = {}) {
        const routes = options.routes

        this.mode = options.mode || 'hash'

        // 路由钩子函数数组
        this.beforeHooks = []

        /** 将路由数据 做扁平化处理 创建映射表 */
        /** 该方法 后续也可动态加载路由 addRoutes */
        this.matcher = createMatcher(options.routes || [])

        /** mode模式 */
        switch(this.mode) {
            case 'hash':
                this.history = new Hash(this)
                break
            case 'history':
                this.history = new HTML5History(this)
                break

        }

    }

    /**
     * @descript 根据路径 查找映射表
     */
    match(location) {
        return this.matcher.match(location)
    }

    /**
     * @descript 改变路径 $router.push
     */
    push(location) {
        // history浏览器可以监听到, 代码操作无法监听到
        this.history.transitionTo(location, () => {
            this.history.pushState(location)
        })
    }

    /**
     * @descript 初始化操作
     */
    init(app) {
        const history = this.history

        // 监听路径 叠片
        const setUpListener = () => {
            history.setUpListener()
        }

        // 路径监听
        history.transitionTo(
            history.getCurrentLocation(),
            setUpListener
        )

        // 改变响应式_route方法传给history
        // 主要是找跟根组件_route 将当前路径的映射表赋值给_route
        history.listen((route) => {
            app._route = route
        })

    }

    /**
     * @description 路由前置钩子
     */
    beforeEach(fn){
        this.beforeHooks.push(fn);
    }

}

VueRouter.install = install


export default VueRouter
扁平化路由表
// create-matcher 文件
import { createRouteMap } from './create-route-map'

/**
 * @description 路由表 -> 映射表
 * @returns {function} match        通过路径查找对应的记录
 * @returns {function} addRoutes    动态添加路由方法
 */
export function createMatcher(routes) {
    /** 创建映射表 */
    const { pathMap } = createRouteMap(routes)

    /** 查寻匹配 pathMap对应的记录 */
    /** 参数是路径 如'/about/a' */
    function match(path) {
        return pathMap[path]
    }

    /** 添加新的路由表 */
    /** 动态路由 如做权限方面 动态添加路由 */
    function addRoutes(newRoutes) {
        return createRouteMap(newRoutes, pathMap)
    }

    return {
        match,
        addRoutes,
    }

}
// create-route-map 文件
/**
 * @description 映射表
 * @description 最终的样子
 * * * * * * * * * * * * * * * * * * * * * * * * * * * * * * * * * * * * * * * * * * * * * * * *
 * {
 *   /        : { path: '/',         componet: {...}, props: {}, parent: {} },
 *   /about   : { path: '/about',    componet: {...}, props: {}, parent: {} },
 *   /about/a : { path: '/about/a',  componet: {...}, props: {}, parent: {path: 'about'...} },
 *   /about/b : { path: '/about/b',  componet: {...}, props: {}, parent: {path: 'about'...} },
 * }
 * * * * * * * * * * * * * * * * * * * * * * * * * * * * * * * * * * * * * * * * * * * * * * * *
 */

export function createRouteMap(routes, oldPathMap) {
    // 创建的格式 最终存储的变量 将层级扁平化处理
    let pathMap = oldPathMap || {}

    routes.forEach(route => {
        addRouteRecord(route, pathMap)
    })

    return { pathMap }
}

/**
 * @description 核心方法
 * @description 递归 创建映射表
 * @param {object} route    用户每个路由组件对应的信息
 * @param {object} pathMap  存储的地方
 * @param {object} parent   是否存在父级
 */
function addRouteRecord(route, pathMap, parent) {
    let path = parent ? `${parent.path}/${route.path}` : route.path

    let record = {
        path,
        component: route.component,
        props: route.props || {},
        parent
    }

    pathMap[path] = record

    route.children && route.children.forEach(childRoute => {
        addRouteRecord(childRoute, pathMap, record)
    })


}
hash和hsitory路径处理方式
// base文件
/**
 * @description 根据当前路径 查找所有的父组件
 * @param {object} record 当前路径对应的映射表
 * @param {object} location 当前路径
 */
function createRoute(record, location) {
    const matched = []
    if (record) {
        while(record) {
            matched.unshift(record)
            record = record.parent
        }
    }

    return {
        ...location,
        matched
    }

}

/**
 * @description 路由钩子队列逻辑 这里以前置钩子为例
 * @description 思想就是将前置钩子都放在一个钩子里
 * @description 最后在依次调用 如: [ ...beforeEach, ...beforeEnter, ...beforeRouteEnter]
 * @param {array}     queue     存放钩子的集合
 * @param {function}  iterator  执行钩子函数 并next() 时看集合中是否还有钩子 有钩子继续执行
 * @param {function}  cb        依次执行完钩子函数后 更改响应式_route(就是获取的this.$route) 更新组件
 */

function runQueue(queue, iterator, cb) {
    const step = index => {
        if (index >= queue.length) {
            cb()

        } else {
            if (queue[index]) {
                // 第一个参数 执行的钩子
                // 第二个参数 next
                iterator(queue[index], () => { step(index + 1) })
            } else {
                step(index + 1)
            }
        }
    }

    step(0)
}

export default class History {
    constructor(router) {
        this.router = router

        // 保存路径的变化
        // 默认{path: '/', matched: []}
        this.current = createRoute(null, {path: '/'})
    }

    /**
     * @description 改变_route响应式值方法
     */
    listen(cb) {
        this.cb = cb
    }

    /**
     * @description 根据当前的路径 去获取对应的映射表
     * @description 并改变_route响应式的值
     */
    transitionTo(path, onComplete) {
        let record = this.router.match(path)
        let route = createRoute(record, { path })

        // 判断当前路由是否一致 一致返回
        // 保证跳转的路径 和 当前路径一致
        // 匹配的记录个数 应该和 当前的匹配个数一致 如第一次打开路径都是'/' 但是匹配的映射表不-样 [] 和 [{...}]
        if (path ===  this.current.path && route.matched.length === this.current.matched.length) {
            return
        }

        // 执行钩子函数的方法 方便迭代
        const iterator = (hook, next) => {
            hook(route, this.current, next)
        }


        // 全部的前置钩子函数
        let queue = this.router.beforeHooks

        runQueue(queue,iterator,() => {
            this.updateRoute(route)

            // 开启路径监听 执行一次
            onComplete && onComplete() // 默认第一次cb是 监听 hashchange || popstate

            // TODO... 后置的钩子可以放在这里 还是调用runQueue
        })

    }

    /**
     * @description 更新组件 为 router-view
     */
    updateRoute(route) {
        // 更改老的映射表
        this.current = route

        // change _route
        this.cb && this.cb(route)
    }

}
// hash 文件
import History from './base'

/**
 * @description 确保路径是hash
 */
function ensureHash() {
    if(!window.location.hash) {
        window.location.hash = '/'
    }
}

/**
 * @description 获取hash
 */
function getHash() {
    return window.location.hash.slice(1)
}

export default class Hash extends History {
    constructor(router) {
        super(router)

        ensureHash()
    }

    /**
     * @description 得到当前的hash
     */
    getCurrentLocation() {
        return getHash()
    }

    /**
     * @description 监听hash路径变化
     */
    setUpListener() {
        window.addEventListener('hashchange', () => {
            // hash 变化 去渲染组件
            this.transitionTo(getHash())
        })
    }

    /**
     * @description 改变路径变化 前进
     */
    pushState(location) {
        window.location.hash = location
    }


}
// html5文件
import History from './base'

export default class HTML5History extends History {
    constructor(router) {
        super(router)
    }

    /**
     * @description 获取路径
     */
    getCurrentLocation() {
        return window.location.pathname
    }

    /**
     * @description 监听html5路径变化
     */
    setUpListener() {
        window.addEventListener('popstate', () => {
            this.transitionTo(this.getCurrentLocation())
        })
    }

    /**
     * @description 改变路径 前进
     */
    pushState(location) {
        history.pushState({}, null, location)
    }


}
router-link和router-view实现
/**
 * @description router-link 组件
 * @description 函数式组件写法
 */
export default {
    functional: true,
    props: {
        to: {
            type: String,
            required: true
        }
    },

    render(h, { props, slots, parent }) {
        const click = () => {
            parent.$router.push(props.to)
        }

        // jsx写法
        return <a onClick = { click }>{ slots().default }</a>
    },
}
/**
 * @description router-view 组件
 * @description 函数式组件
 */
export default {
    functional: true,

    render(h, { parent,data }) {
        // 获取当前路径对应的映射表(current)
        let route = parent.$route

        let depth = 0
        while (parent) {
            if(parent.$vnode && parent.$vnode.data.routerView ){
                depth++
            }
            parent = parent.$parent
        }

        // 有两个router-view  [/about  /about/a]
        // parent.$vnode.data.routerView 没有先渲染/about -> [/about: {routerView: true}, /about/a]
        // parent.$vnode.data.routerView 有再渲染/about/a -> [/about: {routerView: true}, /about/a: {routerView: true}]
        let record = route.matched[depth]

        if(!record){
            return h()
        }

        data.routerView = true

        // $vnode是描述组件的
        // _vnode是描述组件的标签的
        // <router-view routeView=true></router-view>
        return h(record.component, data)
    },
}
完


发表评论
还没有评论,快来抢沙发吧!