前言
wangEditor 是一款简洁、轻量级的富文本编辑器,但是在 vue 中使用时,如何把 wangEditor 封装成一个支持双向绑定(v-model)的组件对于一些同学来说还是比较茫然的,那么今天就来讲讲具体实现
一、理解 v-model 原理
首先我们来看下官方文档是怎么描述自定义 v-model 的:
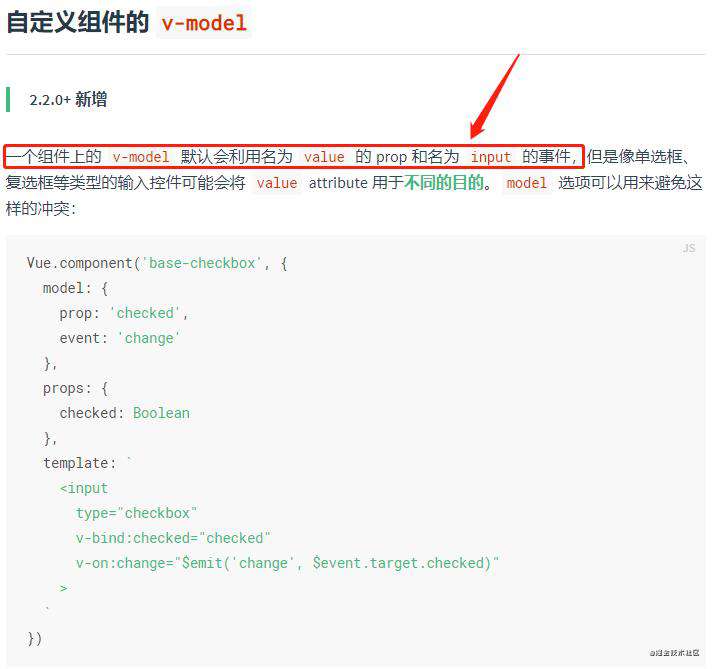
从对比实验中得知,我们是不是可以粗浅的理解为 v-model="html" 等效于 v-bind:value="html" + v-on:input="(e) => { this.html = e.target.value }", 现在是不是好理解多了。
二、在组件中实现 v-model
虽然明白了 v-model 的原理,但是具体怎么封装呢?要点如下:
- 在自定义组件中:
- 我们需要在
props中定义一个value来接受父组件传入的值 - 然后我们需要使用
$emit('input', newValue)将新值发送给父组件
- 我们需要在
- 在父组件中:
- 使用
v-model进行双向绑定
- 使用
第一步:按正常的使用步骤,在 .vue 文件中初始化使用 wangEditor
<template>
    <div ref="wang"></div>
</template>

<script>
import wangEditor from 'wangeditor'

export default {
    data() {
        return {
            editor: null
        }
    },
    mounted() {
        this.editor = new wangEditor(this.$refs.wang)
        this.editor.create()
    },
    beforeDestroy() {
        if (this.editor) {
            this.editor.destroy()
        }
    }
}
</script>
第二步:定义 props.value 接受父组件传值
export default {
    props: {
    	value: {
            type: String,
            default: ''
        }
    },
    mounted() {
        this.editor = new wangEditor(this.$refs.wang)
        this.editor.create()

        // 如果父组件传入了值,将值赋值给编辑器
        if (this.value.length) {
            this.editor.txt.html(this.value)
        }
    },
}
第三步:使用 $emit('input', newVal) 将新值发送到父组件
export default {
    mounted() {
        this.editor = new wangEditor(this.$refs.wang)

        // v-model 双向绑定:把值发送到父组件
        this.editor.txt.eventHooks.changeEvents.push(() => {
            this.$emit('input', this.editor.$textElem.html())
        })

        this.editor.create()

        // 如果父组件传入了值,将值赋值给编辑器
        if (this.value.length) {
            this.editor.txt.html(this.value)
        }
    },
}
三、最终代码
在 v-model 基础上继续封装,然后我们看一下比较完善的代码
<template>
    <div ref="wang"></div>
</template>

<script>
import wangEditor from 'wangeditor'

export default {
    props: {
        // wangEditor 的配置
        option: {
            type: Object,
            default() {
                return {}
            }
        },
        // v-model 双向绑定:接受父组件的值
        // https://cn.vuejs.org/v2/guide/components-custom-events.html#%E8%87%AA%E5%AE%9A%E4%B9%89%E7%BB%84%E4%BB%B6%E7%9A%84-v-model
        value: {
            type: String,
            default: ''
        }
    },
    watch: {
        option: {
            handler(n) {
                Object.entries(n).forEach(([k, v]) => {
                    this.config[k] = v
                })
            },
            immediate: true
        },
        // 监听父组件传值,将值赋值给编辑器
        value: {
            handler(n) {
                if (this.editor && n !== this.temp) {
                    this.editor.$textElem.html(n)
                }
            },
            immediate: true
        }
    },
    data() {
        return {
            temp: '',   // 缓存当前的编辑器中的值,用于与父组件传入值进行对比
            config: {},
            editor: null
        }
    },
    mounted() {
        this.editor = new wangEditor(this.$refs.wang)

        // 合并配置项
        Object.assign(this.editor.config, this.config)

        // v-model 双向绑定:把值发送到父组件
        this.editor.txt.eventHooks.changeEvents.push(() => {
            this.temp = this.editor.$textElem.html()
            this.$emit('input', this.temp)
        })

        this.editor.create()

        // 如果父组件传入了值,将值赋值给编辑器
        if (this.value.length) {
            this.editor.txt.html(this.value)
        }
    },
    beforeDestroy() {
        if (this.editor) {
            this.editor.destroy()
        }
    }
}
</script>
四、wang-editor 组件使用
<template>
  <div id="app">
    <wang-editor :option="option" v-model="html"></wang-editor>
  </div>
</template>

<script>
import WangEditor from './components/wang-editor.vue'

export default {
  name: 'App',
  components: {
    WangEditor
  },
  data() {
    return {
      option: {
        height: 500
      },
      html: '<p>like</p>'
    }
  },
}
</script>
常见问题FAQ
- 免费下载或者VIP会员专享资源能否直接商用?
- 本站所有资源版权均属于原作者所有,这里所提供资源均只能用于参考学习用,请勿直接商用。若由于商用引起版权纠纷,一切责任均由使用者承担。更多说明请参考 VIP介绍。
- 提示下载完但解压或打开不了?
- 找不到素材资源介绍文章里的示例图片?
- 模板不会安装或需要功能定制以及二次开发?


发表评论
还没有评论,快来抢沙发吧!