文中涉及的React demo代码使用了16.8的新增特性Hooks:
前言
刚立项时,可能只有一个根组件Root:管你啥业务,一把梭。
项目慢慢有起色,好事者就拆出了一些子组件,必然,它们间将有一些数据流动,问题不大,可以让他们“父子相连”。
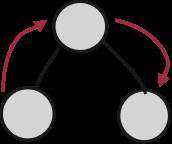
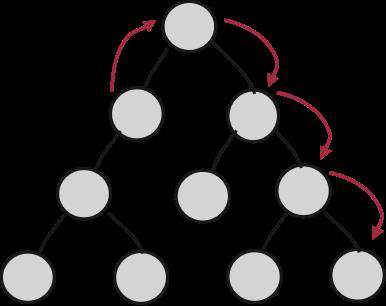
现在项目爆了,业务N倍增长,不得不拆出更多的子孙组件出来,实现更多复杂业务。
但愿逻辑比较简单,数据流动是一层层往下:
现实总是残酷的,往往结构都是这样的,父子孙组件间关系混乱:
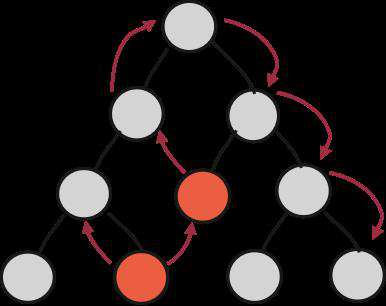
怎么办???
解决方案
"只要思想不滑坡,办法总比困难多":
- 方案1,梳理项目逻辑,重新设计组件(手动Fxxk!!!)
- 方案2,辞职,换个公司重开(手动狗头)
项目迭代过程中,不可避免出现组件间状态共享,而导致逻辑交错,难以控制。
我们会想:能不能有一种实践规范,将所有可能公用的状态、数据及能力提取到组件外,数据流自上往下,哪里需要哪里自己获取,而不是prop drilling,大概如下:
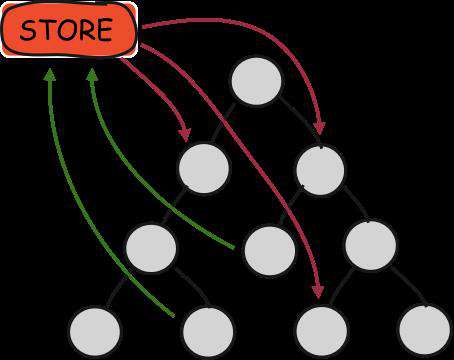
于是这样一种数据结构冒了出来:
const store = {
    state: {
        text: 'Goodbye World!'
    },
    setAction (text) {
        this.text = text
    },
    clearAction () {
        this.text = ''
    }
}
外部变量store,其中state来存储数据,store里面有一堆功能各异的action来控制state的改变。
我们规定:只能通过调用action来改变state,于是我们就可以通过action清晰地掌握着state的动向,日志、监控、回滚等能力随着而来。
于是我们大概的看到了Flux的雏形。
Flux
做一个容易理解的对比,React是用来替换jQuery的,那么Flux就是以替换Backbone.js、Ember.js等MVC一族框架为目的。
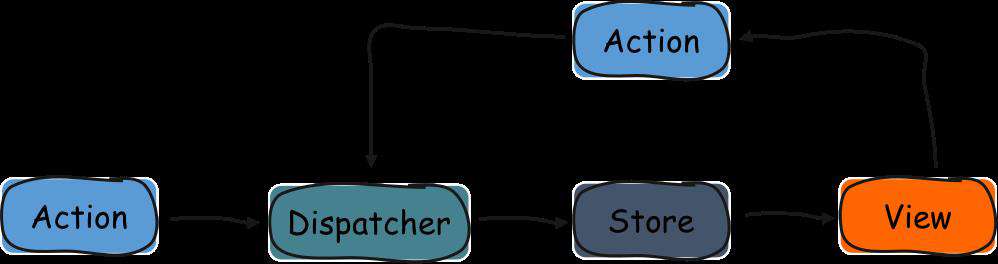 如上图,数据总是“单向流动”,相邻部分不存在互相流动数据的现象,这也是
Flux一大特点。
View发起用户的ActionDispatcher作为调度中心,接收Action,要求Store进行相应更新Store处理主要逻辑,并提供监听能力,当数据更新后触发监听事件View监听到Store的更新事件后触发UI更新
感兴趣可以看看每个部分的具体含义:
Action
在Flux中一般定义actions:一组包含派发action对象的函数。
// actions.js
import AddDispatcher from '@/dispatcher'

export const counterActions = {
    increment (number) {
        const action = {
            type: 'INCREMENT',
            payload: number
        }

        AddDispatcher.dispatch(action)
    }
}
以上代码,使用counterActions.increment,将INCREMENT派发到Store。
Dispatcher
Dispatcher.register方法用来登记各种Action的回调函数
import { CounterStore } from '@/store'
import AddDispatcher from '@/dispatcher'

AppDispatcher.register(function (action) {
  switch (action.type) {
    case INCREMENT:
      CounterStore.addHandler();
      CounterStore.emitChange();
      break;
    default:
    // no op
  }
});
以上代码,AppDispatcher收到INCREMENT动作,就会执行回调函数,对CounterStore进行操作。
Dispatcher只用来派发Action,不应该有其他逻辑。
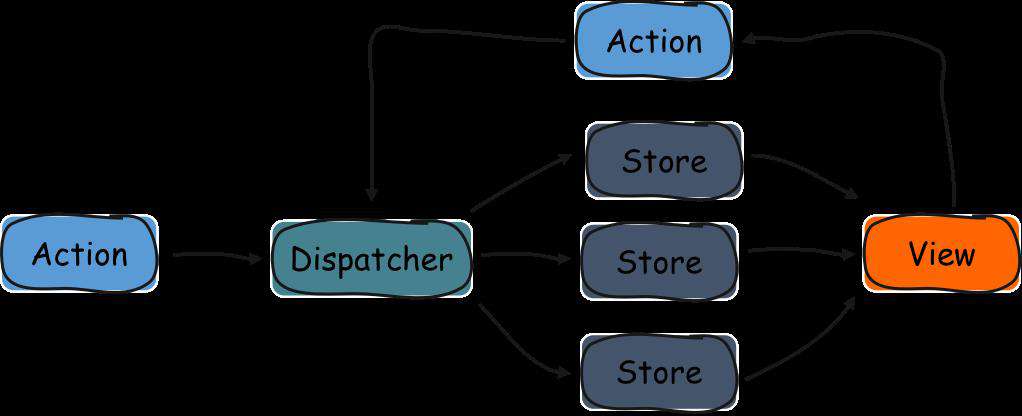
Store
Store中复杂处理业务逻辑,而由于数据变更后View需要更新,所以它也负责提供通知视图更新的能力。
因为其随用随注册,一个应用可以注册多个Store的能力,更新data flow为:
细心的朋友可以发现在上一小节CounterStore中调用了emitChange的方法,对,它就是用来通知变更的。
import { EventEmitter } from "events"

export const CounterStore = Object.assign({}, EventEmitter.prototype, {
  counter: 0,
  getCounter: function () {
    return this.counter
  },
  addHandler: function () {
    this.counter++
  },
  emitChange: function () {
    this.emit("change")
  },
  addChangeListener: function (callback) {
    this.on("change", callback)
  },
  removeChangeListener: function (callback) {
    this.removeListener("change", callback)
  }
});
以上代码,CounterStore通过继承EventEmitter.prototype获得触发emit与监听on事件能力。
View
View需要监听视图中数据的变动来保证视图实时更新,即
- 在组件中需要添加
addChangeListerner - 在组件销毁时移除监听
removeChangeListener
我们看个简单的Couter例子,更好的理解下实际使用。
(手动分割)
认真体验的朋友可能会注意到:
- 点击
reset后,store中的couter被更新(没有emitChange所以没实时更新视图); - 业务逻辑与数据处理逻辑交错,代码组织混乱;
好,打住,再看个新的数据流。
Redux
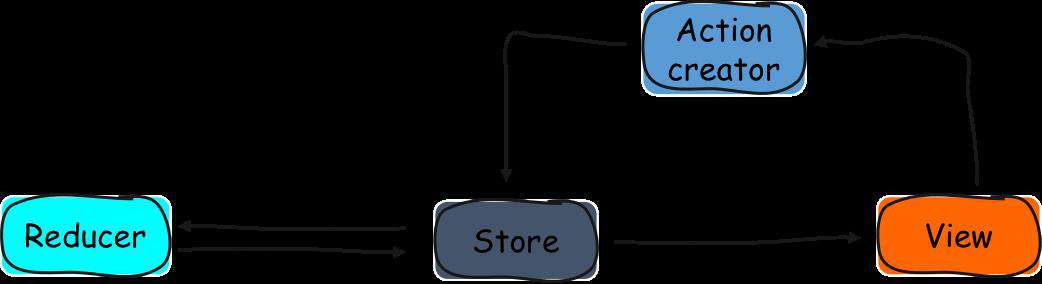
- 用户与
View进行交互 - 通过
Action Creator派发action - 到达
Store后拿到当前的State,一并交给Reducer Reducer经过处理后返回全新的State给StoreStore更新后通知View,完成一次数据更新
Flux的基本原则是“单向数据流”,Redux在此基础上强调:
- 唯一数据源(Single Source of Truth):整个应用只保持一个
Store,所有组件的数据源就是该Store的状态。 - 保持状态只读(State is read-only):不直接修改状态,要修改
Store的状态,必须要通过派发一个action对象完成。 - 数据改变只能通过纯函数完成(Changes are made with pure funtions):这里所说的纯函数指
reducer。
感兴趣可以看看每个部分的具体含义:
(Redux的源码及其短小优雅,有想尝试阅读源码的朋友可以从它开始)
Store
import { createStore } from 'redux'

const store = createStore(fn)
以上代码,使用redux提供的createStore函数,接受另一个函数fn(即稍后提到的Reducers)作为参数,生成应用唯一的store。
可以看看简单实现的createStore函数
const createStore = (reducer) => {
  let state
  let listeners = []

  const getState = () => state

  const dispatch = (action) => {
    state = reducer(state, action);
    listeners.forEach(listener => listener())
  }

  const subscribe = (listener) => {
    listeners.push(listener)
    return () => {
      listeners = listeners.filter(l => l !== listener)
    }
  }

  dispatch({})

  return { getState, dispatch, subscribe }
}
本人看源码有个小技巧,一般先从导出找起,再看return。
如上,return出去三个能力:
getState: 获取state的唯一方法,state被称为store的快照dispatch: view派发action的唯一方法subscribe: 注册监听函数(核心,待会要考),返回解除监听
注意到以上代码片段最后,dispatch了一个空对象,是为了生成初始的state,学习了reducer的写法后可以解释原理。
当然,createStore还可以接收更多的参数,如:preloadedState(默认state),enhancer(store的超能力蘑菇)等,我们后面会分析到。
Action
在redux,type属性是必须的,表示Action的名称,其他属性可以自由设置,参照规范。
const actions = {
    type: 'ADD_TODO',
    payload: 'Learn Redux'
}
可以用Action Creator批量来生成一些Action,如下addTodo就是一个Action Creator,它接受不同的参数生成不同的action:
function addTodo(text) {
  return {
    type: 'ADD_TODO',
    payload: text
  }
}

const action = addTodo('Learn Redux')
reducer
(previousState, action) => newState
以上,是reducer的函数签名,接收来自view的action,并从store上拿到最新state,经过处理后返回一个全新的state更新视图。
const reducers = (state = defaultState, action) => {
    const { type, payload } = action

    switch (type) {
        case 'ADD_TODO':
            return {
                ...state,
                counter: state.counter + (+payload)
            }
        default:
            return state
    }
}
以上代码,createStore留下的悬念可以从default分支获得答案。
reducer返回的结果一定要是一个全新的state,尤其是涉及到引用数据类型的操作时,因为react对数据更新的判断都是浅比较,如果更新前后是同一个引用,那么react将会忽略这一次更新。
理想状态state结构层级可能比较简单,那么如果state树枝叶后代比较复杂时怎么办(state.a.b.c)?
const reducers = (state = {}, action) => {
    const { type, payload } = action

    switch(type) {
        case 'ADD':
            return {
                ...state,
                a: {
                    ...state.a,
                    b: {
                        ...state.a.b,
                        c: state.a.b.c.concat(payload)
                    }
                }
            }
        default:
            return state
    }
}
先不讨论以上写法风险如何,就这一层层看着都吐。
既然这样,我们再想想办法。
前面提到,Redux中store唯一,所以我们只要能保证在reducer中返回的state是一个完整的结构就行,那是不是可以:
const reducers = (state = {}, action) => {
    return {
         A: reducer1(state.A, action),
         B: reducer2(state.B, action),
         C: reducer3(state.C, action)
    }
}
以上,我们曲线救国,将复杂的数据结构拆分,每个reducer管理state树不同枝干,最后再将所有reducer合并后给createStore,这正是combineReducer的设计思路。
combineReducer
import { combineReducers, createStore } from 'redux'

const reducers = combineReducers({
  A: reducer1,
  B: reducer2,
  C: reducer3
})

const store = createStore(reducers)
以上,根据state的key去执行相应的子reducer,并将返回结果合并成一个大的state对象。
可以看下简单实现:
const combineReducers = reducers => (state = {}, action) => {
    return Object.keys(reducers).reduce((nextState, key) => {
        nextState[key] = reducers[key](state[key], action)
        return nextState
    }, {})
}
以上介绍了Redux的基本能力,再看个Demo加深加深印象。
(再次手动分割)
可以注意到一个痛点:
component得主动去订阅store.subscribe``state的变更,让代码显得很蠢,不太“雅”。
Flux vs Redux
好,redux的基本面都覆盖了,它是基于Flux的核心思想实现的一套解决方案,从以上分析我们可以感受到区别:
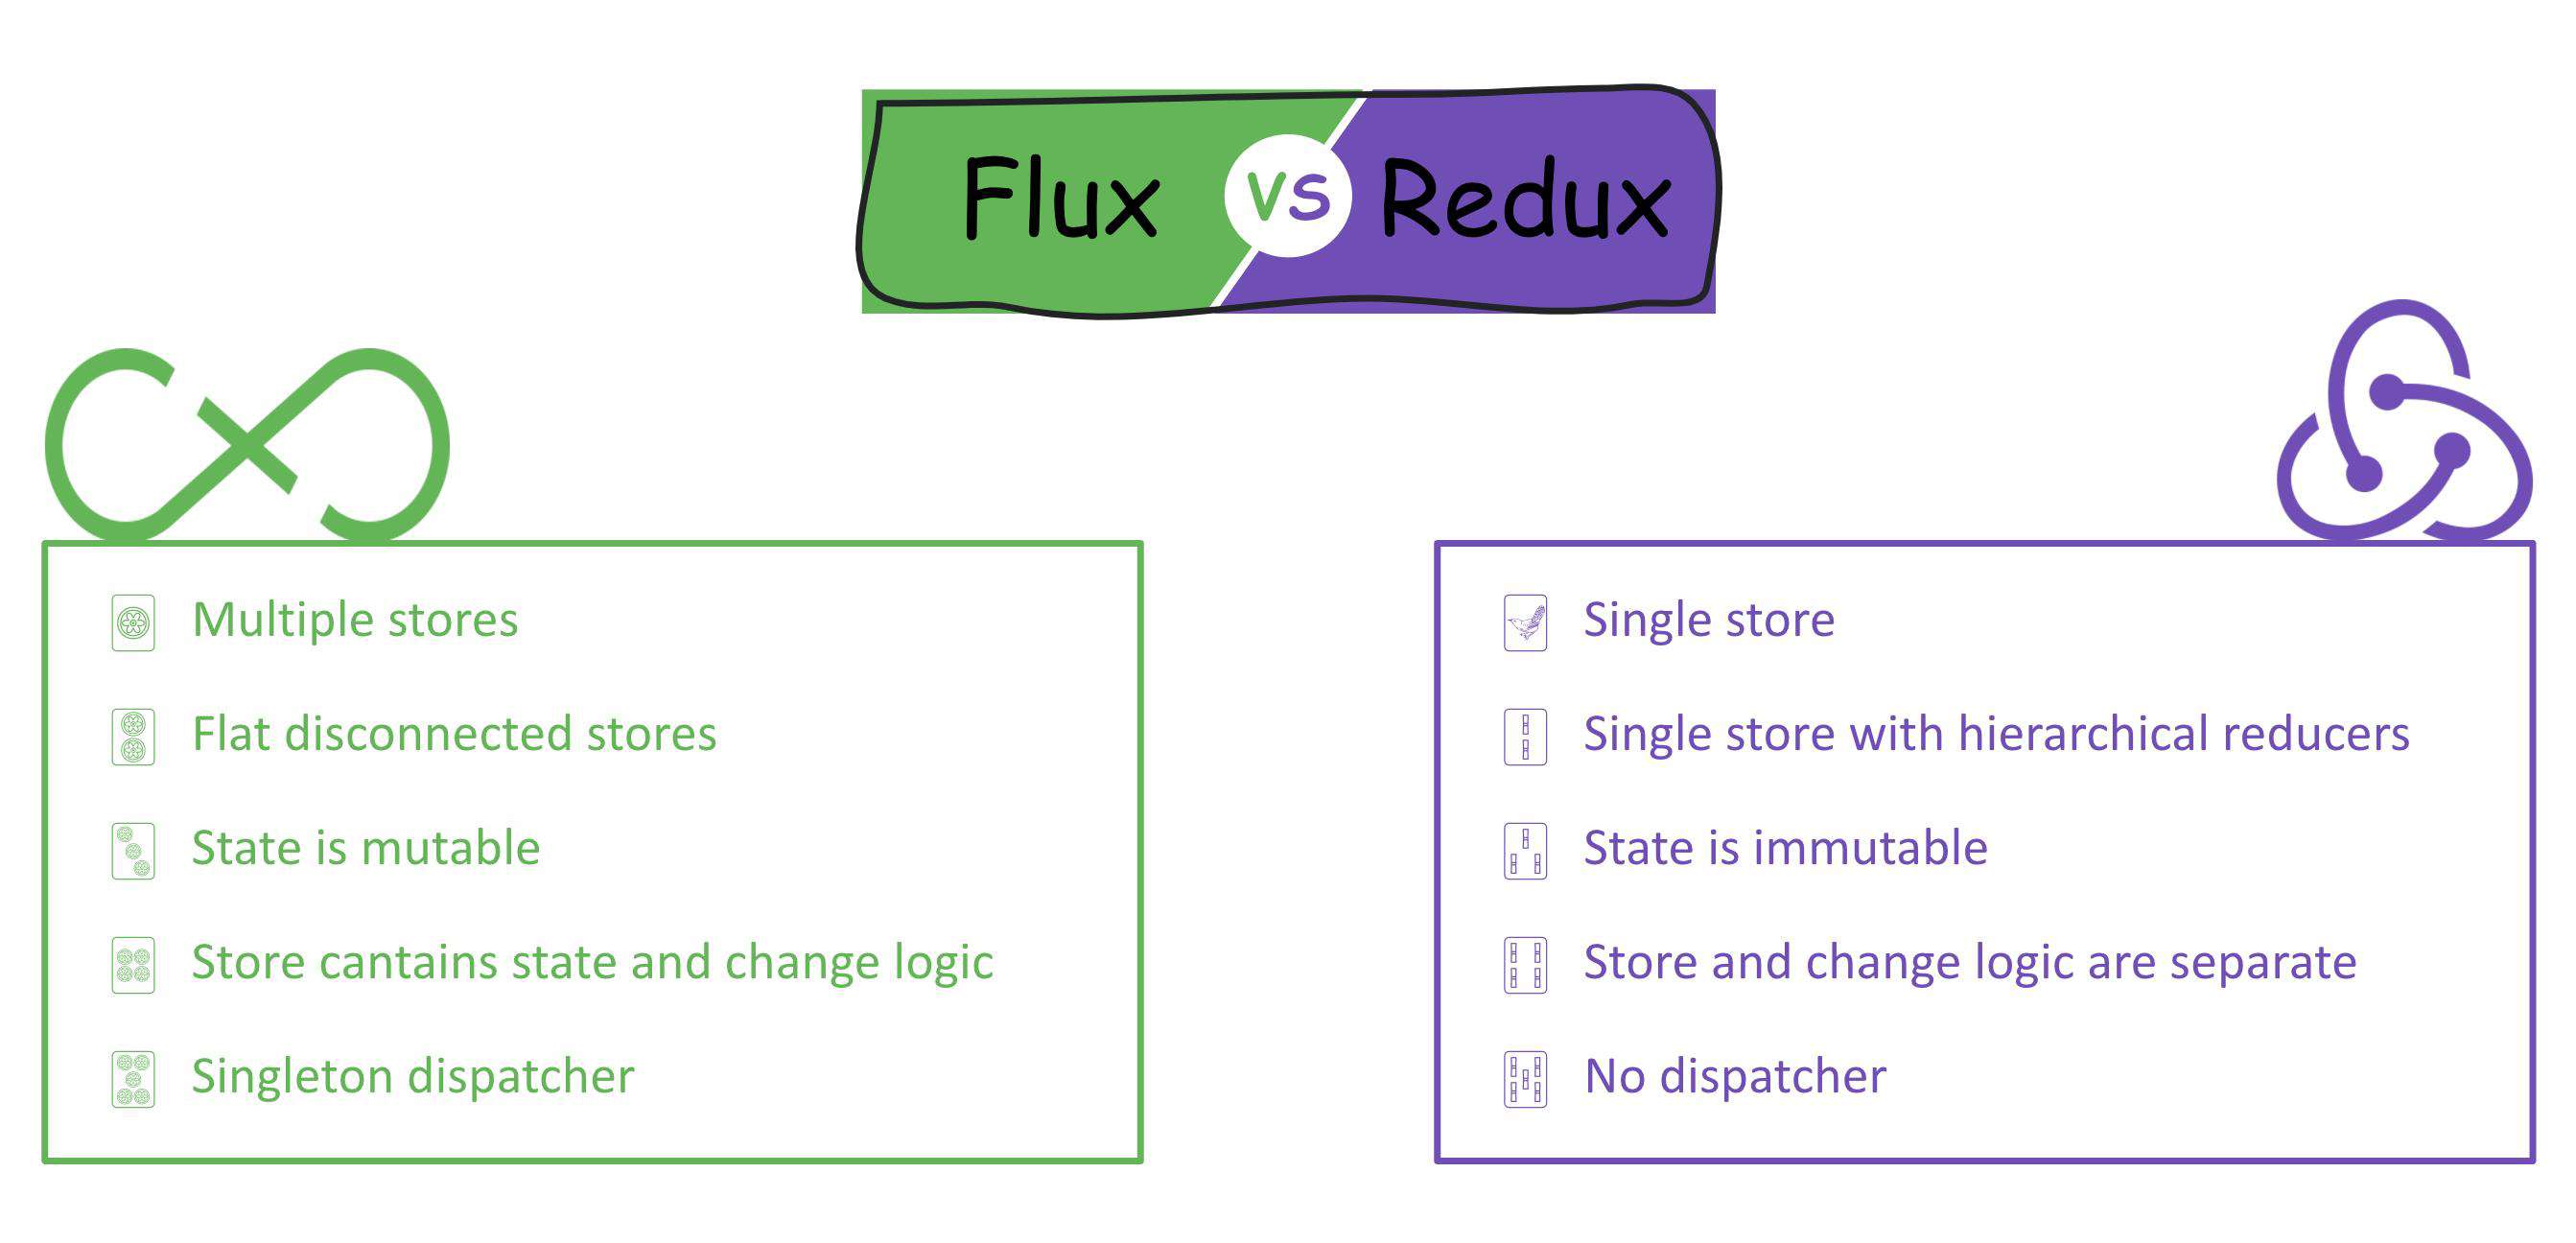
以上,从store与dispatcher两个本质区别比对了二者,相信你们英文一定比我好,就不翻译了。
(不要问我为什么要麻将牌+英文排列,问就是“中西合璧”)
Redux和Flux类似,只是一种思想或者规范,它和React之间没有关系。Redux支持React、Angular、Ember、jQuery甚至纯JavaScript。
因为React包含函数式的思想,也是单向数据流,和Redux很搭,所以一般都用Redux来进行状态管理。
当然,不是所有项目都无脑推荐redux,Dan Abramov很早前也提到“You Might Not Need Redux”,只有遇到react不好解决的问题我们才考虑使用redux,比如:
- 用户的使用方式复杂
- 不同身份的用户有不同的使用方式(比如普通用户和管理员)
- 多个用户之间可以协作/与服务器大量交互,或者使用了WebSocket
- View要从多个来源获取数据
- ...
(再再次手动分割)
好,我们继续来聊Redux。
以上,我们处理的都是同步且逻辑简单的Redux使用场景,真正的业务开发场景远比这复杂,各种异步任务不可避免,这时候怎么办?
一起跟着Redux的Data Flow分析一下:
View:state的视觉层,与之一一对应,不合适承担其他功能;Action:描述一个动作的具体内容,只能被操作,自己不能进行任何操作Reducer:纯函数,只承担计算state的功能,不合适承担其他功能
看来如果想要在action发出后做一些额外复杂的同步/异步操作,只有在派发action,即dispatch时可以做点手脚,我们称负责这些复杂操作:中间件Middleware。
Middleware
以上直译:Middleware提供了第三方的拓展能力,作用于在发起action与action到达reducer之间。
比如我们想在发送action前后添加打印功能,中间件雏形大概就是这样:
let next = store.dispatch
store.dispatch = function Logger(store, action) {
  console.log('dispatching', action)
  next(action)
  console.log('next state', store.getState())
}

// 遵循middleware规范的currying写法
const Logger = store => next => action => {
  console.log('dispatching', action)
  next(action)
  console.log('next state', store.getState())
}
先补充个前置知识,前面说过createStore可以接收除了reducers之外更多的参数,其中一个参数enhancer就是表示你要注册的中间件们,再看看createStore怎么用它?
// https://github.com/reduxjs/redux/blob/v4.0.4/src/createStore.js#L53
...
enhancer(createStore)(reducer, preloadedState)
...
了解了以上代码后,我们来看看redux源码是如何实现store.dispatch的偷梁换柱的。
// https://github.com/reduxjs/redux/blob/v4.0.4/src/applyMiddleware.js
export default function applyMiddleware(...middlewares) {
  return createStore => (...args) => {
    const store = createStore(...args)
    let dispatch = () => {
      throw new Error(
        'Dispatching while constructing your middleware is not allowed. ' +
          'Other middleware would not be applied to this dispatch.'
      )
    }

    const middlewareAPI = {
      getState: store.getState,
      dispatch: (...args) => dispatch(...args)
    }
    const chain = middlewares.map(middleware => middleware(middlewareAPI))
    dispatch = compose(...chain)(store.dispatch)

    return {
      ...store,
      dispatch
    }
  }
}
可以看到,applyMiddleware接收的所有中间件使用map去了currying最外面的一层,这里的middlewareAPI即简易版的store,它保证每个中间件都能拿到当前的同一个store,拿到的chain是[next => action => {}, ...]这样一个数组。
而后,使用compose(函数组合),将以上得到的chain串起来:
export default function compose(...funcs) {
  if (funcs.length === 0) {
    return arg => arg
  }

  if (funcs.length === 1) {
    return funcs[0]
  }

  return funcs.reduce((a, b) => (...args) => a(b(...args)))
}
简单明了,compose的能力就是将[a, b, c]组合成(...args) => a(b(c(...args)))
回到上面,将中间件链组合后,再接收store.dispatch(可以理解,这里就是我们需要的next),增强后的dispatch即
dispatch = middleware1(middleware2(middleware3(store.dispatch)))
结合我们中间件的范式:next => action => next(action),store.dispatch作为middleware3的next,...,middleware2(middleware3(store.dispatch))作为middleware1的next,豁然开朗,就这样dispatch得到了升华,不过如此♂️。
(你看看,你看看,核心代码,就这短短几行,却韵味十足,还有天理吗?心动了吗?心动了还不打开gayhub操作起来?)
当然讲到这里,如果对React生态有些许了解的同学可能会说,“React里面不是有种概念叫 Context,而且随着版本迭代,功能越来越强大,我可以不用Redux吗???”
Context
React文档官网并未对Context给出明确定义,更多是描述使用场景,以及如何使用Context。
简单说就是,当你不想在组件树中通过逐层传递props或者state的方式来传递数据时,可以使用Context api来实现跨层级的组件数据传递。
import { createContext } from "react";

export const CounterContext = createContext(null);
我们声明一个CounterContext简单讲解使用方法,ceateContext接收默认值。
Provider
import React, { useState } from "react"
import { CounterContext } from "./context"

import App from "./App"

const Main = () => {
    const [counter, setCounter] = useState(0)
    return (
        <CounterContext.Provider
            value={{
                counter,
                add: () => setCounter(counter + 1),
                dec: () => setCounter(counter - 1)
            }}
        >
            <App />
        </CounterContext.Provider>
    )
}
如上,在App外层包裹Provider,并提供了counter的一些运算。
Comsumer
import React, { useContext } from "react";
import { CounterContext } from "./context";
import "./styles.css";

export default function App(props) {
  let state = useContext(CounterContext);

  return (
      <>
        ...
      </>
  )
}
(以上使用了Context的hooks新写法,注意确定您的React版本>=16.8后再做以上尝试)
App的任意子孙组件都可以随地使用useContext取到Prodider上的值。
以上就是Context的全部内容了,我们老规矩,简单看个Counter后于Redux做个比较。
Context vs Redux
其实吧,这二者没太多可比较的。
Context api可以说是简化版的Redux,它不能结合强大的middleware扩展自己的超能力,比如redux-thunk或redux-saga等做复杂的异步任务,也没有完善的开发/定位能力,不过如果你只是想找个地方存share data来避开恶心的props drilling的问题,那么Context api的确值得你为他拍手叫好。
react-redux
Redux作为数据层,出色地完成了所有数据层面的事物,而React作为一个UI框架,给我一个state我就能给你一个UI view,现在的关键在于需要将Redux中state的更新通知到React,让其及时更新UI。
于是React团队出手了,他们动手给React做了适配,它的产物就是react-redux。
Provider
import React from 'react'
import ReactDOM from 'react-dom'
import { createStore } from 'redux'
import { Provider } from 'react-redux'

import App from './pages'
import reducers from './reducers'

const store = createStore(reducers)

ReactDOM.render(
    <Provider store={store}>
        <App />
    </Provider>,
    document.getElementById('root')
)
以上就是一个标准的React项目入口,Provider接收Redux提供的唯一store。
connect
import { connect } from "react-redux"

const mapStateToProps = (state) => ({
  counter: state.counter
});

const mapDispatchToProps = {
  add: () => ({ type: 'INCREMENT' }),
  dec: () => ({ type: 'DECREMENT' })
};

export default connect(mapStateToProps, mapDispatchToProps)(App)
以上代码片段,
mapStateToProps接收state,获取component想要的值mapDispatchToProps声明了一些action creator,并由connect提供dispatch能力,赋予component派发action的能力- 它还接收
mergeProps和options等自定义参数
老规矩,我们来看看基于react-redux实现的Counter。
Redux痛点
回顾一下,我们在使用Redux的实例时,分析其痛点,是什么?
对(虽然没人回答,但是我从你们心里听到了)
“ 组件需要主动订阅store的更新 ”
react-redux的demo与之相比,比较直观的感受就是:不再是哪里需要就哪里subscribe,而只需要connect。
那斗胆问一句:“以现有的知识,结合刚刚分析的用法,你会怎么实现react-redux?”
源码分析
没错,必然是Context api啊,一起简单看看源码验证下猜想。
搜索整个项目,我们只用到react-redux提供的唯一两个api,我们可以很快从入口处找到他们的踪迹。
Provider
react-redux汲取了Context api的的精华 才得以实现在app的每个角落都能拿到store的state
import React, { useMemo, useEffect } from 'react'
import { ReactReduxContext } from './Context'
// 对store.subscribe的抽象
import Subscription from '../utils/Subscription'

function Provider({ store, context, children }) {
  const contextValue = useMemo(() => {
    const subscription = new Subscription(store)
    subscription.onStateChange = subscription.notifyNestedSubs
    return {
      store,
      subscription,
    }
  }, [store])

  // 使用userMemo缓存数据,避免多余的re-render
  const previousState = useMemo(() => store.getState(), [store])

  // 当contectValue, previousState变化时,通知订阅者作出响应
  useEffect(() => {
    const { subscription } = contextValue
    subscription.trySubscribe()

    if (previousState !== store.getState()) {
      subscription.notifyNestedSubs()
    }
    return () => {
      subscription.tryUnsubscribe()
      subscription.onStateChange = null
    }
  }, [contextValue, previousState])

  // context nested
  const Context = context || ReactReduxContext

  return <Context.Provider value={contextValue}>{children}</Context.Provider>
}
抛开复杂的nested context与re-render的优化处理,Provider无非就是将接受的store通过Context api传递到每个组件。
connect
首先,我们明确一点:connect的目的是从store取得想要的props给到component。
所以我们知道只要从provider上拿到store,然后在connect中使用一个组件在mounted时添加对指定值的subscribe,此后它的更新都会引起被connected的后代组件的re-render,就达到目的了。
以上分析其实就是connect的实现原理,但是我们知道在React中,props变化的成本很高,它的每次变更都将一起所有后代组件跟随着它re-render,所以以下绝大部分代码都是为了优化这一巨大的re-render开销。
export function createConnect({
  connectHOC = connectAdvanced,
  mapStateToPropsFactories = defaultMapStateToPropsFactories,
  mapDispatchToPropsFactories = defaultMapDispatchToPropsFactories,
  mergePropsFactories = defaultMergePropsFactories,
  selectorFactory = defaultSelectorFactory,
} = {}) {
  return function connect(
    mapStateToProps,
    mapDispatchToProps,
    mergeProps,
    {
      pure = true,
      areStatesEqual = strictEqual,
      areOwnPropsEqual = shallowEqual,
      areStatePropsEqual = shallowEqual,
      areMergedPropsEqual = shallowEqual,
      ...extraOptions
    } = {}
  ) {
    const initMapStateToProps = match(
      mapStateToProps,
      mapStateToPropsFactories,
      'mapStateToProps'
    )
    const initMapDispatchToProps = match(
      mapDispatchToProps,
      mapDispatchToPropsFactories,
      'mapDispatchToProps'
    )
    const initMergeProps = match(mergeProps, mergePropsFactories, 'mergeProps')

    return connectHOC(selectorFactory, {
      // used in error messages
      methodName: 'connect',

      // used to compute Connect's displayName from the wrapped component's displayName.
      getDisplayName: (name) => `Connect(${name})`,

      // if mapStateToProps is falsy, the Connect component doesn't subscribe to store state changes
      shouldHandleStateChanges: Boolean(mapStateToProps),

      // passed through to selectorFactory
      initMapStateToProps,
      initMapDispatchToProps,
      initMergeProps,
      pure,
      areStatesEqual,
      areOwnPropsEqual,
      areStatePropsEqual,
      areMergedPropsEqual,

      // any extra options args can override defaults of connect or connectAdvanced
      ...extraOptions,
    })
  }
}

export default /*#__PURE__*/ createConnect()
好奇怪,默认导出是createConnect的return func,它接受了一堆默认参数,为什么多此一举?
(认真看前面注释,这些是为了方便更好地做testing case)
然后我们继续看其内部实现,接受的四个来自用户的参数,然后使用match给前三个初始化了一下
match
很简单,接受一个工厂函数,以及每次需要初始化的key,从后往前遍历工厂,任何一个response不为空,则返回(其实就是为了兼容用户传入的参数,保证格式与去空)。
然后是connectHOC,这是处理核心,它接收了一个SelectorFactory。
SelectorFactory
根据传入的option.pure(默认true)的值来决定每次返回props是否要缓存,这样将有效的减少不必要的计算,优化性能。
connectHOC
export default function connectAdvanced(
  /*
    selectorFactory is a func that is responsible for returning the selector function used to
    compute new props from state, props, and dispatch. For example:
      export default connectAdvanced((dispatch, options) => (state, props) => ({
        thing: state.things[props.thingId],
        saveThing: fields => dispatch(actionCreators.saveThing(props.thingId, fields)),
      }))(YourComponent)
    Access to dispatch is provided to the factory so selectorFactories can bind actionCreators
    outside of their selector as an optimization. Options passed to connectAdvanced are passed to
    the selectorFactory, along with displayName and WrappedComponent, as the second argument.
    Note that selectorFactory is responsible for all caching/memoization of inbound and outbound
    props. Do not use connectAdvanced directly without memoizing results between calls to your
    selector, otherwise the Connect component will re-render on every state or props change.
  */
  selectorFactory,
  // options object:
  {
    // the func used to compute this HOC's displayName from the wrapped component's displayName.
    // probably overridden by wrapper functions such as connect()
    getDisplayName = (name) => `ConnectAdvanced(${name})`,

    // shown in error messages
    // probably overridden by wrapper functions such as connect()
    methodName = 'connectAdvanced',

    // REMOVED: if defined, the name of the property passed to the wrapped element indicating the number of
    // calls to render. useful for watching in react devtools for unnecessary re-renders.
    renderCountProp = undefined,

    // determines whether this HOC subscribes to store changes
    shouldHandleStateChanges = true,

    // REMOVED: the key of props/context to get the store
    storeKey = 'store',

    // REMOVED: expose the wrapped component via refs
    withRef = false,

    // use React's forwardRef to expose a ref of the wrapped component
    forwardRef = false,

    // the context consumer to use
    context = ReactReduxContext,

    // additional options are passed through to the selectorFactory
    ...connectOptions
  } = {}
) {
  if (process.env.NODE_ENV !== 'production') {
    if (renderCountProp !== undefined) {
      throw new Error(
        `renderCountProp is removed. render counting is built into the latest React Dev Tools profiling extension`
      )
    }
    if (withRef) {
      throw new Error(
        'withRef is removed. To access the wrapped instance, use a ref on the connected component'
      )
    }

    const customStoreWarningMessage =
      'To use a custom Redux store for specific components, create a custom React context with ' +
      "React.createContext(), and pass the context object to React Redux's Provider and specific components" +
      ' like: <Provider context={MyContext}><ConnectedComponent context={MyContext} /></Provider>. ' +
      'You may also pass a {context : MyContext} option to connect'

    if (storeKey !== 'store') {
      throw new Error(
        'storeKey has been removed and does not do anything. ' +
          customStoreWarningMessage
      )
    }
  }

  const Context = context

  return function wrapWithConnect(WrappedComponent) {
    if (
      process.env.NODE_ENV !== 'production' &&
      !isValidElementType(WrappedComponent)
    ) {
      throw new Error(
        `You must pass a component to the function returned by ` +
          `${methodName}. Instead received ${stringifyComponent(
            WrappedComponent
          )}`
      )
    }

    const wrappedComponentName =
      WrappedComponent.displayName || WrappedComponent.name || 'Component'

    const displayName = getDisplayName(wrappedComponentName)

    const selectorFactoryOptions = {
      ...connectOptions,
      getDisplayName,
      methodName,
      renderCountProp,
      shouldHandleStateChanges,
      storeKey,
      displayName,
      wrappedComponentName,
      WrappedComponent,
    }

    const { pure } = connectOptions

    function createChildSelector(store) {
      return selectorFactory(store.dispatch, selectorFactoryOptions)
    }

    // If we aren't running in "pure" mode, we don't want to memoize values.
    // To avoid conditionally calling hooks, we fall back to a tiny wrapper
    // that just executes the given callback immediately.
    const usePureOnlyMemo = pure ? useMemo : (callback) => callback()

    function ConnectFunction(props) {
      const [
        propsContext,
        reactReduxForwardedRef,
        wrapperProps,
      ] = useMemo(() => {
        // Distinguish between actual "data" props that were passed to the wrapper component,
        // and values needed to control behavior (forwarded refs, alternate context instances).
        // To maintain the wrapperProps object reference, memoize this destructuring.
        const { reactReduxForwardedRef, ...wrapperProps } = props
        return [props.context, reactReduxForwardedRef, wrapperProps]
      }, [props])

      const ContextToUse = useMemo(() => {
        // Users may optionally pass in a custom context instance to use instead of our ReactReduxContext.
        // Memoize the check that determines which context instance we should use.
        return propsContext &&
          propsContext.Consumer &&
          isContextConsumer(<propsContext.Consumer />)
          ? propsContext
          : Context
      }, [propsContext, Context])

      // Retrieve the store and ancestor subscription via context, if available
      const contextValue = useContext(ContextToUse)

      // The store _must_ exist as either a prop or in context.
      // We'll check to see if it _looks_ like a Redux store first.
      // This allows us to pass through a `store` prop that is just a plain value.

      const didStoreComeFromProps =
        Boolean(props.store) &&
        Boolean(props.store.getState) &&
        Boolean(props.store.dispatch)
      const didStoreComeFromContext =
        Boolean(contextValue) && Boolean(contextValue.store)

      if (
        process.env.NODE_ENV !== 'production' &&
        !didStoreComeFromProps &&
        !didStoreComeFromContext
      ) {
        throw new Error(
          `Could not find "store" in the context of ` +
            `"${displayName}". Either wrap the root component in a <Provider>, ` +
            `or pass a custom React context provider to <Provider> and the corresponding ` +
            `React context consumer to ${displayName} in connect options.`
        )
      }

      // Based on the previous check, one of these must be true
      const store = didStoreComeFromProps ? props.store : contextValue.store

      const childPropsSelector = useMemo(() => {
        // The child props selector needs the store reference as an input.
        // Re-create this selector whenever the store changes.
        return createChildSelector(store)
      }, [store])

      const [subscription, notifyNestedSubs] = useMemo(() => {
        if (!shouldHandleStateChanges) return NO_SUBSCRIPTION_ARRAY

        // This Subscription's source should match where store came from: props vs. context. A component
        // connected to the store via props shouldn't use subscription from context, or vice versa.
        const subscription = new Subscription(
          store,
          didStoreComeFromProps ? null : contextValue.subscription
        )

        // `notifyNestedSubs` is duplicated to handle the case where the component is unmounted in
        // the middle of the notification loop, where `subscription` will then be null. This can
        // probably be avoided if Subscription's listeners logic is changed to not call listeners
        // that have been unsubscribed in the  middle of the notification loop.
        const notifyNestedSubs = subscription.notifyNestedSubs.bind(
          subscription
        )

        return [subscription, notifyNestedSubs]
      }, [store, didStoreComeFromProps, contextValue])

      // Determine what {store, subscription} value should be put into nested context, if necessary,
      // and memoize that value to avoid unnecessary context updates.
      const overriddenContextValue = useMemo(() => {
        if (didStoreComeFromProps) {
          // This component is directly subscribed to a store from props.
          // We don't want descendants reading from this store - pass down whatever
          // the existing context value is from the nearest connected ancestor.
          return contextValue
        }

        // Otherwise, put this component's subscription instance into context, so that
        // connected descendants won't update until after this component is done
        return {
          ...contextValue,
          subscription,
        }
      }, [didStoreComeFromProps, contextValue, subscription])

      // We need to force this wrapper component to re-render whenever a Redux store update
      // causes a change to the calculated child component props (or we caught an error in mapState)
      const [
        [previousStateUpdateResult],
        forceComponentUpdateDispatch,
      ] = useReducer(storeStateUpdatesReducer, EMPTY_ARRAY, initStateUpdates)

      // Propagate any mapState/mapDispatch errors upwards
      if (previousStateUpdateResult && previousStateUpdateResult.error) {
        throw previousStateUpdateResult.error
      }

      // Set up refs to coordinate values between the subscription effect and the render logic
      const lastChildProps = useRef()
      const lastWrapperProps = useRef(wrapperProps)
      const childPropsFromStoreUpdate = useRef()
      const renderIsScheduled = useRef(false)

      const actualChildProps = usePureOnlyMemo(() => {
        // Tricky logic here:
        // - This render may have been triggered by a Redux store update that produced new child props
        // - However, we may have gotten new wrapper props after that
        // If we have new child props, and the same wrapper props, we know we should use the new child props as-is.
        // But, if we have new wrapper props, those might change the child props, so we have to recalculate things.
        // So, we'll use the child props from store update only if the wrapper props are the same as last time.
        if (
          childPropsFromStoreUpdate.current &&
          wrapperProps === lastWrapperProps.current
        ) {
          return childPropsFromStoreUpdate.current
        }

        // TODO We're reading the store directly in render() here. Bad idea?
        // This will likely cause Bad Things (TM) to happen in Concurrent Mode.
        // Note that we do this because on renders _not_ caused by store updates, we need the latest store state
        // to determine what the child props should be.
        return childPropsSelector(store.getState(), wrapperProps)
      }, [store, previousStateUpdateResult, wrapperProps])

      // We need this to execute synchronously every time we re-render. However, React warns
      // about useLayoutEffect in SSR, so we try to detect environment and fall back to
      // just useEffect instead to avoid the warning, since neither will run anyway.
      useIsomorphicLayoutEffectWithArgs(captureWrapperProps, [
        lastWrapperProps,
        lastChildProps,
        renderIsScheduled,
        wrapperProps,
        actualChildProps,
        childPropsFromStoreUpdate,
        notifyNestedSubs,
      ])

      // Our re-subscribe logic only runs when the store/subscription setup changes
      useIsomorphicLayoutEffectWithArgs(
        subscribeUpdates,
        [
          shouldHandleStateChanges,
          store,
          subscription,
          childPropsSelector,
          lastWrapperProps,
          lastChildProps,
          renderIsScheduled,
          childPropsFromStoreUpdate,
          notifyNestedSubs,
          forceComponentUpdateDispatch,
        ],
        [store, subscription, childPropsSelector]
      )

      // Now that all that's done, we can finally try to actually render the child component.
      // We memoize the elements for the rendered child component as an optimization.
      const renderedWrappedComponent = useMemo(
        () => (
          <WrappedComponent
            {...actualChildProps}
            ref={reactReduxForwardedRef}
          />
        ),
        [reactReduxForwardedRef, WrappedComponent, actualChildProps]
      )

      // If React sees the exact same element reference as last time, it bails out of re-rendering
      // that child, same as if it was wrapped in React.memo() or returned false from shouldComponentUpdate.
      const renderedChild = useMemo(() => {
        if (shouldHandleStateChanges) {
          // If this component is subscribed to store updates, we need to pass its own
          // subscription instance down to our descendants. That means rendering the same
          // Context instance, and putting a different value into the context.
          return (
            <ContextToUse.Provider value={overriddenContextValue}>
              {renderedWrappedComponent}
            </ContextToUse.Provider>
          )
        }

        return renderedWrappedComponent
      }, [ContextToUse, renderedWrappedComponent, overriddenContextValue])

      return renderedChild
    }

    // If we're in "pure" mode, ensure our wrapper component only re-renders when incoming props have changed.
    const Connect = pure ? React.memo(ConnectFunction) : ConnectFunction

    Connect.WrappedComponent = WrappedComponent
    Connect.displayName = displayName

    if (forwardRef) {
      const forwarded = React.forwardRef(function forwardConnectRef(
        props,
        ref
      ) {
        return <Connect {...props} reactReduxForwardedRef={ref} />
      })

      forwarded.displayName = displayName
      forwarded.WrappedComponent = WrappedComponent
      return hoistStatics(forwarded, WrappedComponent)
    }

    return hoistStatics(Connect, WrappedComponent)
  }
}
内容很多很多很多,使用了hooks的语法,看起来更加复杂,不过没关系,按老规矩我们从底往上看。
可以看到最终return的是hoistStatics(Connect, WrappedComponent),这个方法是把WrappedComponent挂的静态方法属性拷贝到结果组件上,于是我们去找Connect。
往上几行看到connect根据pure做了一层react.memo来包裹ConnectFunction,我们知道这是为了阻止props引起的不必要的re-render。
再来看ConnectFunction,这是一个关键函数,return了renderedChild,而renderedChild用memo包裹了renderedWrappedComponent, 而它接收了actualChildProps,看其定义就是我们需要的mapStateToprops返回的结果了。
ok,现在我们知道了这个HOC的渲染逻辑,那么它是如何做到store更新就重新计算然后触发re-render呢?
分析一波:组件要想re-render,那必须是props或state其一,那这里只能是state了。
好家伙,我们看到了useReducer,看到了forceComponentUpdateDispatch,这变量名一听就有戏。
checkForUpdates中通过newChildProps === lastChildProps.current的比对,如果前后两次子props相同,说明props没变,那就不更新,否则通过dispatch,修改state,强行触发组件更新,成!
那么问题来了,checkForUpdates是何方神圣,它又怎么感知到store更新呢?
原来我们刚一开始漏掉了一个狠角色,useIsomorphicLayoutEffectWithArgs。这家伙是兼容ssr版本的useLayoutEffect,在组件每次更新后执行,我们看到组件渲染进来,然后里面通过subscription.trySubscribe进行了订阅以及onStatechnage绑定了checkforUpdate ,所以每次store有变化这里的subscription 都会触发checkforupdate。
就这么简单!!!
Mobx
不得不注意到,除了Redux,社区里近年来还有另一产品呼声很高,那就是Mobx。
它是一个功能强大,上手非常容易的状态管理工具。就连Redux的作者也曾经向大家推荐过它,在不少情况下你的确可以使用Mobx来替代掉Redux。
再次强调Flux、Redux与Mobx等并不与react强绑定,你可以在任何框架中使用他们,所以才会有react-redux,mobx-react等库的必要性。
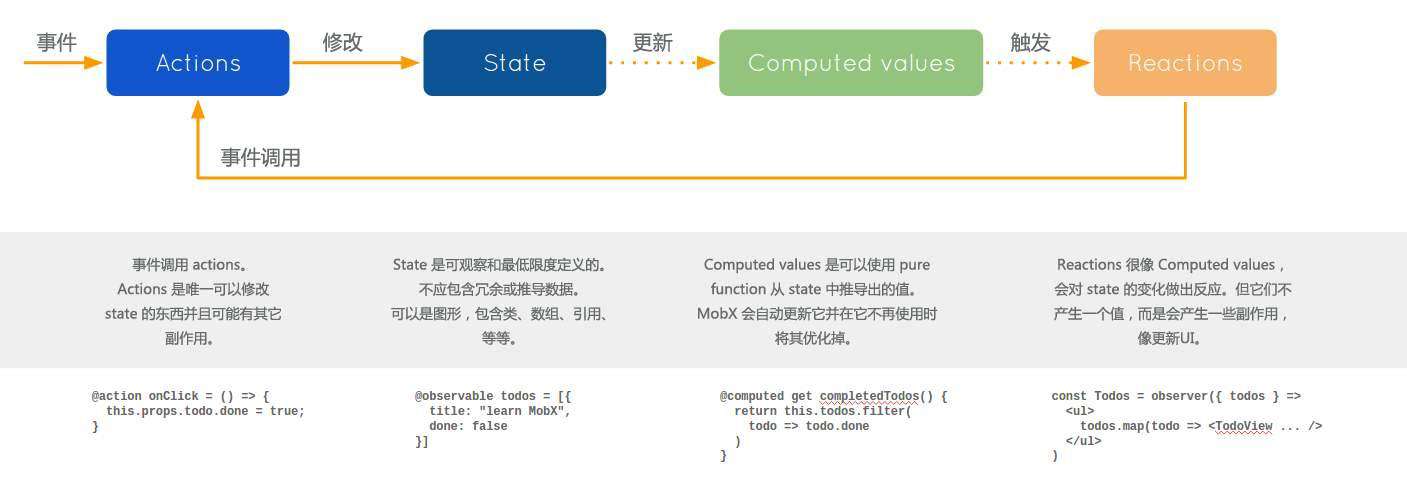
Mobx比较简单,相信从Vue转React的朋友应该会很容易上手,它就三个基本要点:
创建可监测的状态
一般,我们使用observable来创建可被监测的状态,它可以是对象,数组,类等等。
import { observable } from "mobx"

class Store {
  @observable counter = 0
}

const store = new Store()
创建视图响应状态变更
state创建后,如果是开发应用我们需要有视图来让感知变更,MobX会以一种最小限度的方式来更新视图,并且它有着令人匪夷所思的高效。
以下我们以react class component为例。
import React from 'react'
import {observer} from 'mobx-react'

@observer
class Counter extends React.Component {
    render() {
        return (
            <div>
                <div>{this.props.state.counter}</div>
                <button onClick={this.props.store.add}>Add</button>
                <button onClick={this.props.store.dec}>Dec</button>
                <button onClick={() => (this.props.store.counter = 0)}>clear</button>
            </div>
        )
    }
}

export default Counter
触发状态变更
修改第一节中创建监测状态的代码
import { observable, action } from "mobx"

class Store {
  @observable counter = 0
  @action add = () => {
    this.counter++
  }

  @action dec = () => {
    this.counter--
  }
}

const store = new Store()
结合上节视图,add、dec两算法都是通过调用store提供的方法,合情合理。
可怕的是,clear直接就给state的counter赋值,居然也能成功,而且视图是及时更新,不禁回想起flux章节中的clear,恐惧更甚,让人望而退步。
其实大可不必,这就是mobx的魔力,其实跟vue一般,它也是通过Proxy注册监听,实现动态及时响应。
为了满足React用户对于这种状态不可控的恐惧,它也提供了api来限制这种操作,必须通过action来修改store。
enforceAction
规定只有action才能改store。
import { configure } from 'mobx'

configure({enforceAction: true})
provider
当然,为了帮助开发者更合理的制定目录结构与开发规范,它也提供了同react-redux相似的Provider,后代组件使用inject,接收来自Provider注入的状态,再使用observer连接react组件和 mobx状态,达到实时相应状态变化的效果。
还有一些比如autorun,reaction,when computed等能力能在状态满足特定条件自动被触发,有兴趣的可以自行做更多了解。
老规矩,通过一个Counter来看看效果。
Mobx vs Redux
通过上面简单的介绍以及demo的体验,相信你也有了大致的感受,我们再简单的比对下它与Redux。
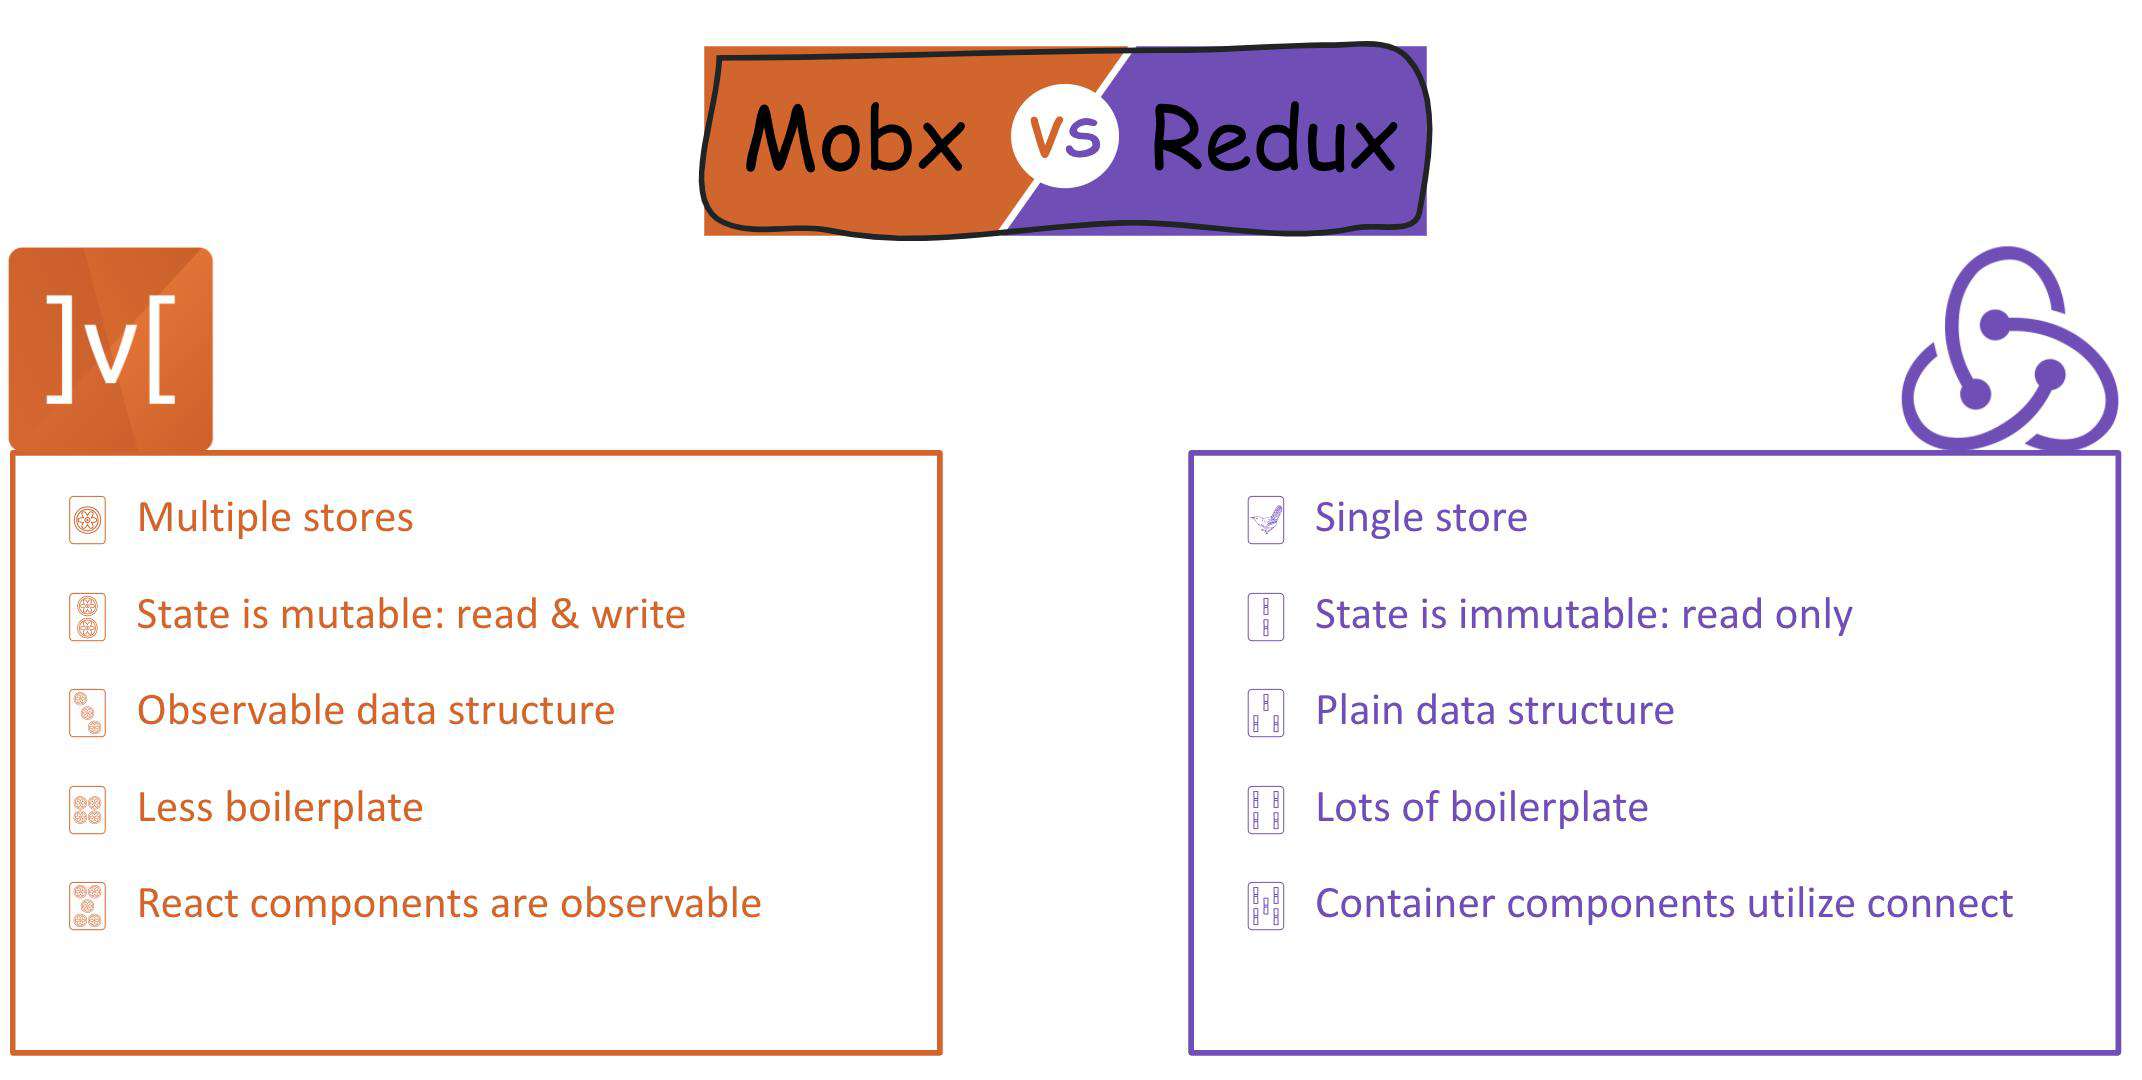
无拘无束,这既是Mobx的优点也是它的缺点,当项目规模较大,涉及到多人开发时,这种不加管束的自由将是"灾难"的开发。
咳,点到即可,懂的都懂。
常见问题FAQ
- 免费下载或者VIP会员专享资源能否直接商用?
- 本站所有资源版权均属于原作者所有,这里所提供资源均只能用于参考学习用,请勿直接商用。若由于商用引起版权纠纷,一切责任均由使用者承担。更多说明请参考 VIP介绍。
- 提示下载完但解压或打开不了?
- 找不到素材资源介绍文章里的示例图片?
- 模板不会安装或需要功能定制以及二次开发?


发表评论
还没有评论,快来抢沙发吧!