前言
树形数据结构的图形表示更加直观, 因此想简单的实现一个渲染二叉树的js类库.
- 为了进行测试, 编写了随机的二叉树生成方法
- 为了复现测试时的问题, 使用了二叉树序列化与反序列化的方法
- 为了使用不同的渲染方式, 解耦布局与渲染过程
数据结构
-
数据结构定义
class TreeNode {
    constructor(value) {
        this.val = value;
        this.left = this.right = null;
    }
}
在定义好树结构之后, 如果想要验证实现的正确性,就必须构造一棵树, 如果纯手工构造....
let root = new TreeNode(0);
root.left = new TreeNode(1);
root.left.left = ...
root.left.left.left.left.......= ...
// fffu...
所以需要实现数据生成的方法
数据生成方法
- 随机生成一颗n个节点的二叉树
function randomTree(count) {
    let index = 0;
    function random(n) {
        if (n === 0) return null;
        let root = new TreeNode(index++);
        let leftNum = randomInt(n - 1);
        root.left = random(leftNum);
        root.right = random(n - leftNum - 1);
        return root;
    }
}
- 生成一颗n层的满二叉树
function fullBinaryTree(level) {
    let index = 0;
    function fullTree(n) {
        console.log(n);
        if (n === 0) return null;
        let root = new TreeNode(index++);
        root.left = fullTree((n - 1)/2);
        root.right = fullTree((n - 1)/2);
        return root;
    }
    return fullTree(Math.pow(2, level) - 1);
}
二叉树序列化与反序列化
如果随机生成一颗树之后, 在测试的过程中发现绘制出现了问题, 如何对问题进行复现?
-
可以把每次生成的数据在控制台打印, 但是如果直接打印, 输出的是object对象,无法直接使用
- 偷懒的方式, 使用
JSON.stringify()序列化,JSON.parse()反序列化; - 优雅的方式, 利用树的前序遍历序列实现树的序列化与反序列化
const serialize = (root) => { if (!root) return 'x'; let left = serialize(root.left); let right = serialize(root.right); return root.val + "," + left + "," + right; } const deserialize = (data) => { const list = data.split(','); function buildTree(list) { let v = list.shift(); if (v === 'x') return null; let root = new TreeNode(v); root.left = buildTree(list); root.right = buildTree(list); return root; } return buildTree(list); } - 偷懒的方式, 使用
到这一步为止, 已经实现的基本的准备工作, 接下来就可以开始实现树的绘制了.
代码结构
首先需要计算树的实际宽度, 可以采取递归的方式计算
递归首先需要终止条件, 那就是空节点的宽度为0.
 // 递归计算节点宽度
function computeWidth(root) {
    // 终止条件, 空节点宽度为0
    if (!root) return 0;
    // 没有子节点, 宽度为预设的节点宽度
    if (!(root.left || root.right)) {
        root.width = nodeW;
        return root.width;
    }
    // 否则为左右节点加间距, 间距为一个节点宽度
    root.width = computeWidth(root.left) + computeWidth(root.right) + nodeW;
    return root.width;
}
计算完节点的宽度之后, 就可以计算每个节点的位置信息了, 同样也是递归的计算, 为了避免子树节点发生交叉, 所以为每颗子树增加左右边界信息(因为节点保存的是绝对宽度, 所以需要边界信息).
通过一张图可以看出递归的原理
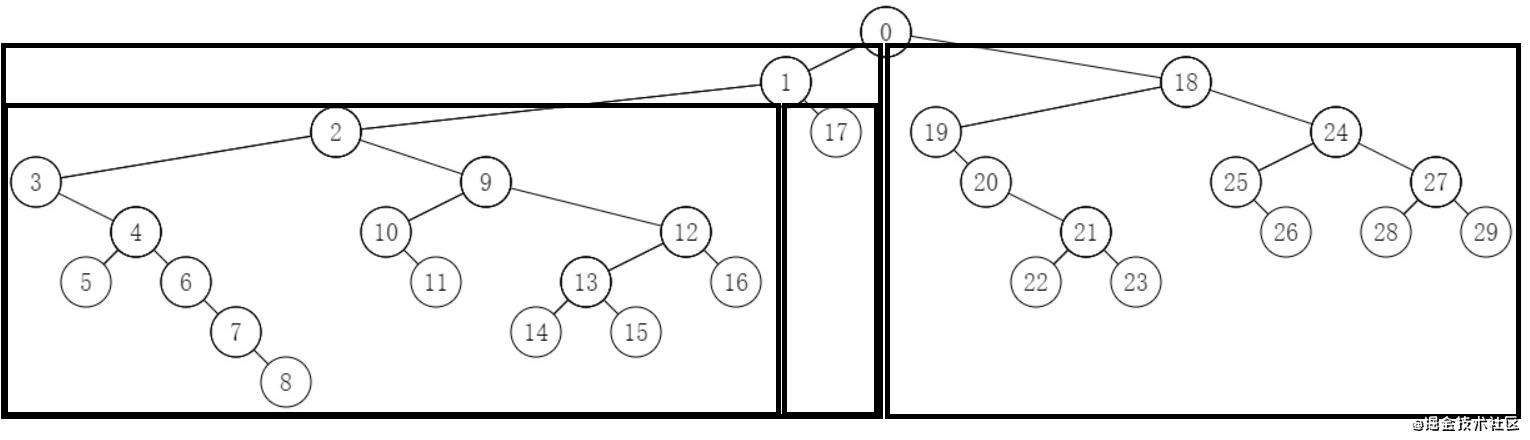
将左子树画到左边的框中, 右子树画到右边的框中, 然后依次递归. 需要将当前节点放到左右子树的中间, 然后分别设置左右子树的边界,递归的进行渲染. 这样就不会产生左右子树交叉的问题. 同时也不需要按照满二叉树的空间进行渲染.
 // 递归计算节点的位置信息
function computePosition(root, left, right, curY = nodeH) {
    if (!root) return;
    let x;
    if (root.left) {
        x = left + root.left.width + nodeW;
    } else {
        x = left + nodeW;
    }
    root.position = [x, curY];
    computePosition(root.left, left, x, curY + nodeH);
    computePosition(root.right, x, right, curY + nodeH);

}
-
整体架构, 简单的分为布局层和渲染层, 通过分层的设计, 只要渲染器实现了对应的接口,就可以将二叉树渲染到不同的目标上
-
布局层(layout)
- 计算节点的位置, 并且保存到节点中
-
渲染层(render)
- 实现渲染器接口, 需要用到的渲染方法有:
renderCircle(x, y, r): 以(x, y) 为中心, r为半径画圆renderLine(x1, y1, x2, y2): 绘制从(x1, y1) 到(x2, y2)的直线renderText(x, y, text): 在(x, y) 点绘制文本
- 可以实现
svg-render,div-render,canvas-render
canvasRender实现class CanvasRender { constructor(container) { this.canvas = document.createElement('canvas'); this.container = container; this.ctx = this.canvas.getContext('2d'); } initSize(w, h) { this.canvas.width = w; this.canvas.height = h; this.container.appendChild(this.canvas) } renderCircle(x, y, r) { this.ctx.beginPath(); this.ctx.arc(x, y, r, 0, Math.PI*2); this.ctx.stroke(); } renderLine(x1, y1, x2, y2) { this.ctx.moveTo(x1, y1); this.ctx.lineTo(x2, y2); this.ctx.stroke(); } renderText(x, y, text) { this.ctx.font = "20px serif"; this.ctx.textAlign = "center"; this.ctx.textBaseline = "middle"; this.ctx.fillText(text, x, y); } }svgRender实现, 文字不是居中的....,对于svg不熟悉class SvgRender { constructor(container) { this.svg = document.createElementNS("http://www.w3.org/2000/svg", "svg"); this.container = container; } initSize(w, h) { this.svg.setAttribute('width', w); this.svg.setAttribute('height', h); this.container.appendChild(this.svg); } renderCircle(x, y, r) { let c = document.createElementNS('http://www.w3.org/2000/svg','circle'); c.setAttribute('cx', x); c.setAttribute('cy', y); c.r.baseVal.value = r; c.setAttribute('stroke', 'black'); c.setAttribute('fill', 'none'); this.svg.appendChild(c) } renderLine(x1, y1, x2, y2) { let p = document.createElementNS('http://www.w3.org/2000/svg','path'); p.setAttribute('d', `M ${x1} ${y1} L ${x2} ${y2} Z`); p.setAttribute('stroke', 'black'); this.svg.appendChild(p); } renderText(x, y, text) { let t = document.createElementNS('http://www.w3.org/2000/svg','text'); t.setAttribute('x', x - 5); t.setAttribute('y', y + 5); t.style.textAlign = 'center'; t.style.fontSize = 20; t.style.verticalAlign = 'middle'; t.innerHTML = text; this.svg.appendChild(t); } }闲着没事也可以实现
divRender... - 实现渲染器接口, 需要用到的渲染方法有:
渲染方式
在计算出布局信息之后, 渲染就变得简单了, 任意使用一种树的遍历方式依次渲染即可.
-
class TreeDrawer {
    constructor(render) {
        this.render = render;
    }
    layout(root, nodeW, nodeH) {
        function computeWidth(root) {
            if (!root) return 0;
            if (!(root.left || root.right)) {
                root.width = nodeW;
                return root.width;
            }
            root.width = computeWidth(root.left) + computeWidth(root.right) + nodeW;
            return root.width;
        }

        function computePosition(root, left, right, curY = nodeH) {
            if (!root) return;
            let x;
            if (root.left) {
                x = left + root.left.width + nodeW;
            } else {
                x = left + nodeW;
            }
            root.position = [x, curY];
            computePosition(root.left, left, x, curY + nodeH);
            computePosition(root.right, x, right, curY + nodeH);

        }

        computeWidth(root);
        computePosition(root, 0, root.width);
        return root.width;
    }

    draw(root, nodeW=40, nodeH=40) {
        let height = getHeight(root);
        let width = this.layout(root, nodeW, nodeH);
        height = height * nodeH + nodeH;
        this.render.initSize(width + nodeW, height);

        // (x, y) ===> (x1, y1)
        // 求出一个向量的单位向量, 方便连线时从圆的边缘开始
        const getVector = (x, y, x1, y1) => {
            let dis = Math.sqrt((x - x1) ** 2 + (y - y1) ** 2);
            return [
                (x1 - x)/dis,
                (y1 - y)/dis
            ]
        }
        const linkNode = (root, child) => {
            let [px, py] = root.position;
            let [cx, cy] = child.position;
            let [dx, dy] = getVector(px, py, cx, cy);
            this.render.renderLine(px + (nodeW/2)*dx, py + (nodeW/2)*dy,
                                   cx - (nodeW/2)*dx, cy - (nodeW/2)*dy)
        }

        const drawNode = (root) => {
            let [x, y] = root.position;
            this.render.renderText(x, y, root.val);
            this.render.renderCircle(x, y, nodeW/2);
        }
        function draw(root) {
            if (!root) return;
            drawNode(root);
            if (root.left) linkNode(root, root.left);
            if (root.right) linkNode(root, root.right);
            draw(root.left);
            draw(root.right);
        }
        draw(root);
    }
}
常见问题FAQ
- 免费下载或者VIP会员专享资源能否直接商用?
- 本站所有资源版权均属于原作者所有,这里所提供资源均只能用于参考学习用,请勿直接商用。若由于商用引起版权纠纷,一切责任均由使用者承担。更多说明请参考 VIP介绍。
- 提示下载完但解压或打开不了?
- 找不到素材资源介绍文章里的示例图片?
- 模板不会安装或需要功能定制以及二次开发?


发表评论
还没有评论,快来抢沙发吧!