本文大致梳理了使用 rollup 打造自己 npm 包的流程,其中包括测试,文档,发布等内容。大多是流程的梳理,过程细节并未一一写明,可配合 源码仓库 一起阅读。
1. 使用 TypeScript
安装 TypeScript: yarn add typescript -D
生成 tsconfig.json 文件,用来配置 ts 的编译选项:npx tsc --init
tsconfig.json
{
  "compilerOptions": {
    "target": "es5",                                /* Specify ECMAScript target version: 'ES3' (default), 'ES5', 'ES2015', 'ES2016', 'ES2017', 'ES2018', 'ES2019', 'ES2020', or 'ESNEXT'. */
    "module": "esnext",                           /* Specify module code generation: 'none', 'commonjs', 'amd', 'system', 'umd', 'es2015', 'es2020', or 'ESNext'. */

    // 输出的目录
    "outDir": "./types",                              /* Redirect output structure to the directory. */

    /* Strict Type-Checking Options */
    "strict": true,                                 /* Enable all strict type-checking options. */
    "noImplicitAny": false,                       /* Raise error on expressions and declarations with an implied 'any' type. */

    /* Module Resolution Options */
		// 模块的解析策略
    "moduleResolution": "node",                  /* Specify module resolution strategy: 'node' (Node.js) or 'classic' (TypeScript pre-1.6). */
    // "allowSyntheticDefaultImports": true,        /* Allow default imports from modules with no default export. This does not affect code emit, just typechecking. */
    "esModuleInterop": true,                        /* Enables emit interoperability between CommonJS and ES Modules via creation

    /* Advanced Options */
    "skipLibCheck": true,                           /* Skip type checking of declaration files. */
    "forceConsistentCasingInFileNames": true,        /* Disallow inconsistently-cased references to the same file. */

    // 只生成类型文件,不转换代码
    "declaration": true,
    "emitDeclarationOnly": true,
  },
  // 只编译 src 目录下的文件
  "include": [
    "src"
  ],
  "exclude": [
    "test"
  ]
}
2. 编写源码并导出
在 src 目录中使用 TypeScript 编写源码,并在 src/index.ts 中将需要的内容进行导出
3. 添加 ESLint 用于规范源代码
一个库的代码,最好是有统一的代码规范,某些地方要不要空格,行尾要不要分号等等。因此我们需要 ESLint 来检查我们的代码。
安装 ESLint: yarn add eslint -D
生成配置文件:npx eslint --init
同时新建 .eslintignore 让 eslint 不检查某些文件,内容如下:
test/**
lib/**
types/**
4. 使用 rollup 进行打包
到了关键的环节,我们的代码是 ESM 规范的,并且是由 TS 书写的。我们要将它打包,提供给 Node 或者浏览器直接使用,因此我们可以用 rollup 对代码进行处理。
安装 rollup: yarn add rollup -D
新建 rollup.config.js 配置文件:
import typescript from '@rollup/plugin-typescript';  // 让 rollup 认识 ts 的代码
import pkg from './package.json';

// 为了将引入的 npm 包,也打包进最终结果中
import resolve from 'rollup-plugin-node-resolve';
import commonjs from '@rollup/plugin-commonjs';

// 一段自定义的内容,以下内容会添加到打包结果中
const footer = `
if(typeof window !== 'undefined') {
  window._Dry_VERSION_ = '${pkg.version}'
}`

export default {
  input: './packages/index.ts',
  output: [
    {
      file: pkg.main,
      format: 'cjs',
      footer,
    },
    {
      file: pkg.module,
      format: 'esm',
      footer,
    },
    {
      file: pkg.browser,
      format: 'umd',
      name: 'Dry',
      footer,
    },
  ],
  plugins: [
    typescript(),
    commonjs(),
    resolve()
  ]
}
往 package.json 文件中新增 scripts 命令: build 和 build:types 用于打包 bundle 和 types 类型文件:
package.json
{
  "name": "@songjp/dry",
  "version": "0.0.1",
  "description": "",
  "main": "lib/bundle.cjs.js",
  "module": "lib/bundle.esm.js",
  "browser": "lib/bundle.browser.js",
  "types": "types/index.d.ts",
  "scripts": {
    // 打包出 cjs, esm, 和 umd 的包
    "build": "rollup -c",
    // 打包出类型文件
    "build:types": "tsc"
  },
  "author": "",
  "license": "ISC",
  "devDependencies": {
    "@rollup/plugin-commonjs": "^18.0.0",
    "@rollup/plugin-typescript": "^8.2.1",
    "rollup": "^2.45.1",
    "rollup-plugin-node-resolve": "^5.2.0",
    "typescript": "^4.2.4"
  },
  "dependencies": {
    // 一个单纯用于测试的, 第三方 npm 包
    "dayjs": "^1.10.4"
  }
}
执行 yarn build 和 yarn build:types 可查看打包结果
5. 使用 jest 对代码进行测试
如果没有测试用例,以后就不太敢对这个库的代码进行改动,万一改坏了呢?因此我们需要对代码添加测试用例。
我们使用 ts-jest 来对代码进行测试:yarn add jest ts-jest @types/jest -D
创建 jest 配置文件: npx ts-test config:init
在 package.json 中新增测试 scripts: test
package.json
{
  "scripts": {
    "test": "jest",
  }
}
在根目录下新建 test 目录,存放测试文件,例如 test/Queue.ts:
import { Queue } from '../packages/index';

describe('Queue', () => {
  test('Queue Methods', () => {
    const queue = new Queue()
    expect(queue.isEmpty()).toBe(true)
    queue.enqueue('john')
    queue.enqueue('jack')
    expect(queue.toString()).toBe('john,jack')
    queue.enqueue('camila')
    expect(queue.toString()).toBe('john,jack,camila')
    expect(queue.size()).toBe(3)
    expect(queue.isEmpty()).toBe(false)
    queue.dequeue()
    queue.dequeue()
    expect(queue.toString()).toBe('camila')
  });
});
执行 yarn test 可查看测试用例的情况
6. 使用 VuePress 编写文档
一个库提供给别人用,最好能够有说明文档,说明这个库暴露了哪些 API,这些 API 如何使用等。因此我们需要给这个库搭建个文档站点。我们选用了 VuePress 来搭建文档,后续我们还会将文档部署到 Github Pages。
7. 配置 husky 规范 commit
当对库提交代码时,我们希望提交的代码都是“好的”,希望在 lint 和 test 都通过之后才能进行 commit。
另外,我们还可以规范 commit message 的格式,要求更有意义的 commit message 才能进行 commit,这样方便后续通过脚本生成 CHANGELOG,详情请查看: conventional-changelog-cli
因此,我们可以使用 husky 来规范 commit。详情查看 官方文档
在前两天使用的过程中,发现 husky 的使用方式变了。即 husky 有一个 v4 - v6 版本的更新,原来的使用方式是在 package.json 中添加以下的内容:
{
  "hooks": {
    "pre-commit": "npm test && npm run foo"
  }
}
在新版本中,利用 git 的新配置 core.hooksPath ,使得 husky 的使用方式改变了。首先在 package.json 中新增 prepare scripts:
npm set-script prepare "husky install" && npm run prepare
然后新增一个 hook:
npx husky add .husky/pre-commit "这里是你需要执行的命令,比如 npm test && npm run foo"
注意: 每次删除 .git 目录之后,需要再次执行 yarn prepare , 该命令修改了当前仓库的 git 中 core.hooksPath 的配置,具体配置可以查看 .git/config 文件: 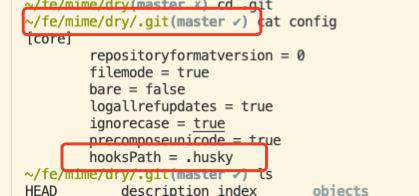
8. 配置 Github Action
如果不熟悉 Github Action 的话,可以先看看 Github Action 文档。
总之 Github Action 可以帮助你自动化的做一些事情, 比如每次 push 代码时自动进行代码检查,或者每次打 tag 时,自动将代码发布到 npm 仓库去,并且部署文档。
在根目录下新建 .github/workflows/dry.yml 文件,内容如下:
name: dry

on:
  push:
    tags:
      - '*'           # Push events to every tag not containing /
  pull_request:
    branches:
      - main
  # 或者手动触发
  workflow_dispatch:       # 设置手动触发,参考文档 https://github.blog/changelog/2020-07-06-github-actions-manual-triggers-with-workflow_dispatch/

jobs:
  build:
    runs-on: ubuntu-18.04
    steps:
      - uses: actions/checkout@v2   # 将我们提交的代码 checkout (拷贝) 一份出来
        with:
          persist-credentials: false # otherwise, the token used is the GITHUB_TOKEN, instead of your personal token
          fetch-depth: 0 # otherwise, you will failed to push refs to dest repo

      - uses: actions/setup-node@v1  # 会建立 node 环境,便于我们执行 node 脚本
      - uses: actions/cache@v2
        with:
          path: ~/.npm
          key: ${{ runner.os }}-node-${{ hashFiles('**/package-lock.json') }}
          restore-keys: |
            ${{ runner.os }}-node-
      - name: check code   # 检查代码
        run: |
          npm install
          npm run lint
          npm run test

      - run: echo "//registry.npmjs.org/:_authToken=${{ secrets.NPM_TOKEN }}" > ~/.npmrc
      - name: publish                          # 发布 npm 包
        if: ${{contains(github.ref, 'refs/tags/')}}  # 如果有新 tag
        run: |
          npm run build
          npm run build:types
          npm run docs:build
          npm publish --access public
      - name: deploy                          # 发布文档
        if: ${{contains(github.ref, 'refs/tags/')}}
        uses: JamesIves/github-pages-deploy-action@4.1.1
        with:
          branch: gh-pages # The branch the action should deploy to.
          folder: docs/.vuepress/dist # The folder the action should deploy.
以上的配置主要是让 Github Action 帮我们跑 lint 和 test,并且当我们 推了 tag 时( 比如 git push origin --tags ,意味着我们想要发布新版本),那么就再帮我们发包到 npm 上,并且部署下最新的文档。
注意: 配置文件中使用到了 secrets.NPM_TOKEN 这样一个变量,这是一个 npm 网站的 token 值,有了这个 token 就可以进行发布了。你可以在本地执行 npm login ,登录成功后通过 cat ~/.npmrc 查看,然后将 token 值设置到 Github 仓库中。
9. 如何发布
在我们写完代码之后,如果需要发布新版本,就需要以下的一些步骤:
# 打 tag
npm version patch/minor/maior

# 推代码
git push

# 推 tag 触发 CI 执行发布
git push origin --tags
这个步骤也可以优化,比如通过编写脚本来完成所有步骤。利用 Inquirer.js 这种交互式命令行的方式,比如通过命令行来选择新版本是 patch,minor 还是 major,得到所有的答案之后,最终在脚本中执行 git push 的操作。
10. 如何使用
当我们的包发布之后,我们可以通过以下方式来使用我们的包: yarn add @songjp/dry
// 方式1: import
import { Queue } from '@songjp/dry'
console.log(new Queue().isEmpty())

// 方式2: require 的方式,适用于 NodeJS
const { Queue } = require('@songjp/dry')
console.log(new Queue().isEmpty())

// 方式3: 在 HTML 文件中使用 script 标签加载,此时会在 window 上挂载一个 Dry 的变量,比如
<script src="node_modules/@songjp/dry/lib/bundle.browser.js"></script>
<script>
  console.log(new Dry.Queue().isEmpty())
</script>
也可以在 yes1am.github.io/dry/ 中查看我们书写的文档,了解 @songjp/dry 如何使用。
结语
如果觉得有用,可以点个 star 支持下,有错误烦请指出,有疑问也欢迎评论交流。
常见问题FAQ
- 免费下载或者VIP会员专享资源能否直接商用?
- 本站所有资源版权均属于原作者所有,这里所提供资源均只能用于参考学习用,请勿直接商用。若由于商用引起版权纠纷,一切责任均由使用者承担。更多说明请参考 VIP介绍。
- 提示下载完但解压或打开不了?
- 找不到素材资源介绍文章里的示例图片?
- 模板不会安装或需要功能定制以及二次开发?


发表评论
还没有评论,快来抢沙发吧!