最近看了《Three.js开发指南》,深刻地意识到光看不练跟没看差不多,所以就练习写了这个小动画。
项目地址: github.com/magicsoso/t…
前置知识
WebGL让我们能在浏览器开发3D应用,然而直接使用WebGL编程还是挺复杂的,开发者需要知道WebGL的底层细节,并且学习复杂的着色语言来获得WebGL的大部分功能。Three.js提供了一系列很简单的关于WebGL特性的JavaScript API,使开发者可以很方便地创作出好看的3D图形。在Three.js官网,就有很多酷炫3D效果。
使用Three.js开发3D应用,通常要包括渲染器(Renderer)、场景(Scene)、照相机(Camera),以及你在场景中创建的物体,光照。
设想一下照相的情况,我们需要一个场景(Scene),在这个场景中摆好要拍摄的物体,设置光照环境,摆放好照相机(Camera)的位置和朝向,然后就可以拍照了。渲染器(Renderer)可能和摄影师比较像吧,负责下命令拍摄,并且生成图像(照片)。
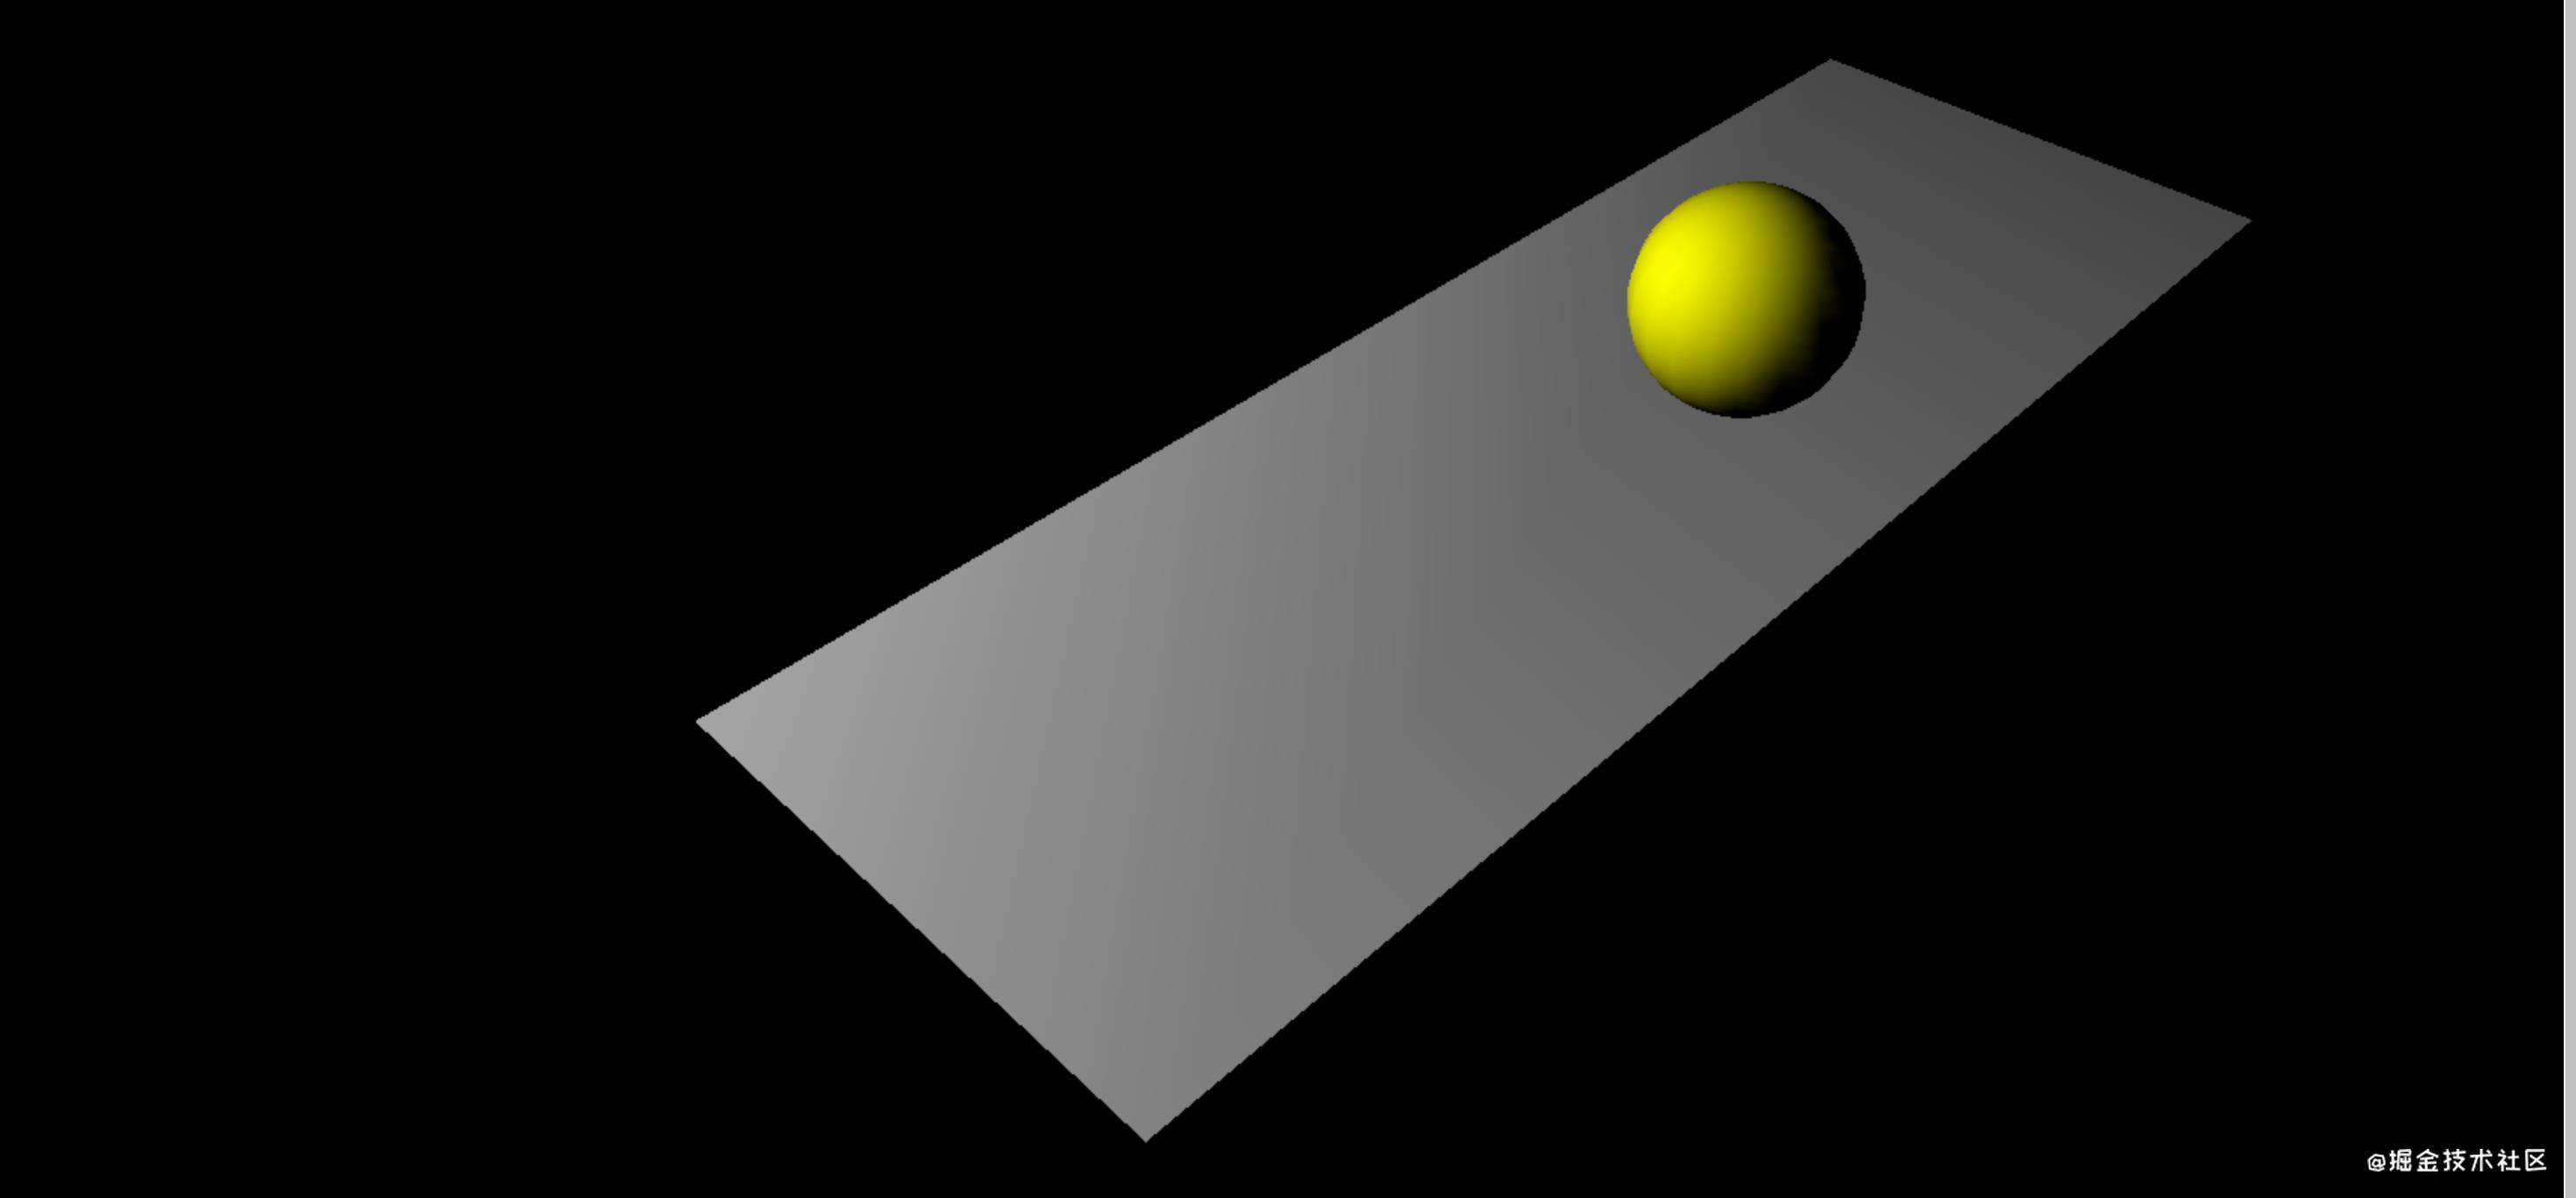
将下面的代码的复制并运行,就可以得到一个很简单的3D场景。
<!DOCTYPE html>
<html lang="en">
<head>
  <meta charset="UTF-8">
  <meta http-equiv="X-UA-Compatible" content="IE=edge">
  <meta name="viewport" content="width=device-width, initial-scale=1.0">
  <title>room</title>
</head>
<body>
  <div id="webgl-output"></div>
  <script src="https://unpkg.com/three@0.119.0/build/three.js"></script>
  <script>
    function init () {
      const scene = new THREE.Scene()

      const camera = new THREE.PerspectiveCamera(45,
        window.innerWidth / window.innerHeight,
        0.1,
        1000
      )
      camera.position.set(-30, 40, 30)
      camera.lookAt(0,0,0)
      scene.add(camera)

      const planeGeometry = new THREE.PlaneGeometry(60,20)
      const planeMaterial = new THREE.MeshLambertMaterial({
        color: 0xAAAAAA
      })
      const plane = new THREE.Mesh(planeGeometry, planeMaterial)
      plane.rotation.x = -Math.PI / 2
      plane.position.set(15, 0, 0)
      scene.add(plane)

      const sphereGeometry = new THREE.SphereGeometry(4, 20, 20)
      const sphereMaterial = new THREE.MeshLambertMaterial({
        color: 0xffff00
      })
      const sphere = new THREE.Mesh(sphereGeometry, sphereMaterial)
      sphere.position.set(20, 4, 2)
      scene.add(sphere)

      const spotLight = new THREE.SpotLight(0xffffff)
      spotLight.position.set(-20, 30, -15)
      scene.add(spotLight)

      const renderer = new THREE.WebGLRenderer()
      renderer.setClearColor(new THREE.Color(0x000000))
      renderer.setSize(window.innerWidth, window.innerHeight)
      document.getElementById('webgl-output').appendChild(renderer.domElement)

      renderer.render(scene, camera)
    }

    init()
</script>
</body>
</html>
场景(Scene)
THREE.Scene对象是所有不同对象的容器,但这个对象本身没有很复杂的操作,我们通常在程序最开始的时候实例化一个场景,然后将照相机、物体、光源添加到场景中。
const scene = new THREE.Scene()
scene.add(camera)        //添加照相机
scene.add(plane)         //添加灰色平面
scene.add(sphere)        //添加黄色球体
scene.add(spotLight)     //添加光源
照相机(Camera)
Three.js库提供了两种不同的照相机:透视投影照相机和正交投影照相机。
透视投影照相机的效果类似人眼在真实世界中看到的场景,有 "近大远小" 的效果,垂直视平面的平行线在远方会相交。

正交投影照相机的效果类似我们在数学几何学课上老师教我们画的效果,在三维空间内平行的线,在屏幕上永远不会相交。
我们这里用的是透视投影照相机,就主要讨论它,正交投影照相机后面用到再说。
const camera = new THREE.PerspectiveCamera(
  45,
  window.innerWidth / window.innerHeight,
  0.1,
  1000
)
camera.position.set(-30, 40, 30)
camera.lookAt(0,0,0)
scene.add(camera)
设置一个照相机分三步: 确定视野范围, 确定照相机坐标, 确定照相机聚焦点。
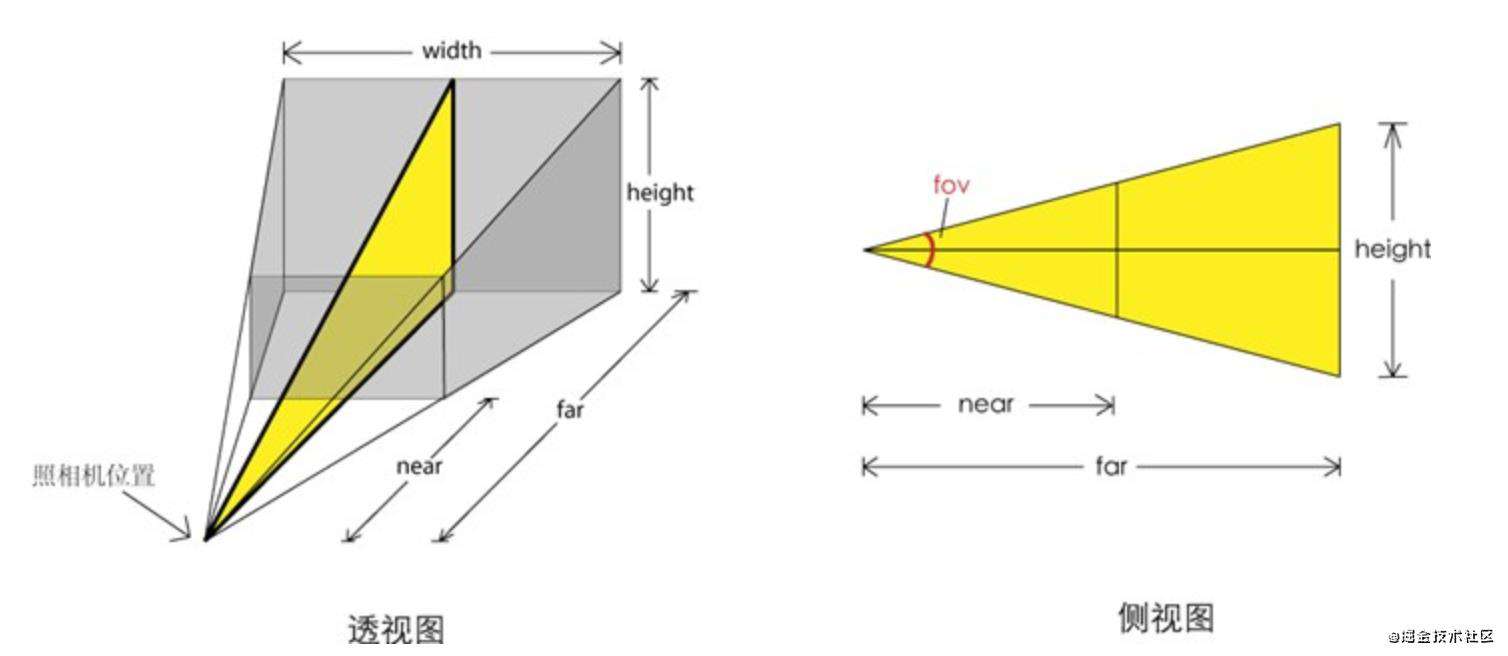 我们在
我们在new THREE.PerspectiveCamera的时候确定照相机的视野范围,对应上图,45是fov,就是视野上下边缘之间的夹角。window.innerWidth / window.innerHeight是视野水平方向和竖直方向长度的比值,0.1(near)和1000(far)分别是照相机到视景体最近、最远的距离,这些参数决定了要显示的三维空间的范围,也就是上图中的灰色区域。
camera.position.set(-30, 40, 30)确定了照相机在空间中的坐标。
camera.lookAt(0,0,0)确定了照相机聚焦点,该点和照相机坐标的连线就是拍摄方向。
上图中的灰色区域在屏幕上的显示效果,也就是将三维空间的坐标投影到屏幕二维坐标是webgl完成的,我们只需要关心三维空间的坐标。
坐标系
与我们之前讲到的CSS的3D坐标系不同,webgl坐标系是右手坐标系,X轴向右,Y轴向上,Z轴是指向“自己”的。
伸出右手,让拇指和食指成"L"形,大拇指向右,食指向上。其余的手指指向自己,这样就建立了一个右手坐标系。

其中,拇指、食指和其余手指分别代表x,y,z轴的正方向
在空间中定位、平移都比较好理解,这里看一下旋转。
有时,我们会这样设置物体的旋转:object.rotation.x = -Math.PI / 2,表示的是绕X轴旋转-90度。具体是怎么旋转,就要对照上面坐标系,展开右手,拇指指向x轴正方向,其余手指的弯曲方向就是旋转的正方向;拇指指向x轴负方向,其余手指的弯曲方向就是旋转的负方向。y轴和z轴旋转方向的判断同理。
物体
在three.js中,创建一个物体需要两个参数:几何形状(Geometry)和 材质(Material)。通俗的讲,几何形状决定物体的形状,材质决定物体表面的颜色、纹理贴图、对光照的反应等等。
//创建一个平面几何体,参数是沿X方向的Width和沿Y方向的height
const planeGeometry = new THREE.PlaneGeometry(60,20)

//创建一种材质,MeshLambertMaterial是一种考虑漫反射而不考虑镜面反射的材质
const planeMaterial = new THREE.MeshLambertMaterial({
  color: 0xAAAAAA
})

//根据几何形状和材质创建物体
const plane = new THREE.Mesh(planeGeometry, planeMaterial)

//设置物体的位置和旋转,并将物体加到场景(scene)中
plane.rotation.x = -Math.PI / 2
plane.position.set(15, 0, 0)
scene.add(plane)
一些常用的几何形状和材质可以参考Three.js入门指南
光照
没有光源,渲染的场景将不可见(除非你使用基础材质或线框材质,当然,在构建3D应用时,几乎不怎么用基础材质和线框材质)。
WebGL本身并不支持光源。如果不使用Three.js,则需要自己写WebGL着色程序来模拟光源。Three.js让光源的使用变得简单。
const spotLight = new THREE.SpotLight(0xffffff)
spotLight.position.set(0, 0, 100)
scene.add(spotLight)
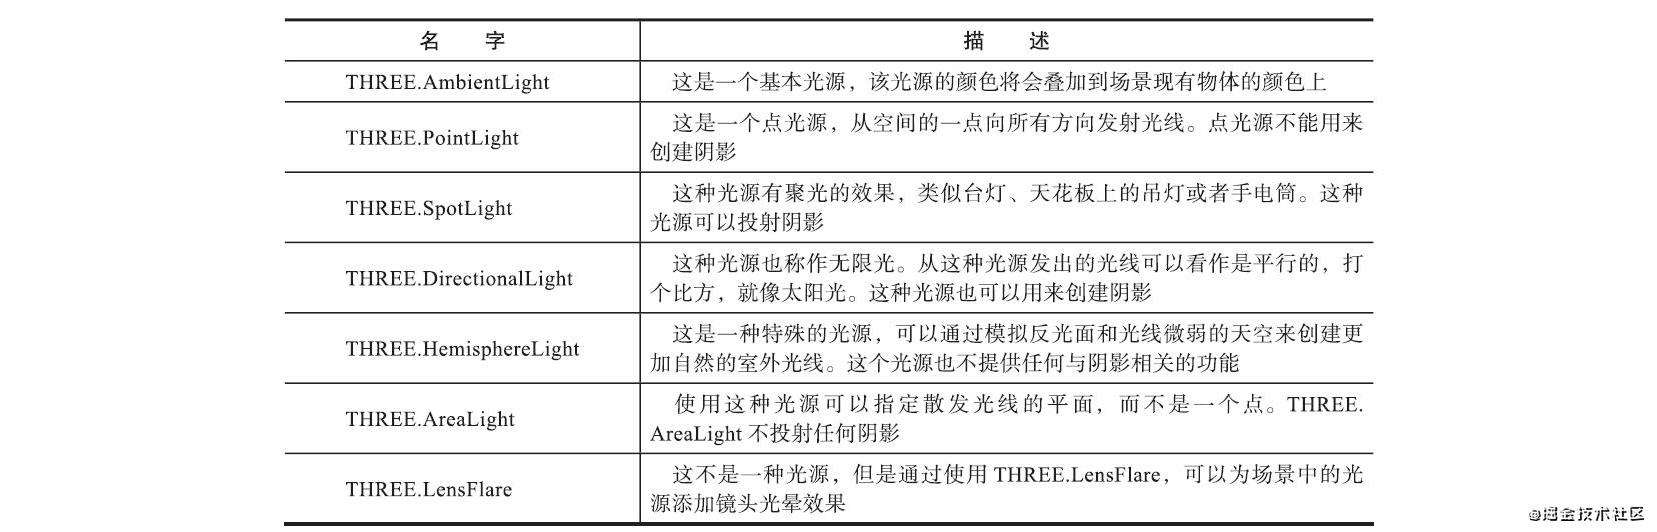
如上所示,我们只需要创建一个光源,并将它加入到场景中就可以了。three.js会根据光源的类型、位置等信息计算出场景中各个物体的展示效果。
最常用的几种光源是AmbientLight、PointLight、SpotLight、DirectionalLight。
渲染器(Renderer)
当场景中的照相机、物体、光照等准备就绪,就该渲染器上场了。
在上面那个小例子中,我们是这样使用渲染器的:
//new 一个渲染器
const renderer = new THREE.WebGLRenderer()

//设置画布背景色,也就是画布中没有物体的地方的显示颜色
renderer.setClearColor(new THREE.Color(0x000000))

//设置画布大小
renderer.setSize(window.innerWidth, window.innerHeight)

//将画布元素(即renderer.domElement,它是一个canvas元素)挂载到一个dom节点
document.getElementById('webgl-output').appendChild(renderer.domElement)

//执行渲染操作,参数是上面定义的场景(scene)和照相机(camera)
renderer.render(scene, camera)
可以看出,使用Three.js开发3D应用,我们只需要关心场景中物体、照相机、光照等在三维空间中的布局,以及运动,具体怎么渲染都由Three.js去完成。当然,懂一些webgl的基本原理会更好,毕竟有一些应用会复杂到three.js的API满足不了要求。
实现下雨动画
初始化场景
因为每个3D应用的初始化都有scene、camera、render,所以我们把这三者的初始化封装成一个类Template,后面的应用初始化可以通过子类继承这个类,以便快速搭建框架。
import {
  Scene,
  PerspectiveCamera,
  WebGLRenderer,
  Vector3,
  Color
} from 'three'

export default class Template {
  constructor () {               //各种默认选项
    this.el = document.body
    this.PCamera = {
      fov: 45,
      aspect: window.innerWidth / window.innerHeight,
      near: 1,
      far: 1000
    }
    this.cameraPostion = new Vector3(0, 0, 1)
    this.cameraLookAt = new Vector3(0,0,0)
    this.rendererColor = new Color(0x000000)
    this.rendererWidth = window.innerWidth
    this.rendererHeight = window.innerHeight
  }

  initPerspectiveCamera () {     //初始化相机,这里是透视相机
    const camera = new PerspectiveCamera(
      this.PCamera.fov,
      this.PCamera.aspect,
      this.PCamera.near,
      this.PCamera.far,
    )
    camera.position.copy(this.cameraPostion)
    camera.lookAt(this.cameraLookAt)
    this.camera = camera
    this.scene.add(camera)
  }

  initScene () {                //初始化场景
    this.scene = new Scene()
  }

  initRenderer () {             //初始化渲染器
    const renderer = new WebGLRenderer()
    renderer.setClearColor(this.rendererColor)
    renderer.setSize(this.rendererWidth, this.rendererHeight)
    this.el.appendChild(renderer.domElement)
    this.renderer = renderer
  }

  init () {
    this.initScene()
    this.initPerspectiveCamera()
    this.initRenderer()
  }
}
在我们的下雨动画中,创建一个Director类管理动画,它继承自Template类。可以看出,它要做的事很清晰:初始化框架、修改父类的默认配置、添加物体(云层和雨滴)、添加光照(闪电也是光照形成的)、添加雾化效果、循环渲染。
//director.js
export default class Director extends Template{
  constructor () {
    super()

    //set params
    //camera
    this.PCamera.fov = 60       //修改照相机的默认视场fov

    //init camera/scene/render
    this.init()
    this.camera.rotation.x = 1.16   //设置照相机的旋转角度(望向天空)
    this.camera.rotation.y = -0.12
    this.camera.rotation.z = 0.27

    //add object
    this.addCloud()                  //添加云层和雨滴
    this.addRainDrop()

    //add light
    this.initLight()                //添加光照,用PointLight模拟闪电
    this.addLightning()

    //add fog
    this.addFog()                   //添加雾,在相机附近视野清晰,距离相机越远,雾的浓度越高

    //animate
    this.animate()                 //requestAnimationFrame实现动画
  }
}
创建不断变换的云层
我们首先创建一个平面,将一小朵云做为材质,得到一个云朵物体。然后将很多云朵物体进行叠加,得到一团云。

//Cloud.js
const texture = new TextureLoader().load('/images/smoke.png')  //加载云朵素材
const cloudGeo = new PlaneBufferGeometry(564, 300)   //创建平面几何体
const cloudMaterial = new MeshLambertMaterial({   //图像作为纹理贴图,生成材质
  map: texture,
  transparent: true
})
export default class Cloud {
  constructor () {
    const cloud = new Mesh(cloudGeo, cloudMaterial)   //生成云朵物体
    cloud.material.opacity = 0.6
    this.instance = cloud
  }

  setPosition (x,y,z) {
    this.instance.position.set(x,y,z)
  }

  setRotation (x,y,z) {
    this.instance.rotation.x = x
    this.instance.rotation.y = y
    this.instance.rotation.z = z
  }

  animate () {
    this.instance.rotation.z -= 0.003            //云朵的运动是不断绕着z轴旋转
  }
}
在Director类中,生成30个云朵物体,随机设置它们的位置和旋转,形成铺开和层叠的效果。在循环渲染时调用云朵物体的animate方法。
//director.js
addCloud () {
  this.clouds = []
  for(let i = 0; i < 30; i++){
    const cloud = new Cloud()
    this.clouds.push(cloud)
    cloud.setPosition(Math.random() * 1000 - 460, 600, Math.random() * 500 - 400)
    cloud.setRotation(1.16, -0.12, Math.random() * 360)
    this.scene.add(cloud.instance)
  }
}
animate () {
    //cloud move
    this.clouds.forEach((cloud) => {  //调用每个云朵物体的animate方法,形成整个云层的不断变换效果
      cloud.animate()
    })
    ...
    this.renderer.render(this.scene, this.camera)
    requestAnimationFrame(this.animate.bind(this))
  }
环境光和闪电
同时使用了AmbientLight和DirectionalLight作为整个场景的稳定光源,增强对现实场景的模拟。
//director.js
initLight () {
  const ambientLight = new AmbientLight(0x555555)
  this.scene.add(ambientLight)

  const directionLight = new DirectionalLight(0xffeedd)
  directionLight.position.set(0,0,1)
  this.scene.add(directionLight)
}
用PointLight模拟闪电,首先是初始一个PointLight。
//director.js
addLightning () {
  const lightning = new PointLight(0x062d89, 30, 500, 1.7)
  lightning.position.set(200, 300, 100)
  this.lightning = lightning
  this.scene.add(lightning)
}
在循环渲染时,不断随机改变点光源PointLight的强度(power),形成闪烁的效果,当强度较小,即光线暗下来时,"悄悄"改变点光源的位置,这样就能不突兀使闪电随机地出现在云层地各个位置。
//director.js
animate () {
  ...
  //lightning
  if(Math.random() > 0.93 || this.lightning.power > 100){
    if(this.lightning.power < 100){
      this.lightning.position.set(
        Math.random() * 400,
        300 + Math.random() * 200,
        100
      )
    }
    this.lightning.power = 50 + Math.random() * 500
  }

  this.renderer.render(this.scene, this.camera)
  requestAnimationFrame(this.animate.bind(this))
}
创建雨滴
创建雨滴用到的粒子效果。创建一组粒子,直观的方法是,创建一个粒子物体,然后复制N个,分别定义它们的位置和旋转。
当你使用少量的对象时,这很有效,但是当你想使用大量的THREE.Sprite对象时,你会很快遇到性能问题,因为每个对象需要分别由Three.js进行管理。
Three.js提供了另一种方式来处理大量的粒子,这需要使用THREE.Points。通过THREE.Points,Three.js不再需要管理大量单个的THREE.Sprite对象,而只需管理THREE.Points实例。
使用THREE.Points,可以非常容易地创建很多细小的物体,用来模拟雨滴、雪花、烟和其他有趣的效果。
THREE.Points的核心思想,就是先声明一个几何体geom,然后确定几何体各个顶点的位置,这些顶点的位置将会是各个粒子的位置。通过PointsMaterial确定顶点的材质material,然后new Points(geom, material),根据传入的几何体和顶点材质生成一个粒子系统。
粒子的移动: 粒子的位置坐标是由一组数字确定const positions = this.geom.attributes.position.array,这组数字,每三个数确定一个坐标点(x\y\z),所以要改变粒子的X坐标,就改变positions[ 3n ] (n是粒子序数);同理,Y坐标对应的是positions[ 3n+1 ],Z坐标对应的是positions[ 3n+2 ]。
//RainDrop.js
export default class RainDrop {
  constructor () {
    const texture = new TextureLoader().load('/images/rain-drop.png')
    const material = new PointsMaterial({    //用图片初始化顶点材质
      size: 0.8,
      map: texture,
      transparent: true
    })

    const positions = []

    this.drops = 8000
    this.geom = new BufferGeometry()
    this.velocityY = []

    for(let i = 0; i < this.drops; i++){
      positions.push( Math.random() * 400 - 200 )
      positions.push( Math.random() * 500 - 250 )
      positions.push( Math.random() * 400 - 200 )
      this.velocityY.push(0.5 + Math.random() / 2)  //初始化每个粒子的坐标和粒子在Y方向的速度
    }

    //确定各个顶点的位置坐标
    this.geom.setAttribute( 'position', new Float32BufferAttribute( positions, 3 ) )
    this.instance = new Points(this.geom, material)  //初始化粒子系统
  }

  animate () {
    const positions = this.geom.attributes.position.array;

    for(let i=0; i<this.drops * 3; i+=3){    //改变Y坐标,加速运动
      this.velocityY[i/3] += Math.random() * 0.05
      positions[ i + 1 ] -=  this.velocityY[i/3]
      if(positions[ i + 1 ] < -200){
        positions[ i + 1 ] =  200
        this.velocityY[i/3] = 0.5 + Math.random() / 2
      }
    }
    this.instance.rotation.y += 0.002
    this.geom.attributes.position.needsUpdate = true
  }
}
将雨滴粒子添加到场景中,并在循环渲染时,调用RainDrop的animate方法:
//director.js
addRainDrop () {
  this.rainDrop = new RainDrop()
  this.scene.add(this.rainDrop.instance)
}
animate () {
  //rain drop move
  this.rainDrop.animate()
  ...
  this.renderer.render(this.scene, this.camera)
  requestAnimationFrame(this.animate.bind(this))
}
常见问题FAQ
- 免费下载或者VIP会员专享资源能否直接商用?
- 本站所有资源版权均属于原作者所有,这里所提供资源均只能用于参考学习用,请勿直接商用。若由于商用引起版权纠纷,一切责任均由使用者承担。更多说明请参考 VIP介绍。
- 提示下载完但解压或打开不了?
- 找不到素材资源介绍文章里的示例图片?
- 模板不会安装或需要功能定制以及二次开发?


发表评论
还没有评论,快来抢沙发吧!