Chimera Flutter Code Push动态化热更新介绍
一、前言
在如今这个编程语言百花齐放、百家争鸣的年代,谁能占领移动端App开发的市场,谁就会受到各大厂商的青睐;而在移动端开发领域,如果谁能在跨平台技术上有所突破,那她便更成为百家语言中的花中之魁。众所周知,Google主导开发的Flutter就以其“多端一致”和“渲染性能”上的优势让其他跨端方案望尘莫及。
Flutter支持现有所知的所有平台(iOS,android,Windows,Linux, Web..),并且支持一套代码全平台一键部署。
然而,出于对性能和安全的考量,Google于2019 年 4 月主动放弃了对于Flutter动态化热更新的支持,这便成了Flutter这门“超级框架”的美中不足。为了满足市场的需求和技术的突破,我们维彤科技Chimera团队从2019年底开始对Flutter动态化更新进行立项研究,截止今年12月初,我们的动态化热更新SDK和对接方案已告一段落,产品代号也为“Chimera”。
二、什么是Chimera?
Chimera(奇美拉)是传说中希腊的一只神兽,他是一个“混合体”, 他拥有狮子的头颅,山羊的身躯和蟒蛇的尾巴,并拥有超强的战斗力。
我们的产品就像是奇美拉一样,可以为各个平台提供一套完善的整体嵌入式解决方案,我们的SDK具有易接入,易整合,易编译的优势和特点,不管你的app是在开发初期,还是app已经开发完了,都是一键无缝接入,同时整个代码整合和编译过程都可谓是“傻瓜式”介入。我们的产品提供细粒度热更新能力,无需等待发版即可实现修复应用线上问题,最终用户全程无感。
2.1 产品优势
- 通用性,即时一键接入现有Flutter项目,不会对源App开发进程有任何影响
- 低成本,动态化对齐 Flutter 生态和常规开发习惯,且可低成本转化现有的 Flutter 页面
- 适用性,修复范围广,编译包体积小,无侵入,无第三方语言介入高性能,保持Flutter App自身性能,无任何性能影响损耗
- 好服务,一站式整体体验,支持双端商业化平台,拥有高可复用的开发体验
2.2 实现具体过程:
Chimera Flutter热更新(CodePush)是一个SDK,已经开发了2年以上,用于Flutter应用程序、代码热更新的增强和完善。
如您所知,Google Flutter团队已宣布,Flutter将不支持其引擎中的代码推送功能。
Google在这里提到:
因此,Chimera Flutter CodePush在那时就已经进行了初始化和开发:Chimera CodePush是一种云服务,使Flutter开发人员可以将移动应用程序更新直接部署到其用户的设备上。它充当中央存储库的角色,开发人员可以将更新发布到该存储库,并且应用程序可以从中查询更新。在解决错误和/或添加不需要重新构建二进制文件并通过各自的应用商店重新分发二进制文件的小功能时,这使您可以与用户群建立更具确定性和直接的参与度模型。
Chimera可以将捆绑包中的UI / Logic / ..(所有您想要的)更改分发给用户,方法类似于其他开源热更新Project,但是又有所不同。通过集成Flutter Chimera,您可以发布所有应用程序页面,而无需等待应用程序的下一个发布日期。 Chimera提供了一个出色的编译器,它可以用作转换,运行,升级Flutter页面/应用程序全新魔术工具。我们的SDK基于Dart原生语言,没有使用任何第三方语言做任何开发,所以使用我们的SDK对于flutter开发者非常友好,对您来说,没有任何的学习成本,可以说是一键秒上手!
要开始使用Chimera CodePush,请参考本文档,如果您想从源代码构建/贡献项目,请阅读以下步骤。
2.3 DEV Setup
现在开始:
? 首先你可能需要先成为一个出色的Flutter程序员或者是一面flutter编程爱好者,像我一样:-),主要是需要熟悉Flutter编程,还有一颗喜欢钻研和学习的心。
设置Flutter代码环境:here.
切记要安装 http-server,因为后续的工作需要http-server:
brew install http-server
大杀器在这里,我们的编译器!这个编译器便是主要的工具来服务Chimera CodePush。
# 编译工具下载链接
下载 link:
https://github.com/Waytoon/chimera_flutter_code_push/releases/download/v1.0.0/rust_compile
? 请检查您计算机上的运行时环境。 Chimera基于Flutter最新的稳定版本。并且SDK将来会继续支持最新的稳定Flutter版本。
2.4 使用 CodePush SDK
-
首先运行
mkdir test创建一个test文件夹。如下图: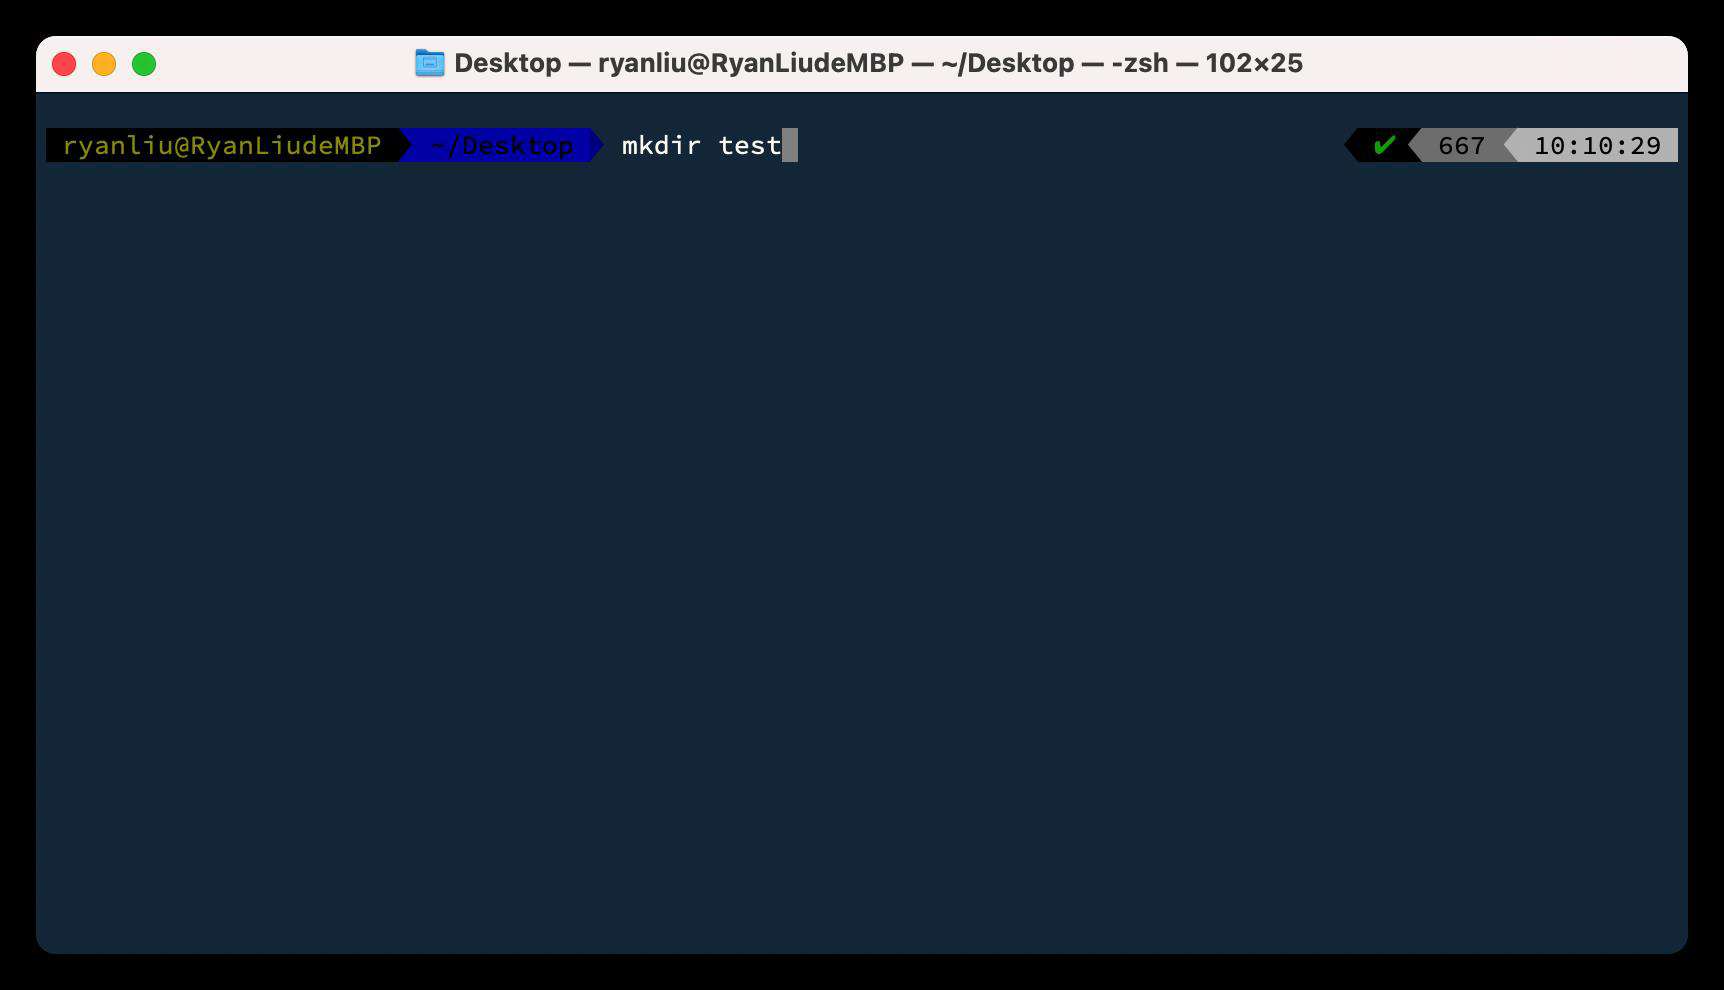
cd test进入test目录创建一个hello项目:flutter create hello。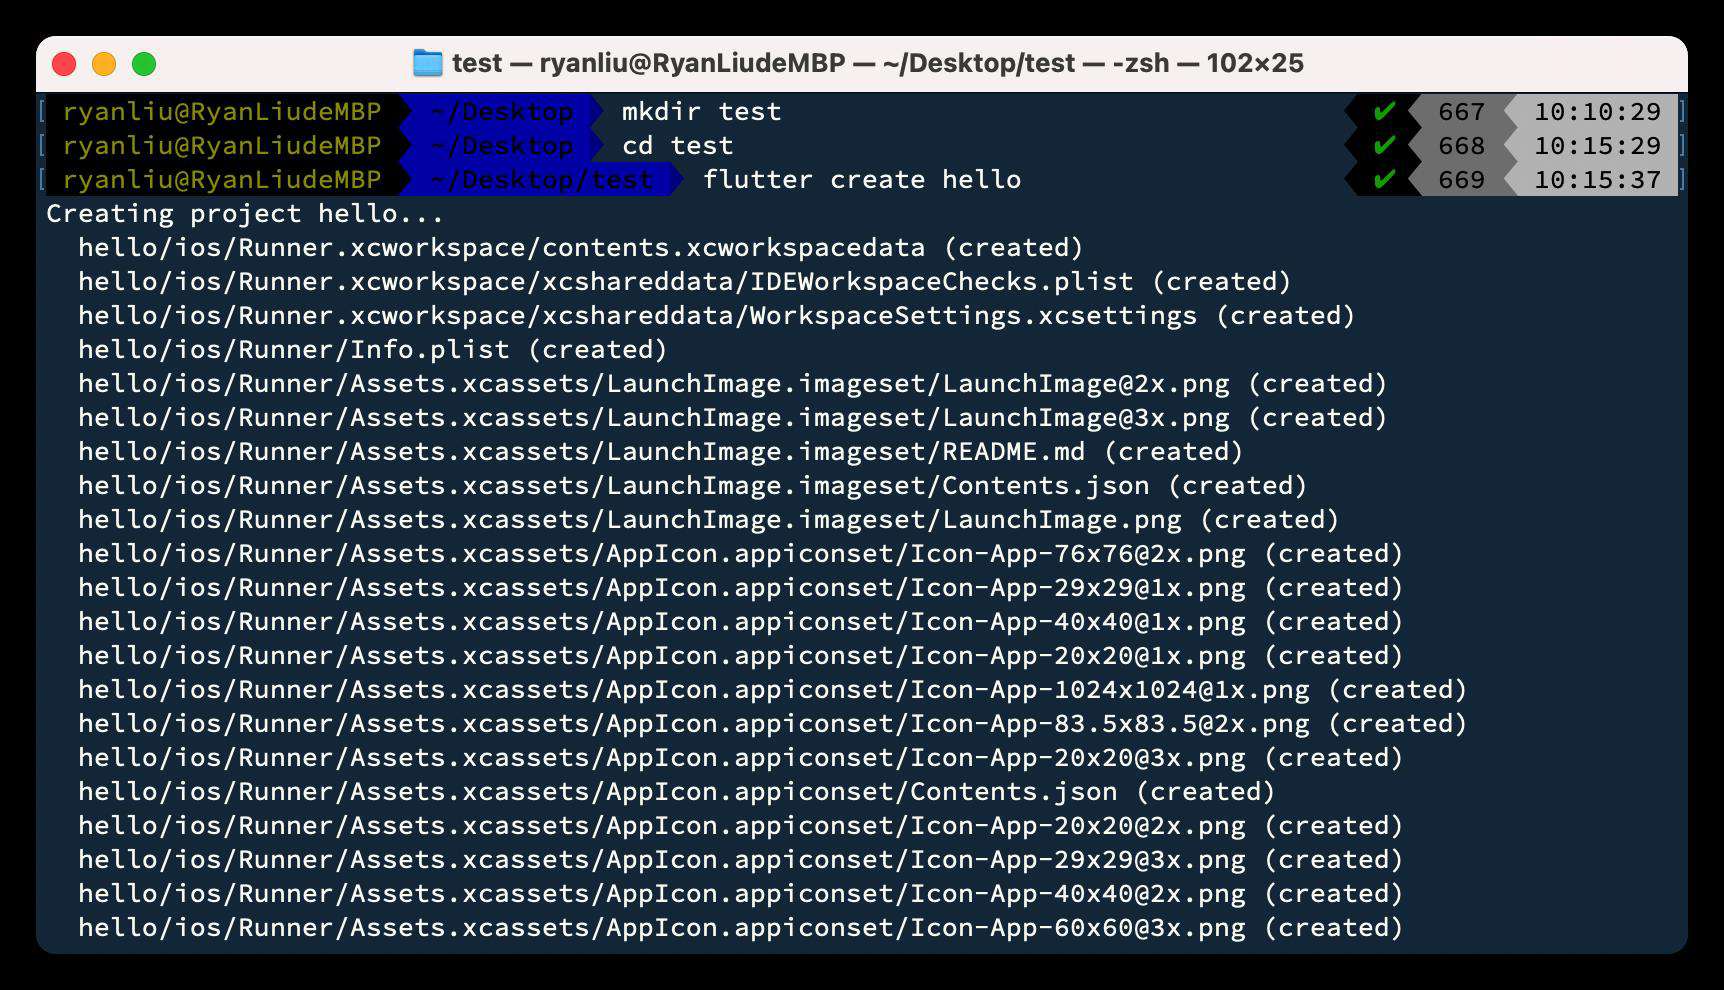
hello目录结构如下:.hello folder ├── README.md ├── android ├── hello.iml ├── ios ├── lib ├── pubspec.lock ├── pubspec.yaml └── test
2.用IDE打开hello这个项目:
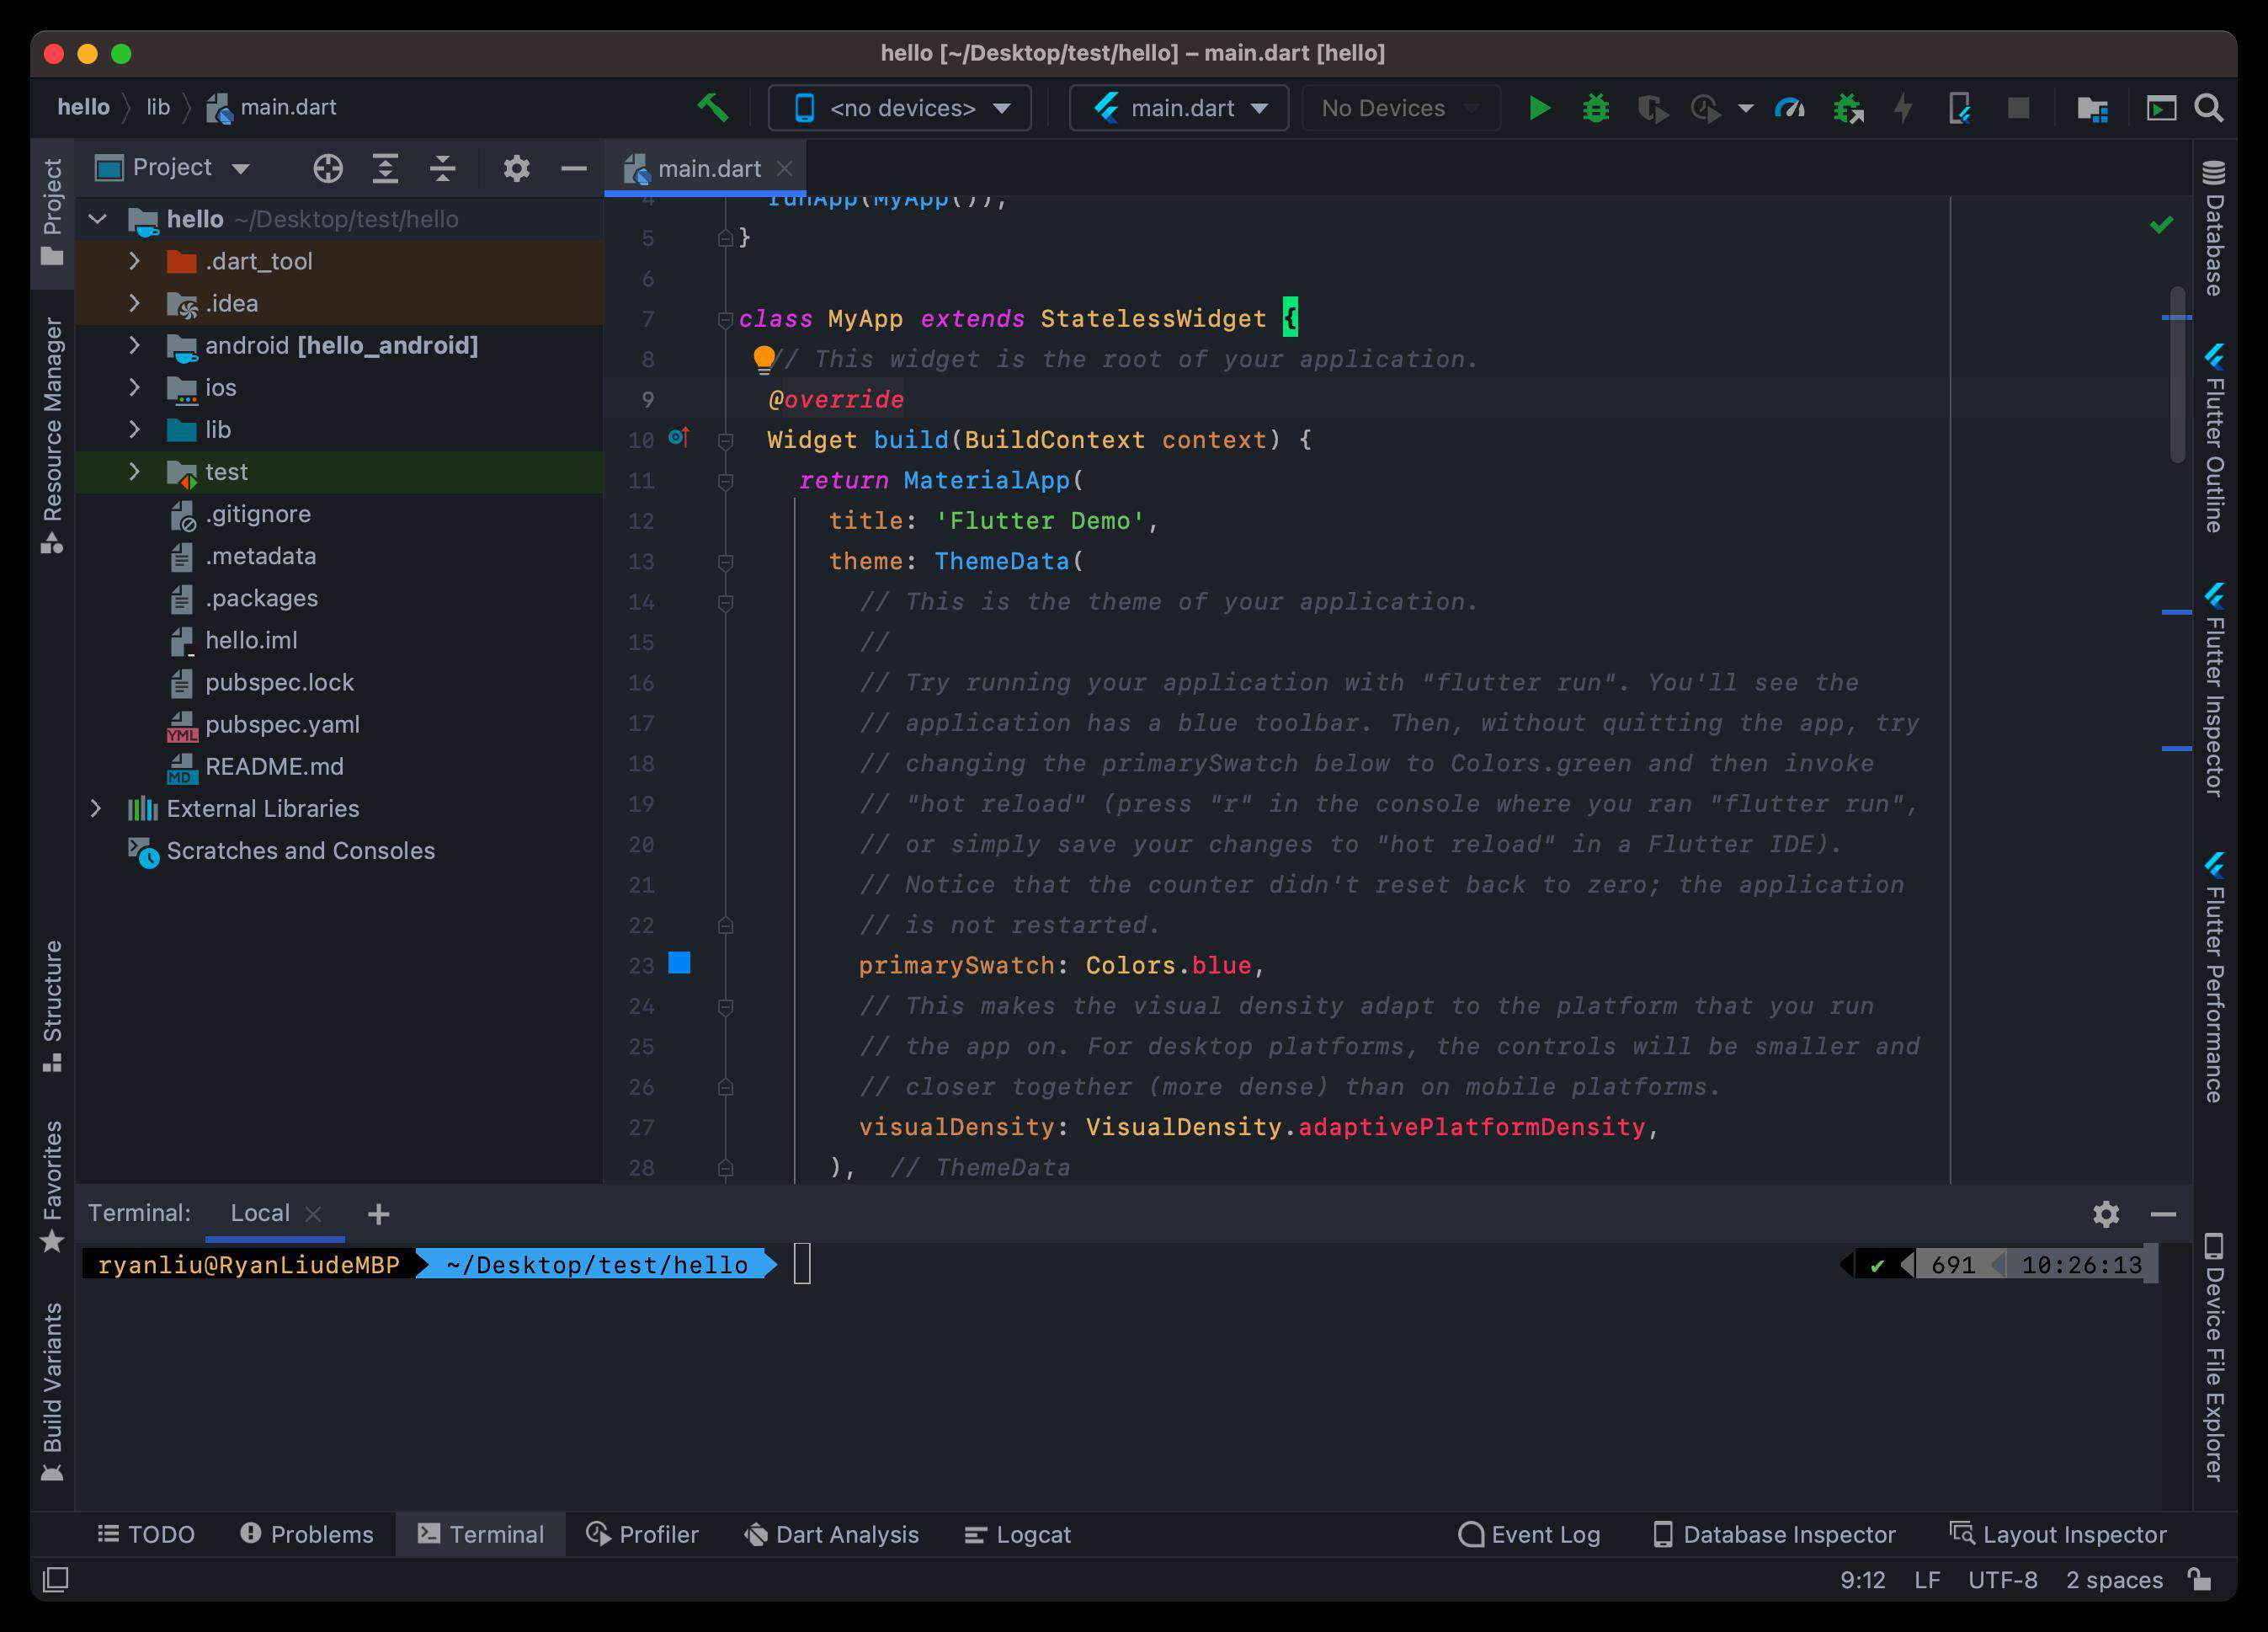
这里一定要注意!! 使用IDE调试一次hello这个项目,不管是使用模拟器还是真机,以下我们使用模拟器作为示例演示。
-
很重要的一步下载我们的编译器,链接:
https://github.com/Waytoon/chimera_flutter_code_push/releases/download/v1.0.0/rust_compile
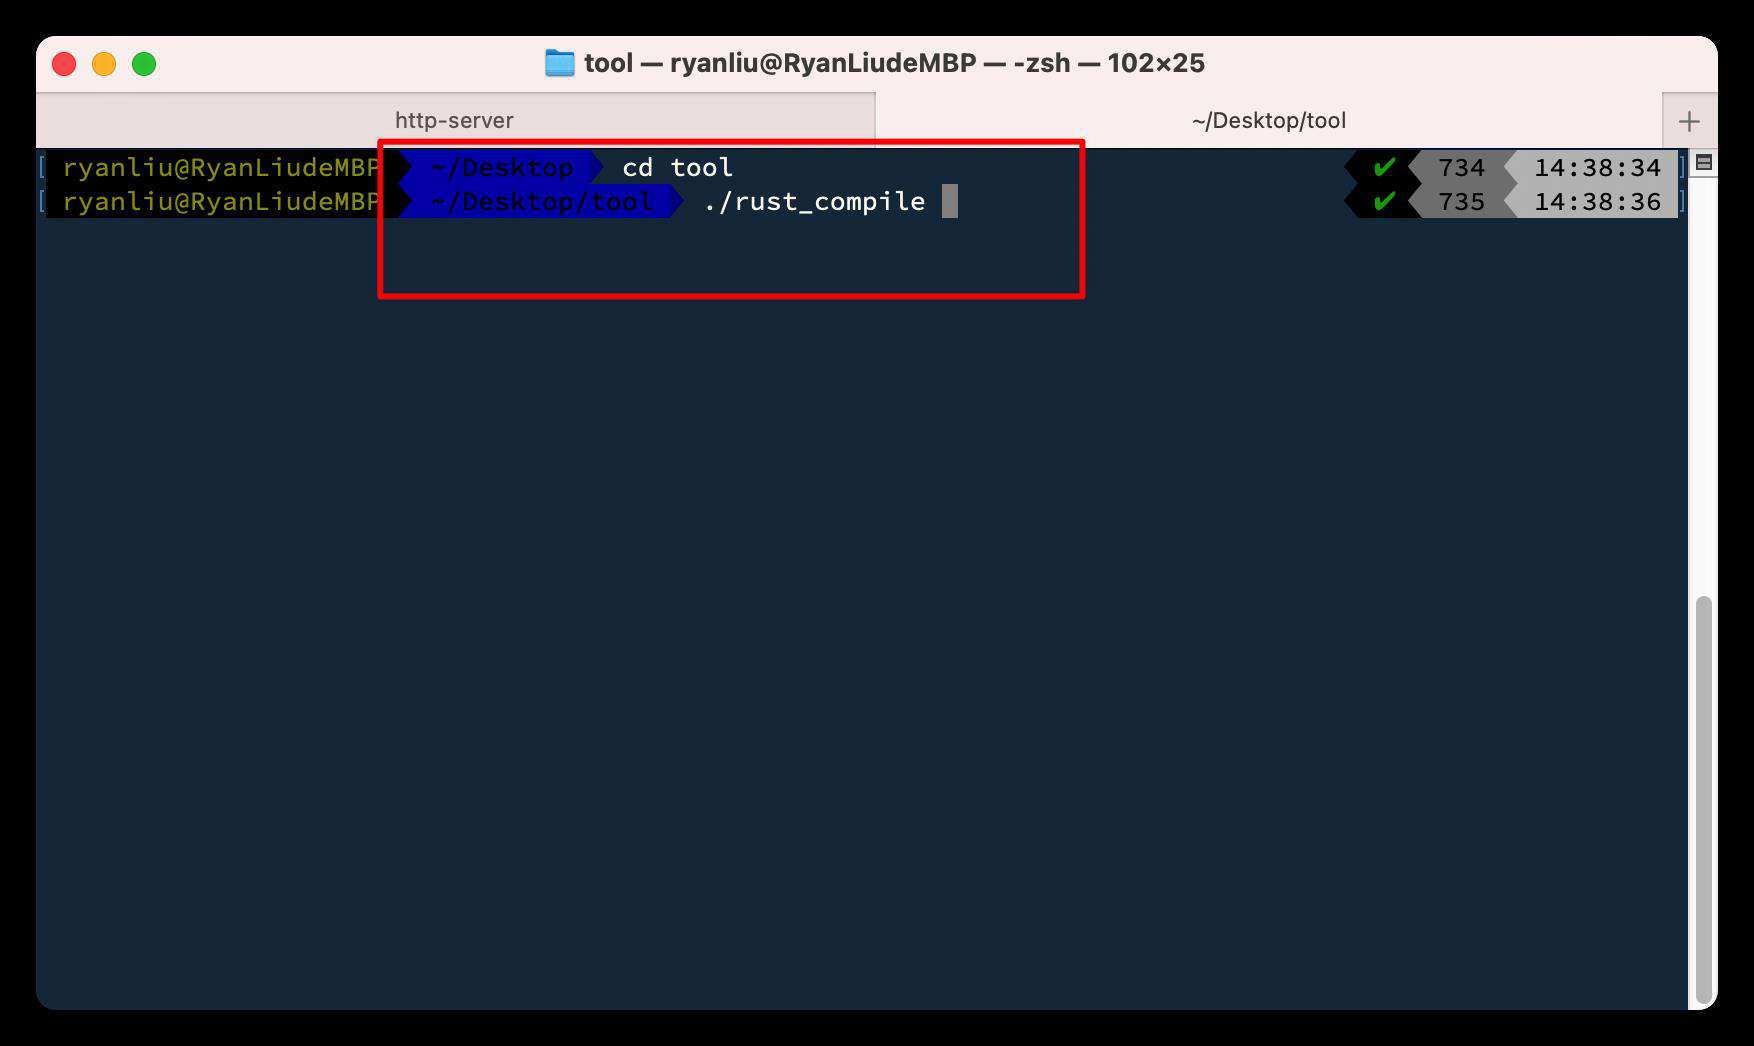
下载到一个指定目录,随意给一个名字,我们就用tool吧:

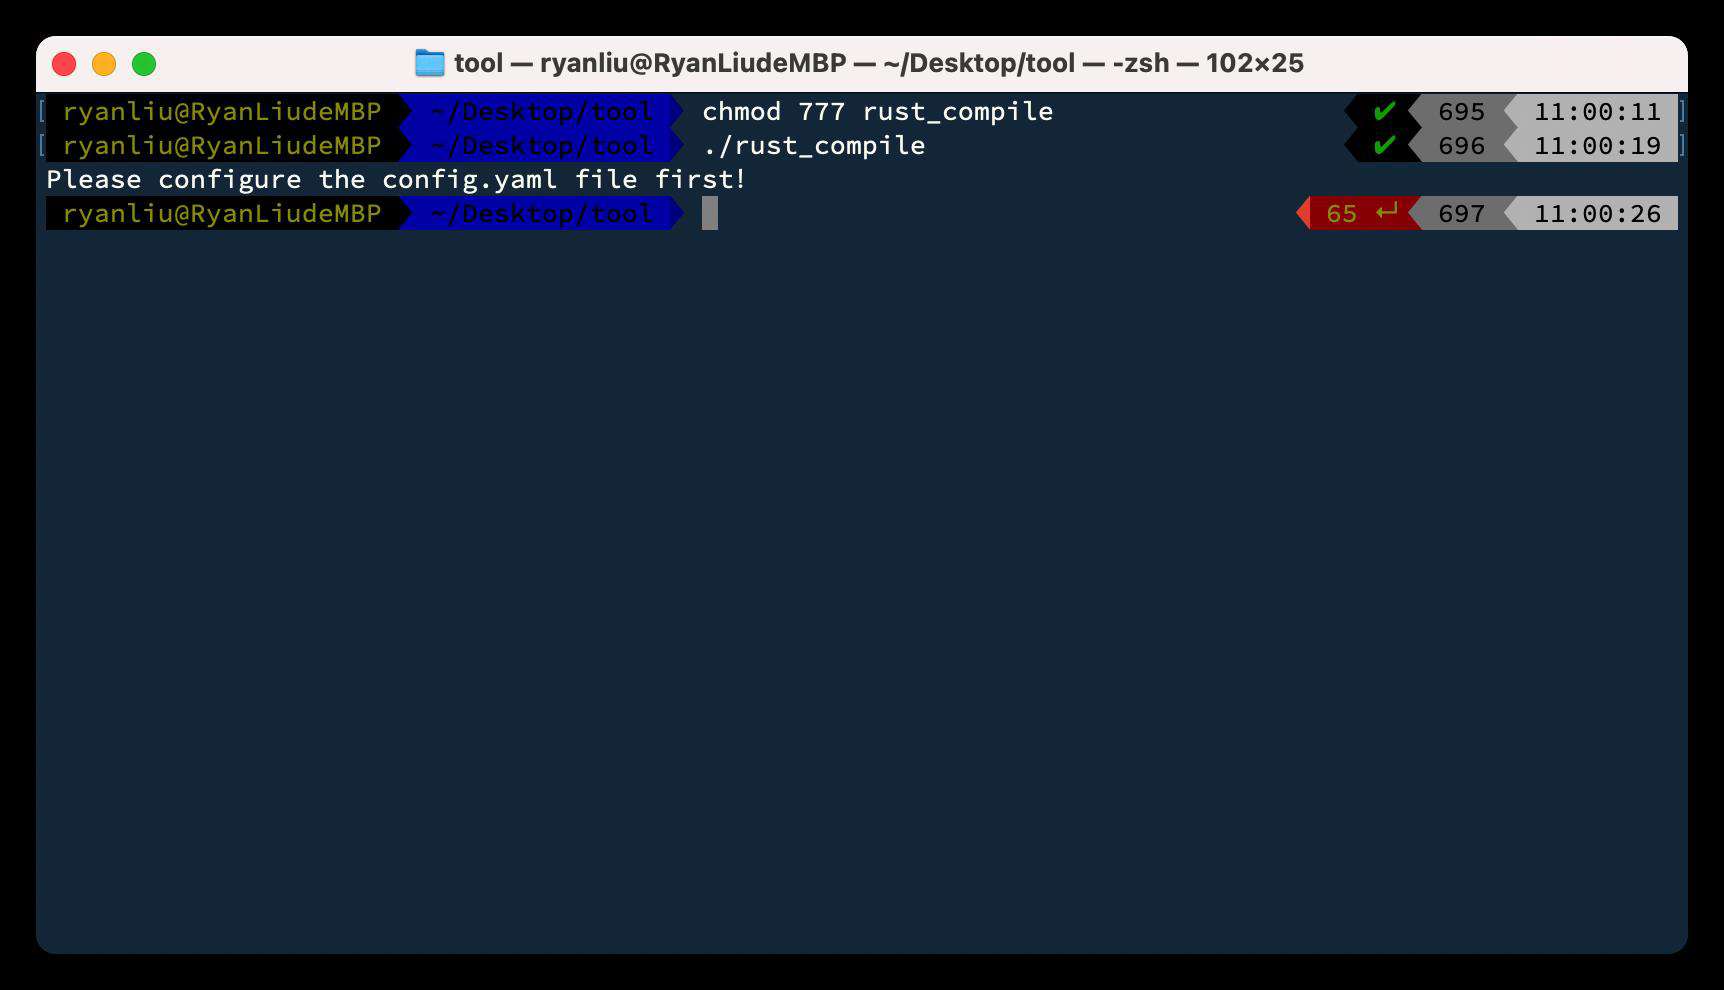
然后打开终端terminal,进入编译器的目录,运行命令chmod 777 rust_compile,以使得编译器有权限可以运行
下一步在终端中运行./rust_compile:
-
运行后会提示配置
config.yaml,如上图所示。打开
config.yaml并配置如下内容:
  # Project path
  projectPath: /Users/ryanliu/Desktop/test/hello #修改成hello的目录
  # Flutter SDK
  flutterSdkPath: /Users/ryanliu/development/flutter #修改当前flutter环境的SDK目录
  # Compile cache path
  buildCachePath: /Users/ryanliu/Desktop/temp/dart_compile_cache #设置一个专门目录保存dart_compile_cache
  # FTP
  #ftpConfig: 192.168.80.141|root|123456  此处可忽略
-
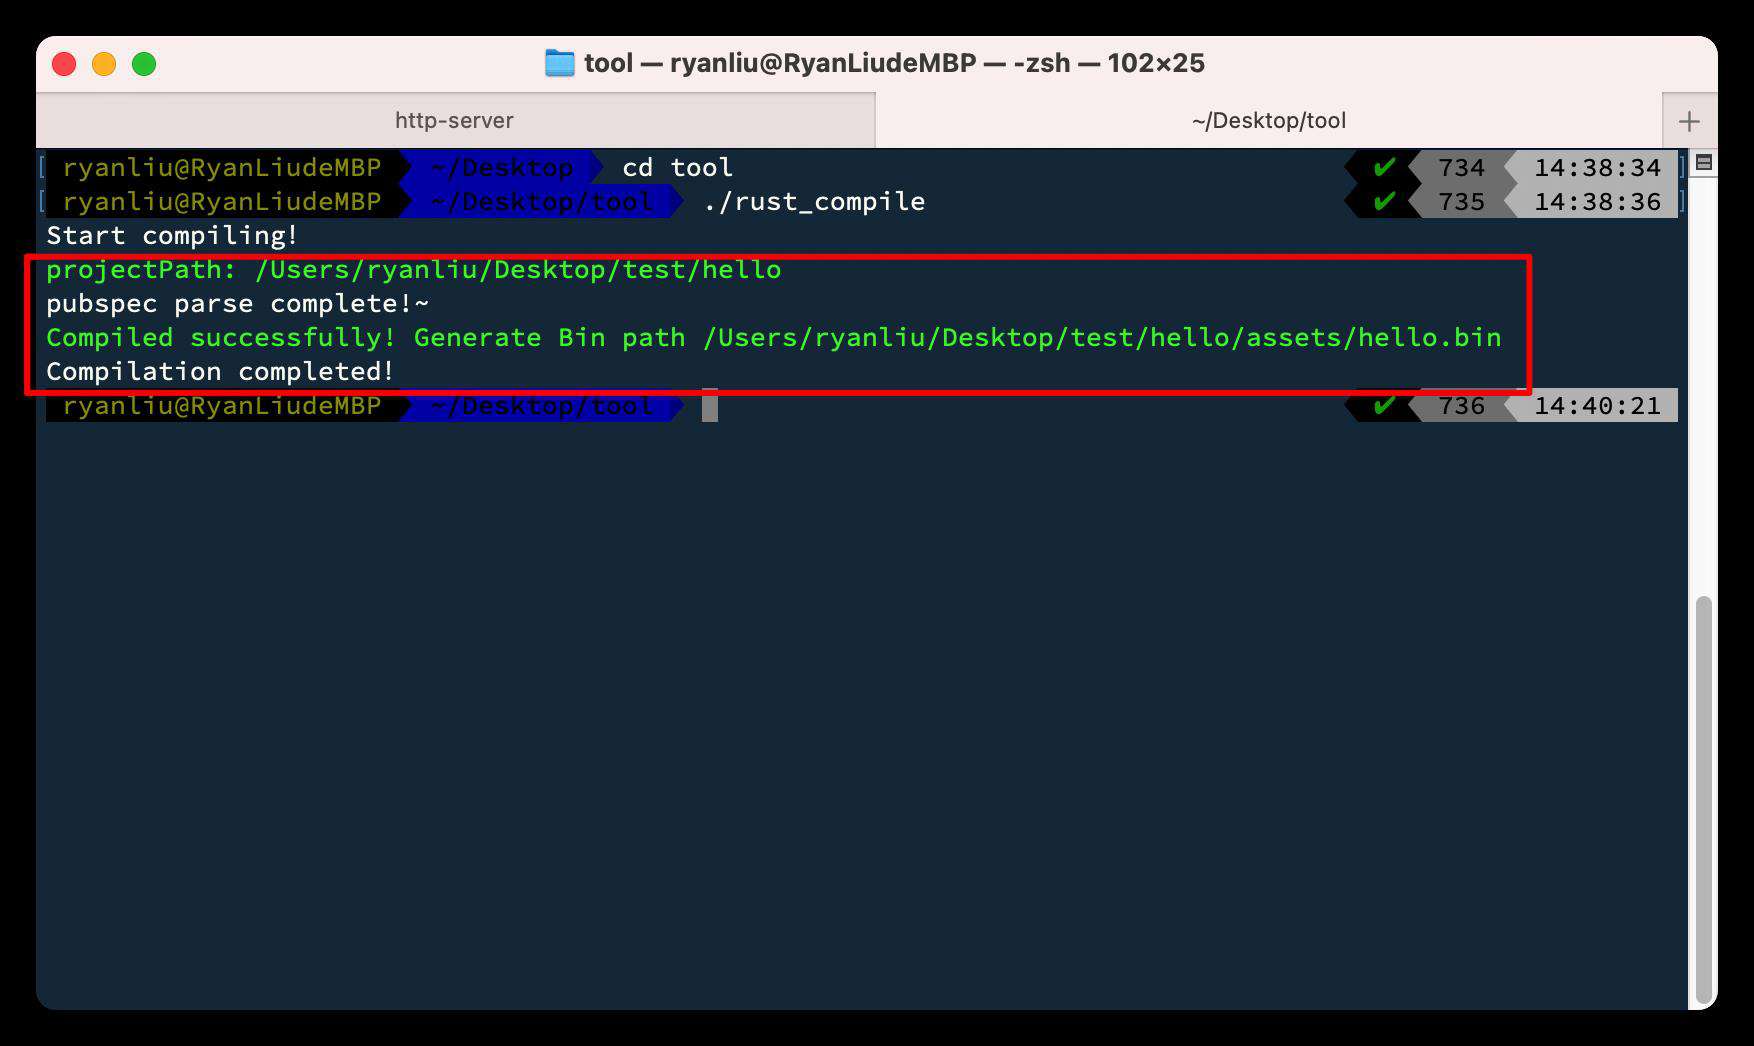
然后在终端中再次运行
./rust_compile执行我们的编译过程。大概2-5分钟的样子,就可以得到下面的画面结果,编译的产物
hello.bin在项目hello/assets/目录下,同时多出了wtbase库目录。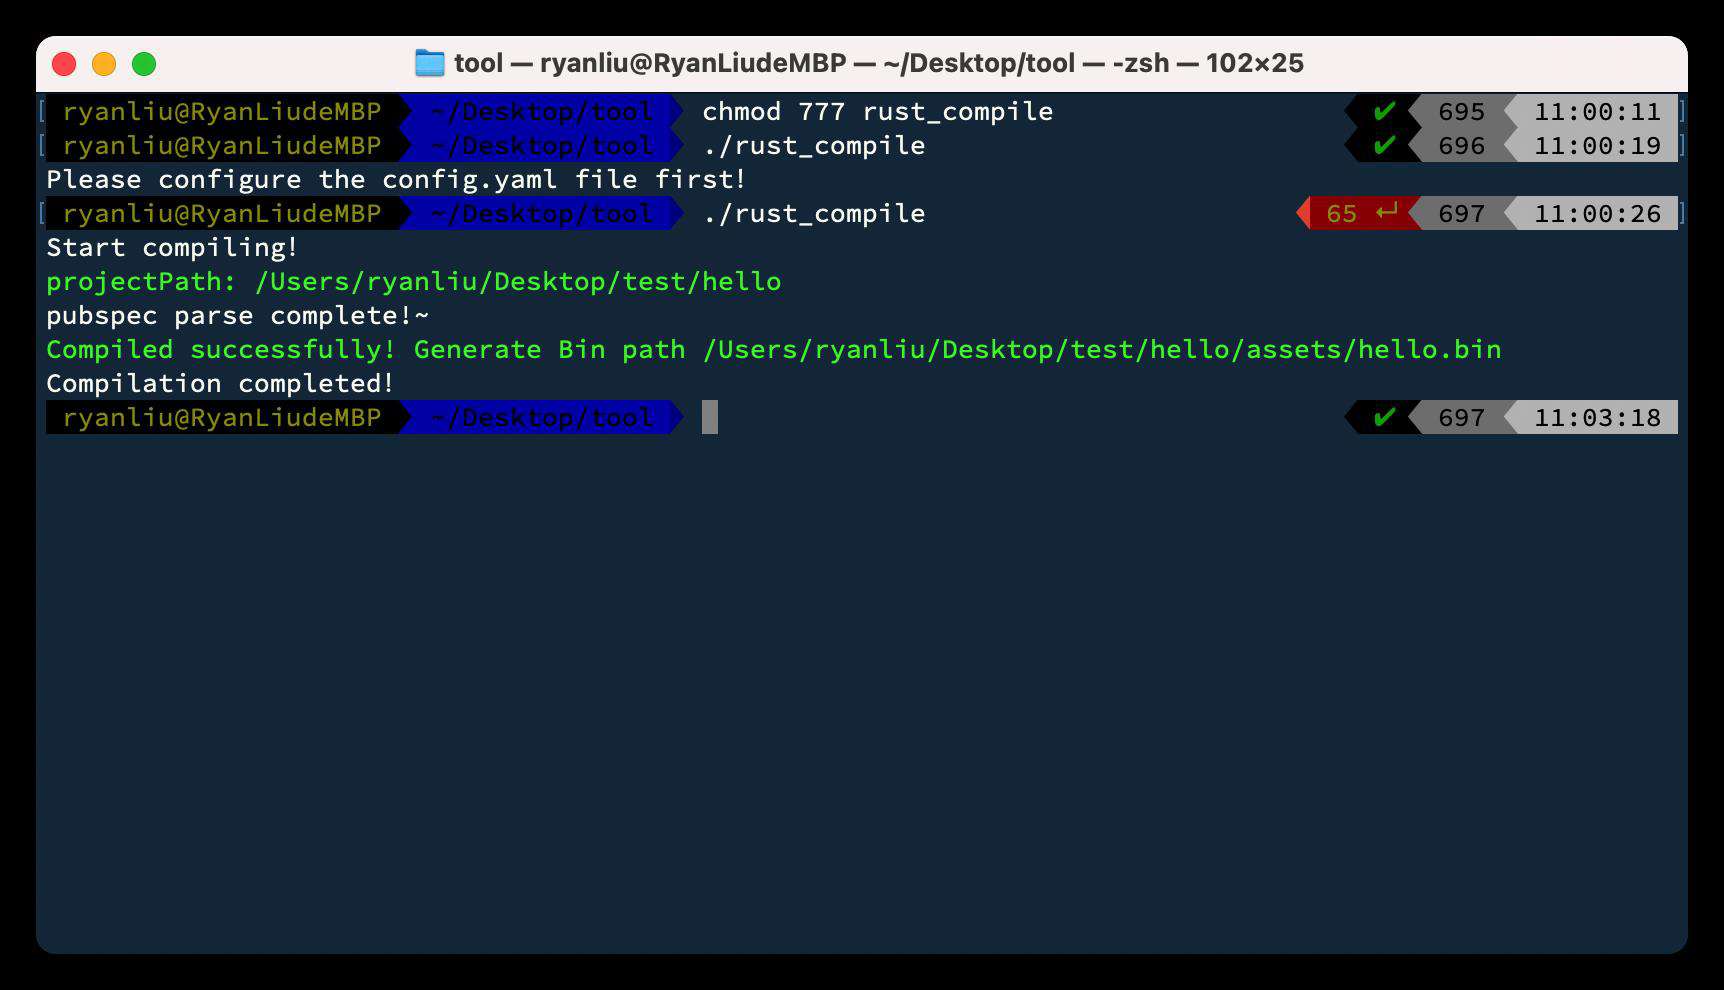
我们可以看到
hello文件夹目录变化为,注意目录里多出了两个新的文件夹assets和wtbase:├── README.md ├── android ├── assets ├── build ├── hello.iml ├── ios ├── lib ├── pubspec.lock ├── pubspec.yaml ├── test └── wtbase -
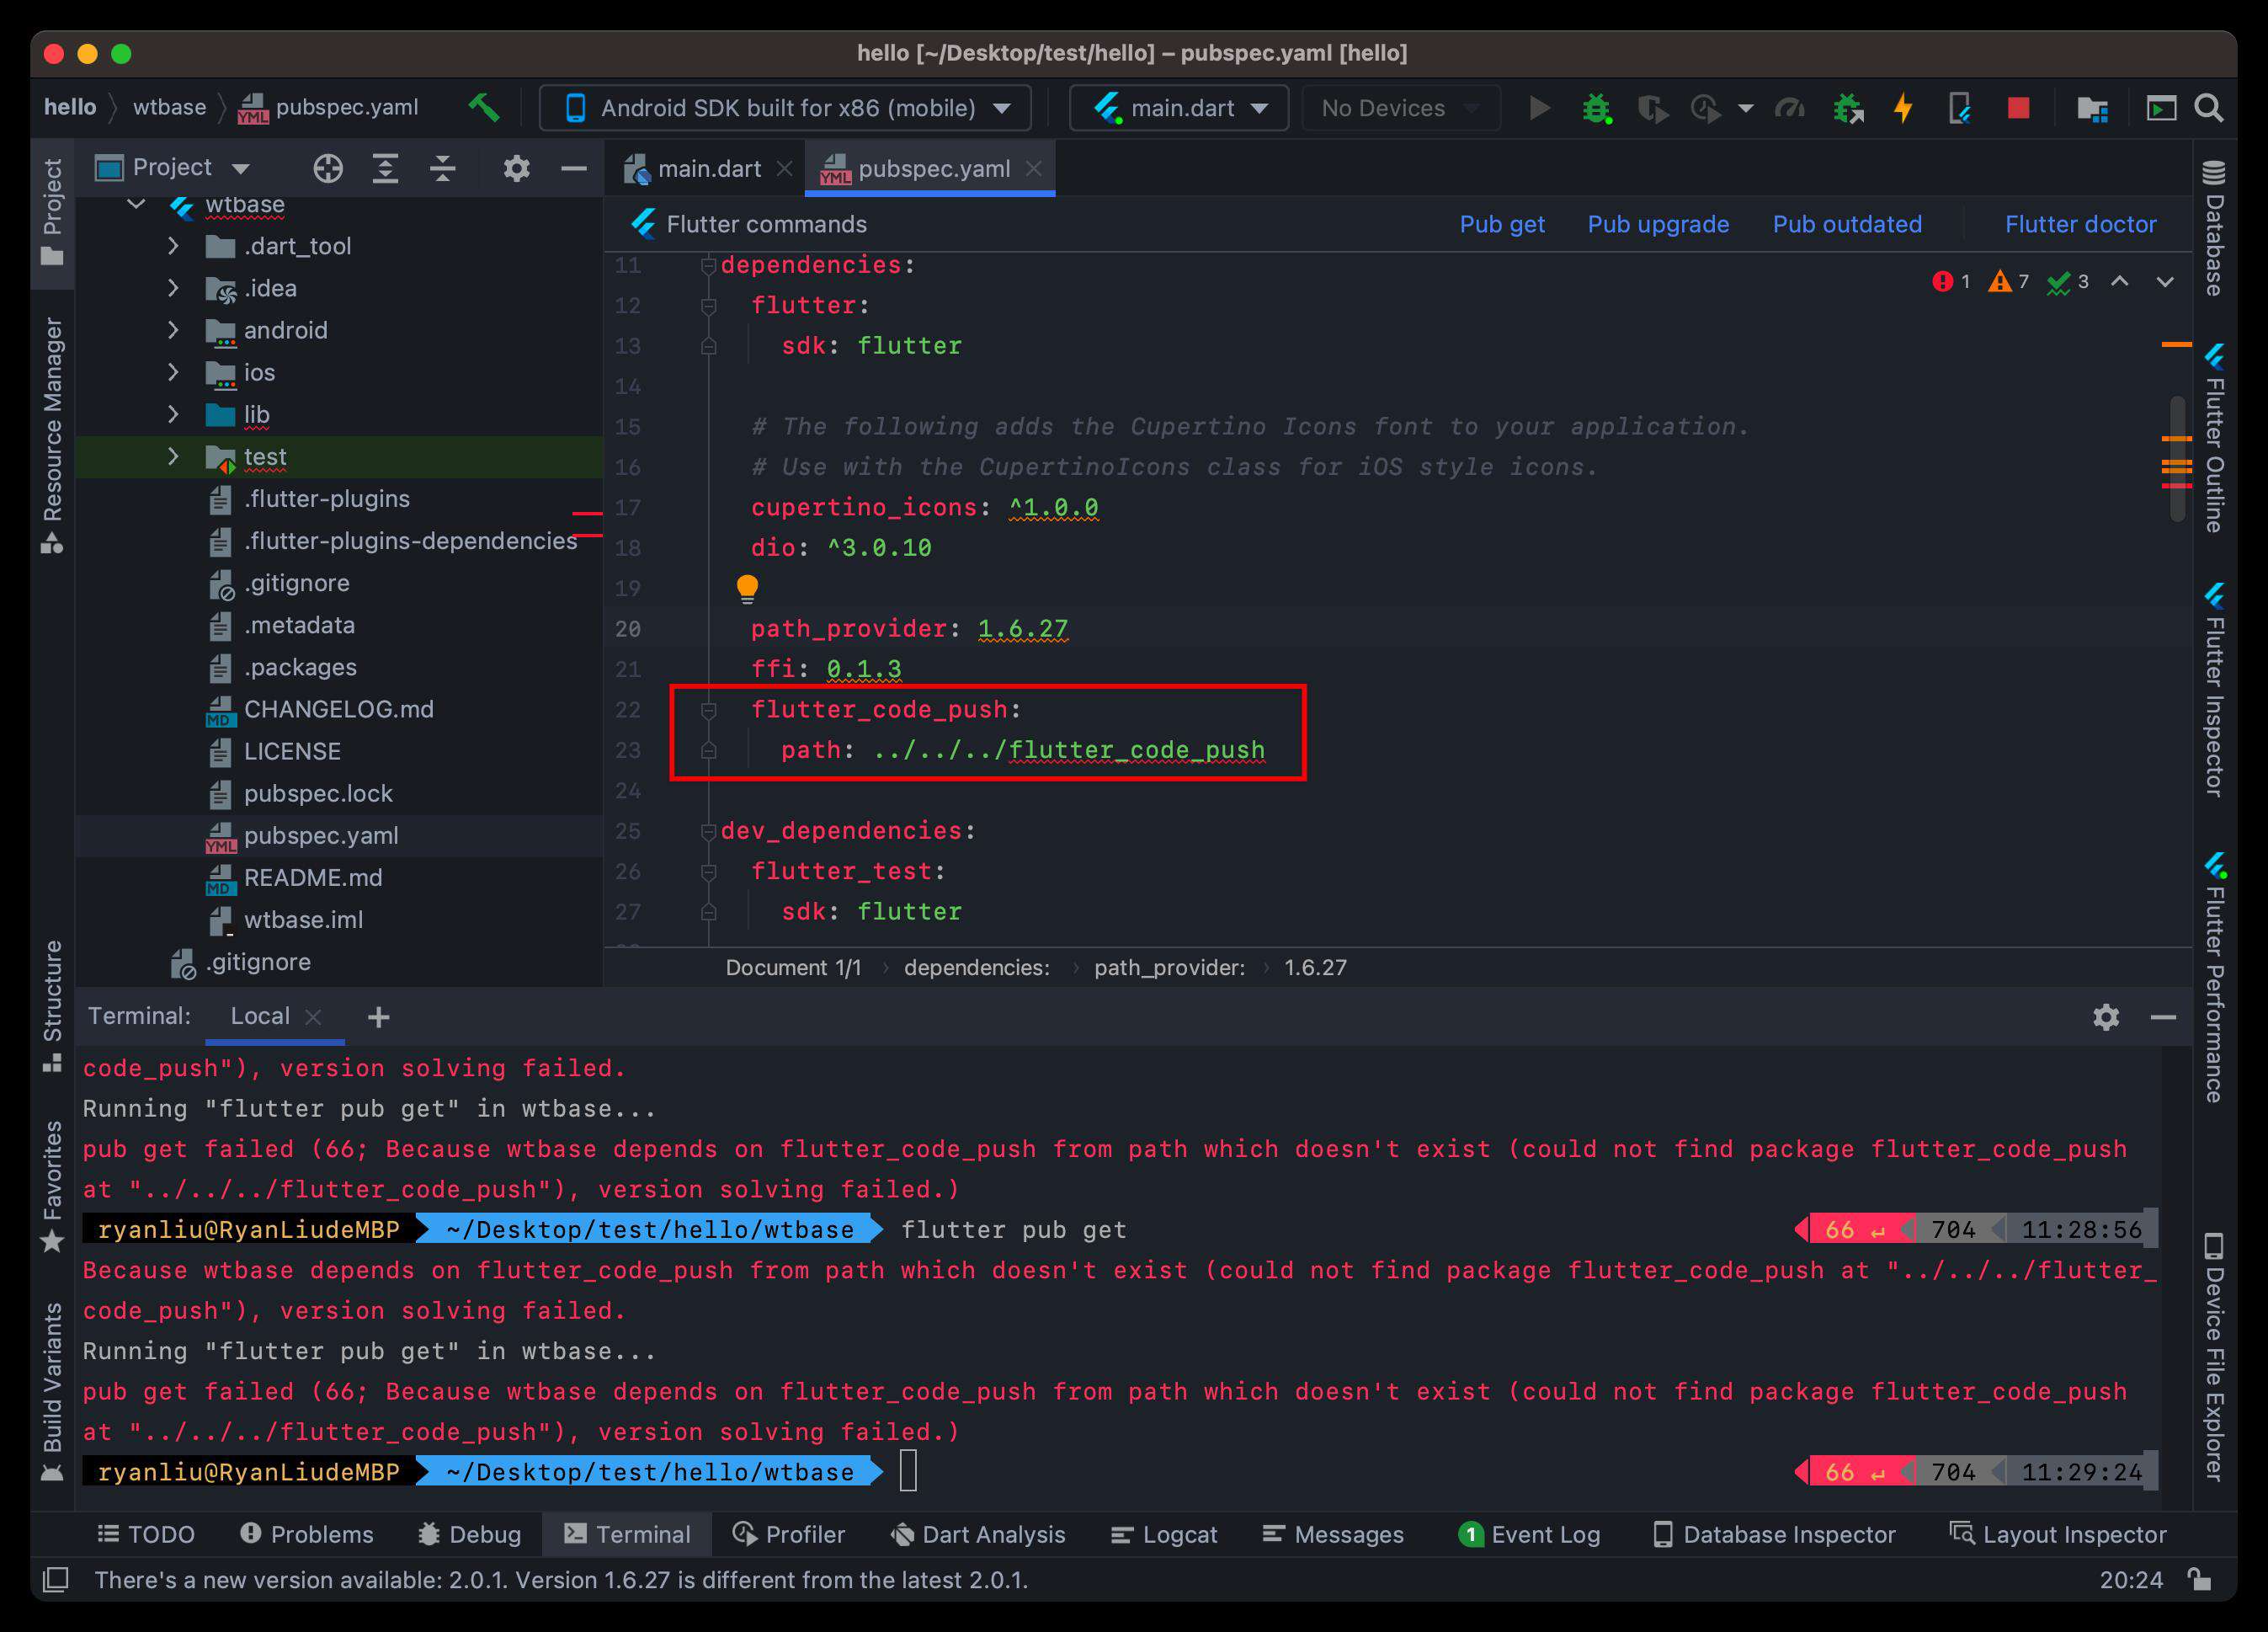
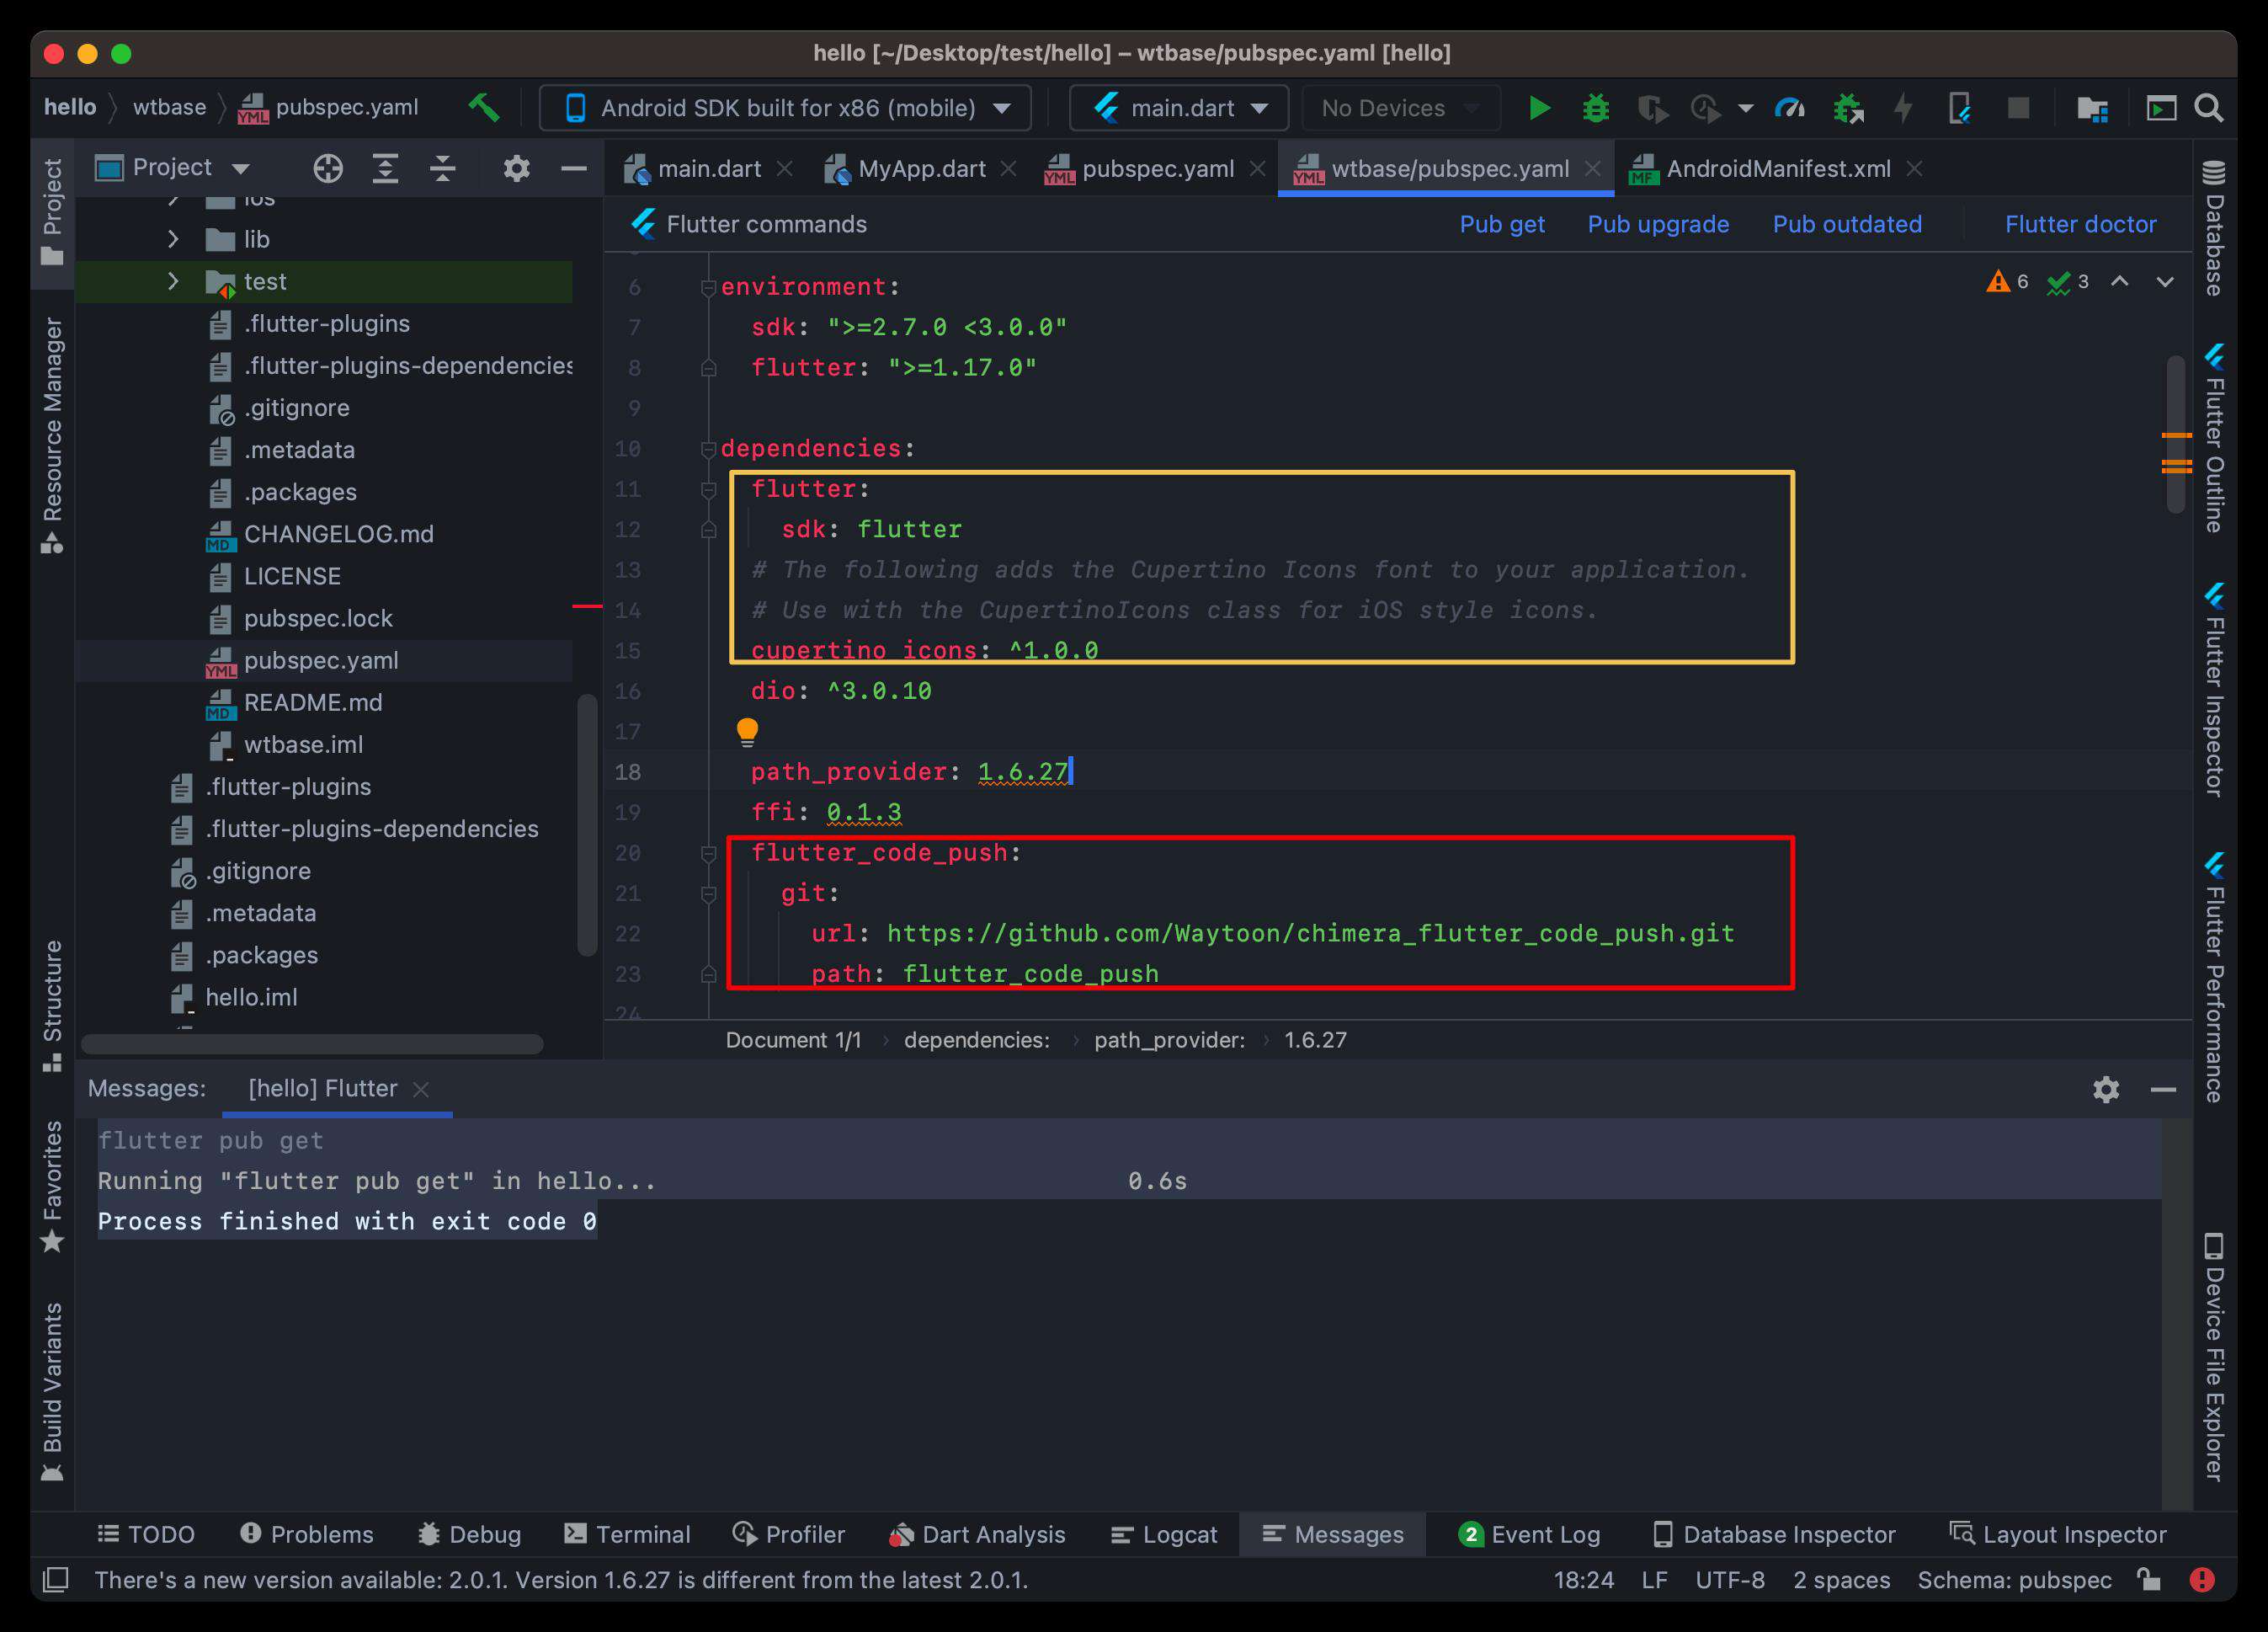
下面这一步非常重要! 配置
wtbase/pubspec.yaml在dependencies修改flutter_code_push的引导路径为以下:
         flutter_code_push:
             git:
               url: https://github.com/Waytoon/chimera_flutter_code_push.git
               path: flutter_code_push
原配置:
修改之后:
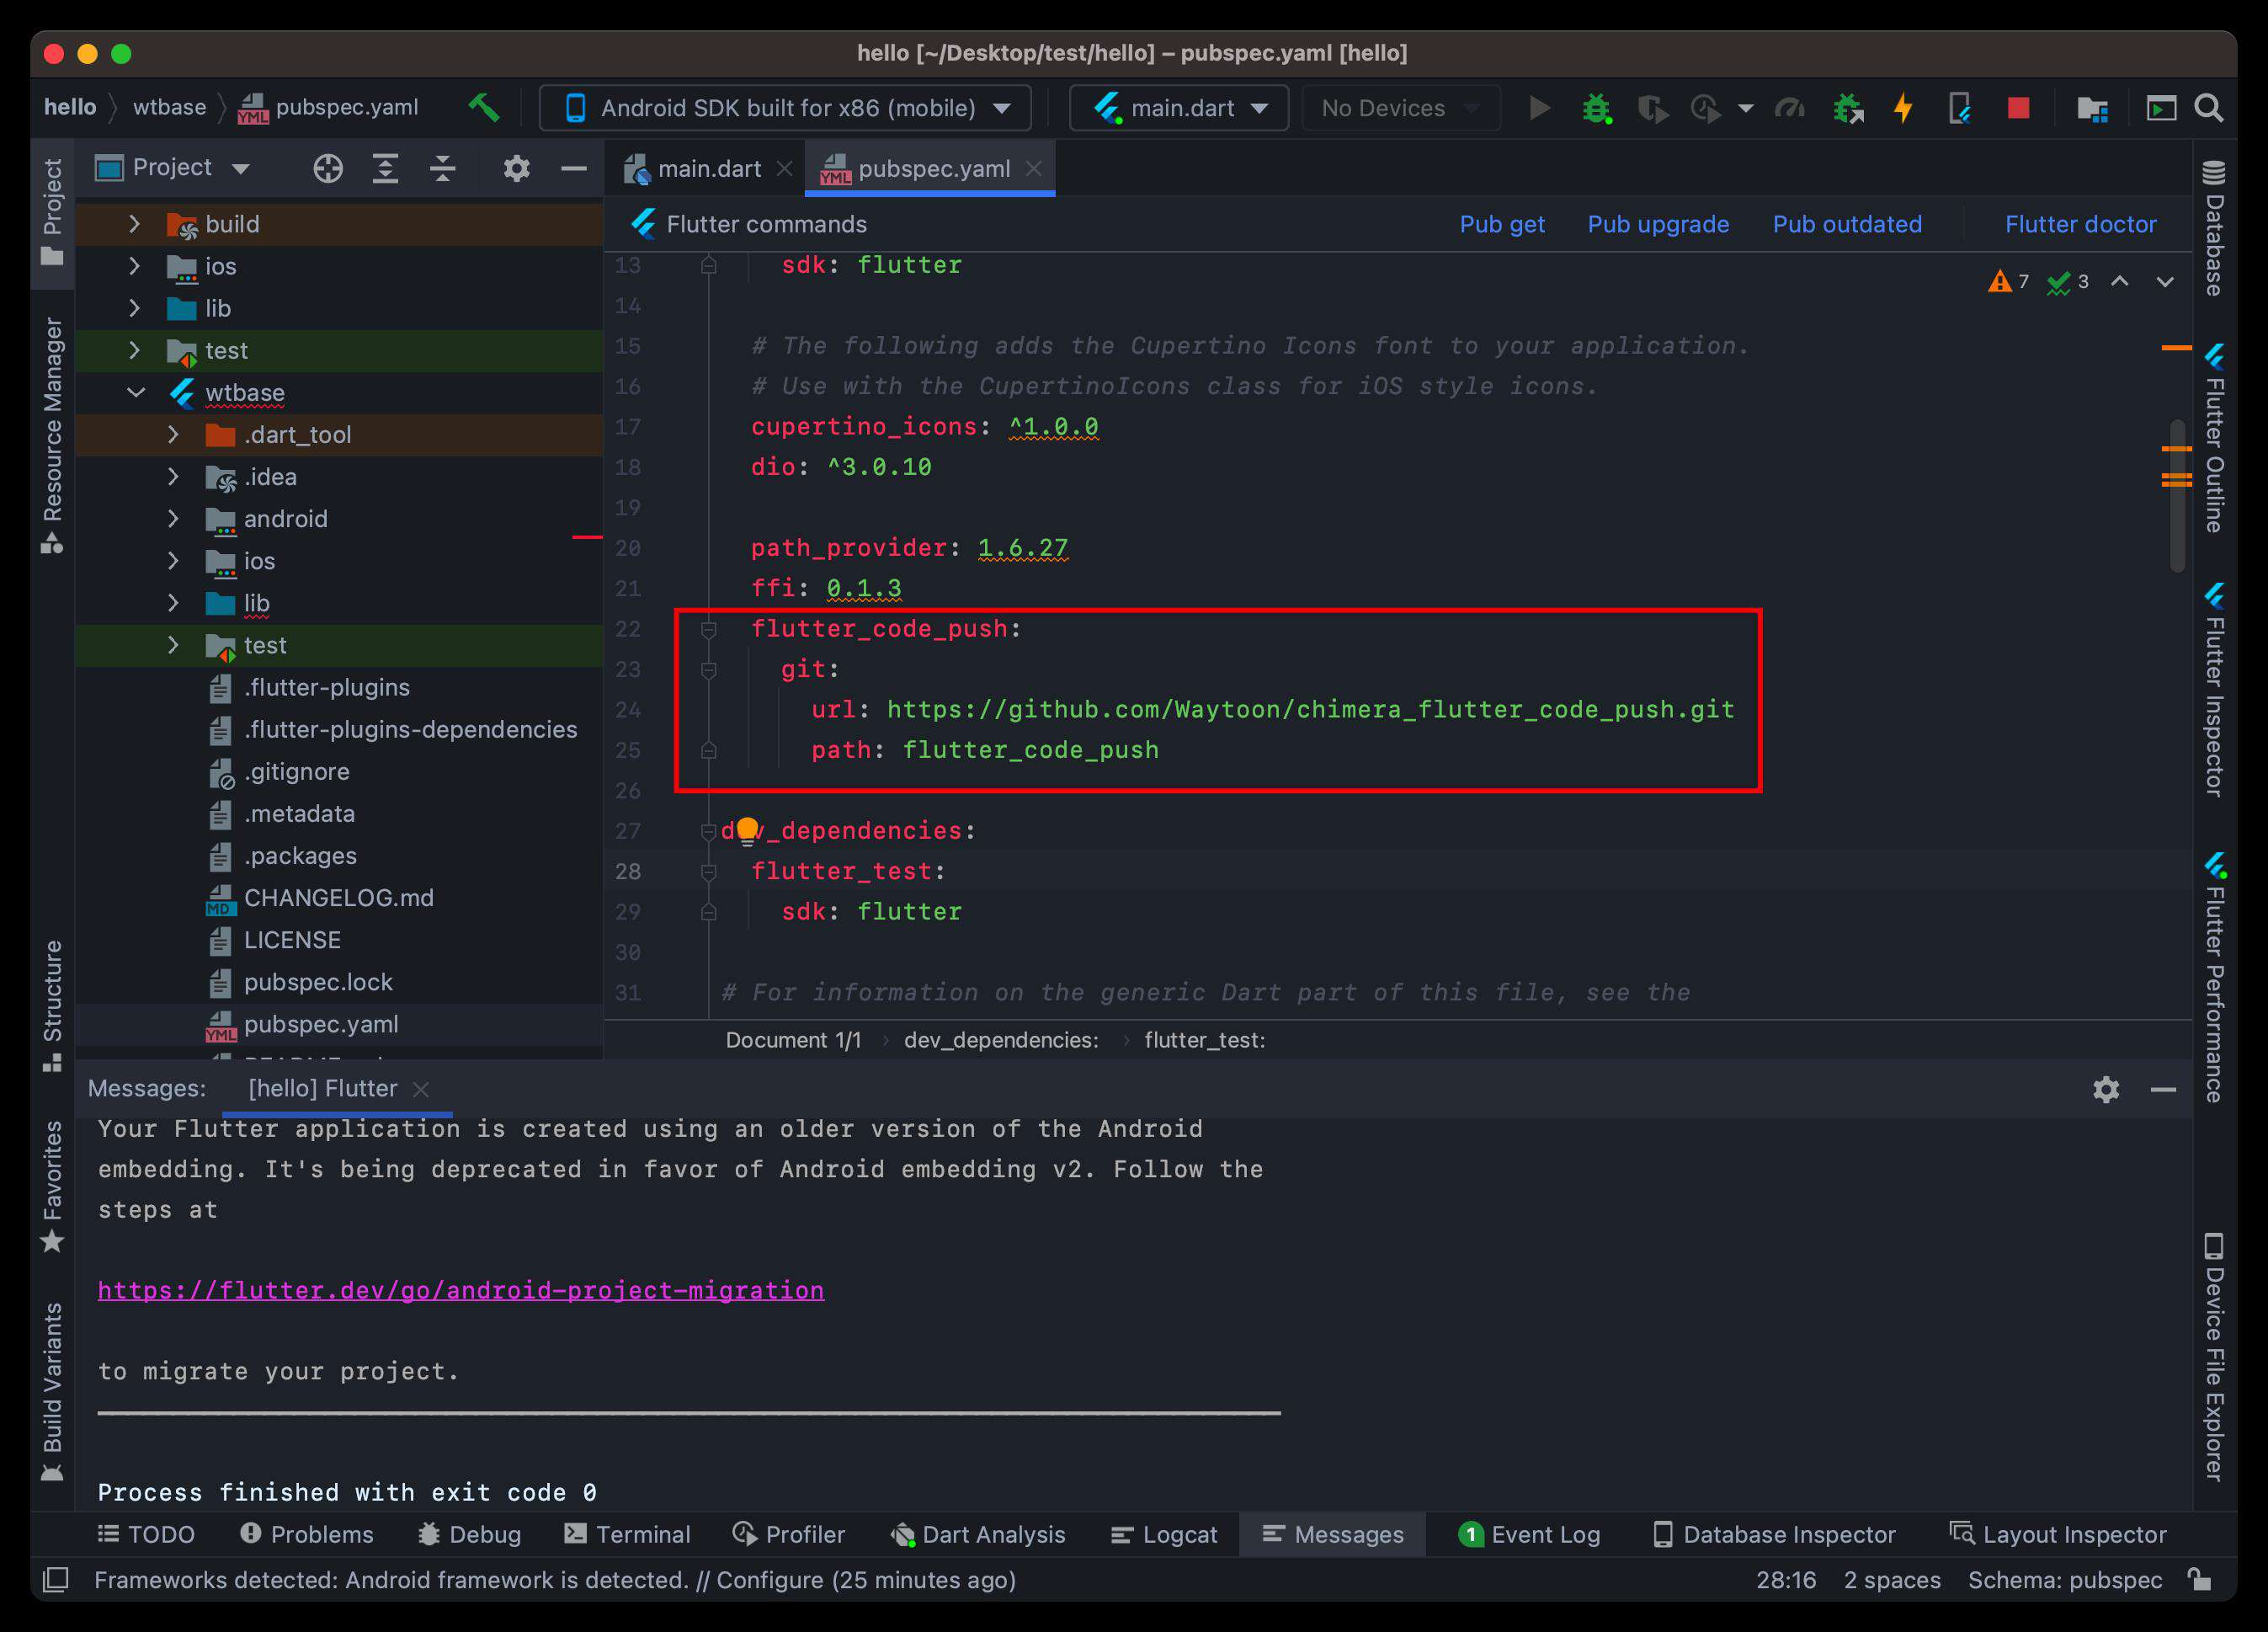
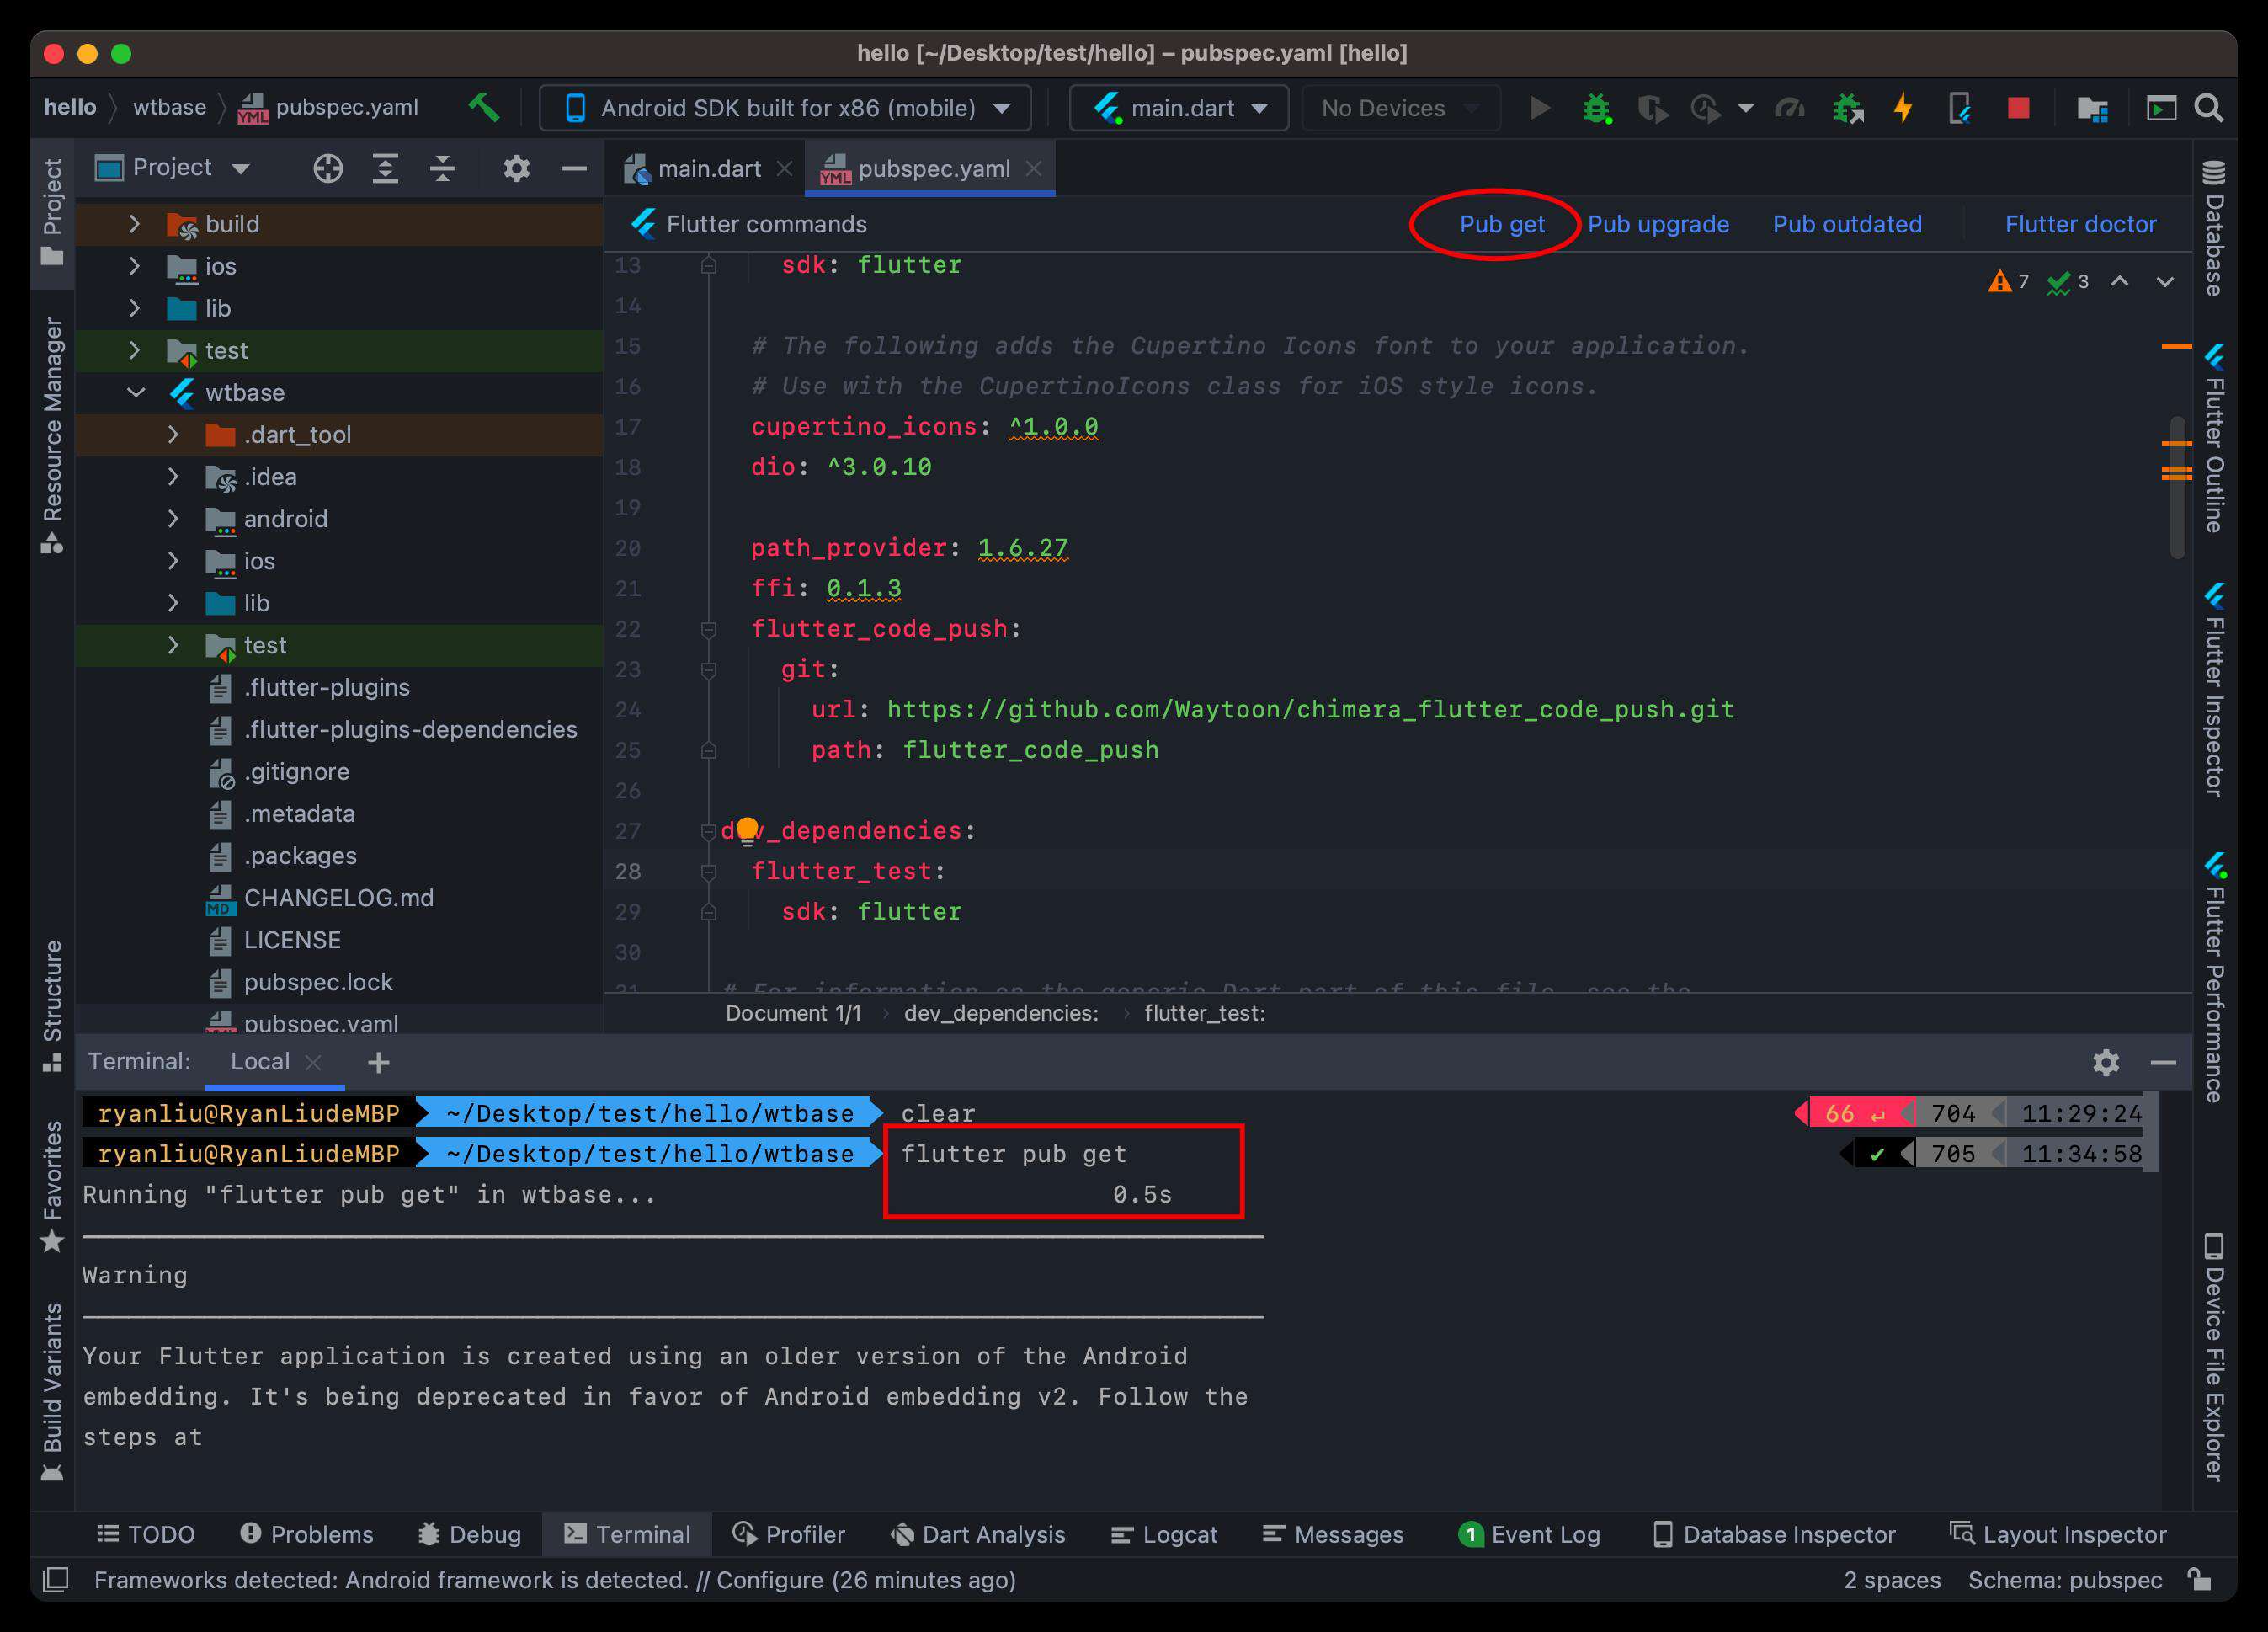
记得点一下上面的pub get,或者在terminal里输入flutter pub get.
- 然后修改
hello/pubspec.yaml,在dependencies添加如下:
wtbase: path: ./wtbase
并将dependencies下的其他依赖库剪切复制到wtbase/pubspec.yaml’的dependencies`下,最终效果如下:
hello/pubspec.yaml:
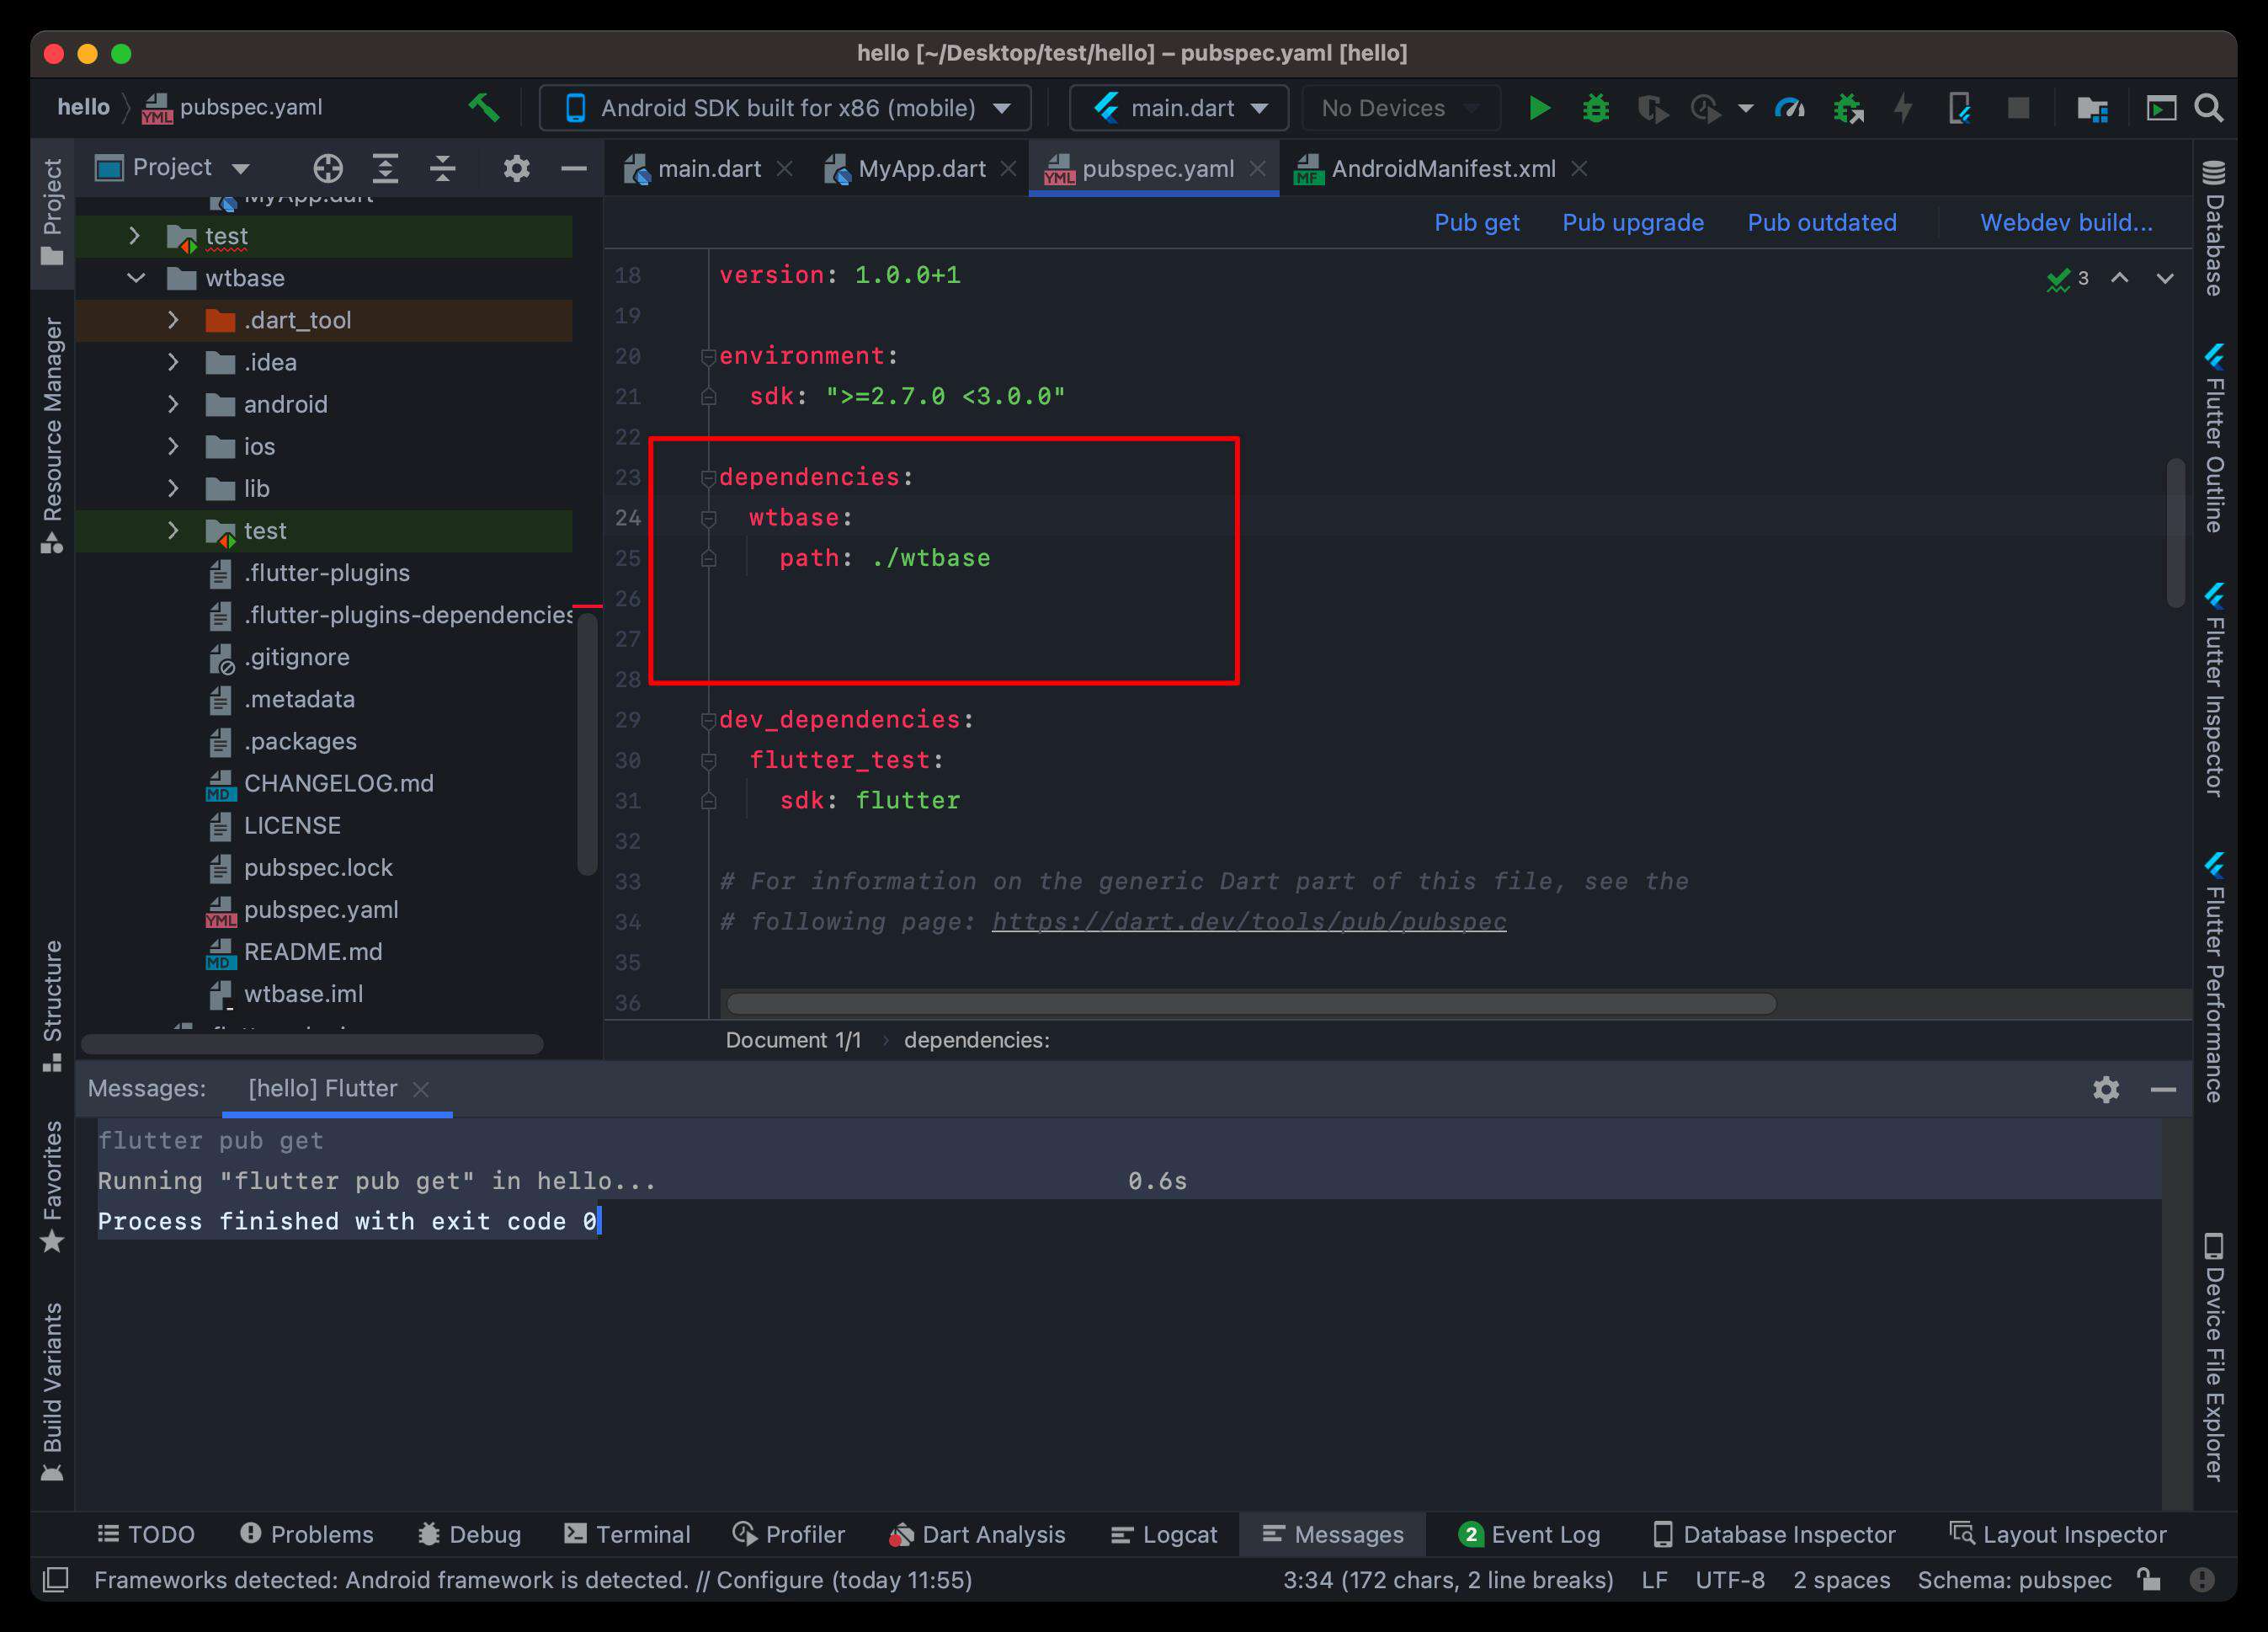
hello/wtbase/pubspec.yaml:
记得运行flutter pub get,或者点击Pub get按钮。
注意事项: 请先运行wtbase目录的Pub get, 然后在运行hello项目的Pub get。这样做的目的是为了保证项目依赖库的版本号保持一致性。
截止到这里,初步的SDK配置工作已经完成,下面我们讲解如何在我们的source code里使用和实现热更新。
- 现在在
hello/lib目录下创建MyApp.dart文件,Source code如下:
import 'package:flutter/material.dart';
            import 'package:dio/dio.dart';

            void initApp() {
              runApp(MyApp());
            }

            class MyApp extends StatelessWidget {
              // This widget is the root of your application.
              @override
              Widget build(BuildContext context) {
                return MaterialApp(
                  title: 'Flutter Demo',
                  theme: ThemeData(
                    // This is the theme of your application.
                    //
                    // Try running your application with "flutter run". You'll see the
                    // application has a blue toolbar. Then, without quitting the app, try
                    // changing the primarySwatch below to Colors.green and then invoke
                    // "hot reload" (press "r" in the console where you ran "flutter run",
                    // or simply save your changes to "hot reload" in a Flutter IDE).
                    // Notice that the counter didn't reset back to zero; the application
                    // is not restarted.
                    primarySwatch: Colors.blue,
                    // This makes the visual density adapt to the platform that you run
                    // the app on. For desktop platforms, the controls will be smaller and
                    // closer together (more dense) than on mobile platforms.
                    visualDensity: VisualDensity.adaptivePlatformDensity,
                  ),
                  home: MyHomePage(title: 'Flutter Demo Home Page'),
                );
              }
            }

            class MyHomePage extends StatefulWidget {
              MyHomePage({Key key, this.title}) : super(key: key);

              // This widget is the home page of your application. It is stateful, meaning
              // that it has a State object (defined below) that contains fields that affect
              // how it looks.

              // This class is the configuration for the state. It holds the values (in this
              // case the title) provided by the parent (in this case the App widget) and
              // used by the build method of the State. Fields in a Widget subclass are
              // always marked "final".

              final String title;

              @override
              _MyHomePageState createState() => _MyHomePageState();
            }

            class _MyHomePageState extends State<MyHomePage> {
              int _counter = 0;
              String _response;

              void _incrementCounter() {
                setState(() {
                  // This call to setState tells the Flutter framework that something has
                  // changed in this State, which causes it to rerun the build method below
                  // so that the display can reflect the updated values. If we changed
                  // _counter without calling setState(), then the build method would not be
                  // called again, and so nothing would appear to happen.
                  _counter++;
                });
              }

              void _getHttp() async {
                try {
                  Response response = await Dio().get("http://www.google.com");
                  setState(() {
                    String temp = '$response';
                    for (var i = 0; i < 10; ++i) {
                      temp = '$i' + temp;
                    }
                    _response = temp.substring(0, 100);
                  });
                } catch (e) {
                  print(e);
                }
              }


              @override
              void initState() {
                _getHttp();
                super.initState();
              }

              @override
              Widget build(BuildContext context) {
                // This method is rerun every time setState is called, for instance as done
                // by the _incrementCounter method above.
                //
                // The Flutter framework has been optimized to make rerunning build methods
                // fast, so that you can just rebuild anything that needs updating rather
                // than having to individually change instances of widgets.
                return Scaffold(
                  appBar: AppBar(
                    // Here we take the value from the MyHomePage object that was created by
                    // the App.build method, and use it to set our appbar title.
                    title: Text(widget.title),
                  ),
                  body: Center(
                    // Center is a layout widget. It takes a single child and positions it
                    // in the middle of the parent.
                    child: Column(
                      // Column is also a layout widget. It takes a list of children and
                      // arranges them vertically. By default, it sizes itself to fit its
                      // children horizontally, and tries to be as tall as its parent.
                      //
                      // Invoke "debug painting" (press "p" in the console, choose the
                      // "Toggle Debug Paint" action from the Flutter Inspector in Android
                      // Studio, or the "Toggle Debug Paint" command in Visual Studio Code)
                      // to see the wireframe for each widget.
                      //
                      // Column has various properties to control how it sizes itself and
                      // how it positions its children. Here we use mainAxisAlignment to
                      // center the children vertically; the main axis here is the vertical
                      // axis because Columns are vertical (the cross axis would be
                      // horizontal).
                      mainAxisAlignment: MainAxisAlignment.center,
                      children: <Widget>[
                        Text(
                          'You have pushed the button this many times:',
                        ),
                        Text(
                          '$_counter',
                          style: Theme.of(context).textTheme.headline4,
                        ),
                        Text(
                       'Server Response:\n$_response'
                        )
                   ],
                    ),
               ),
                  floatingActionButton: FloatingActionButton(
                    onPressed: _incrementCounter,
                    tooltip: 'Increment',
                    child: Icon(Icons.add),
                  ), // This trailing comma makes auto-formatting nicer for build methods.
                );
              }
            }
添加完这个文件后,记得运行flutter pub get一下,确保依赖正确导入。
然后我们修改main.dart文件如下:
        ```dart
        import 'package:hello/MyApp.dart';
        import 'package:wtbase/wtbase.dart';
        import 'package:flutter/material.dart';

        void main() async {
          WidgetsFlutterBinding.ensureInitialized();

          bool isNative = false;
          if (isNative) {
            initApp();
          } else {
            String downloadUrl = "http://yourlocalhost/hello.bin";
            readCode = WTAnalysisReadCode();
            await readCode.loadFile(downloadUrl);
            readCode.executeMethod(
                'package:hello/MyApp.dart', 'initApp');
          }
        }
        ```
另一个至关重要的步骤:
打开终端terminal,进入hello/assets目录:
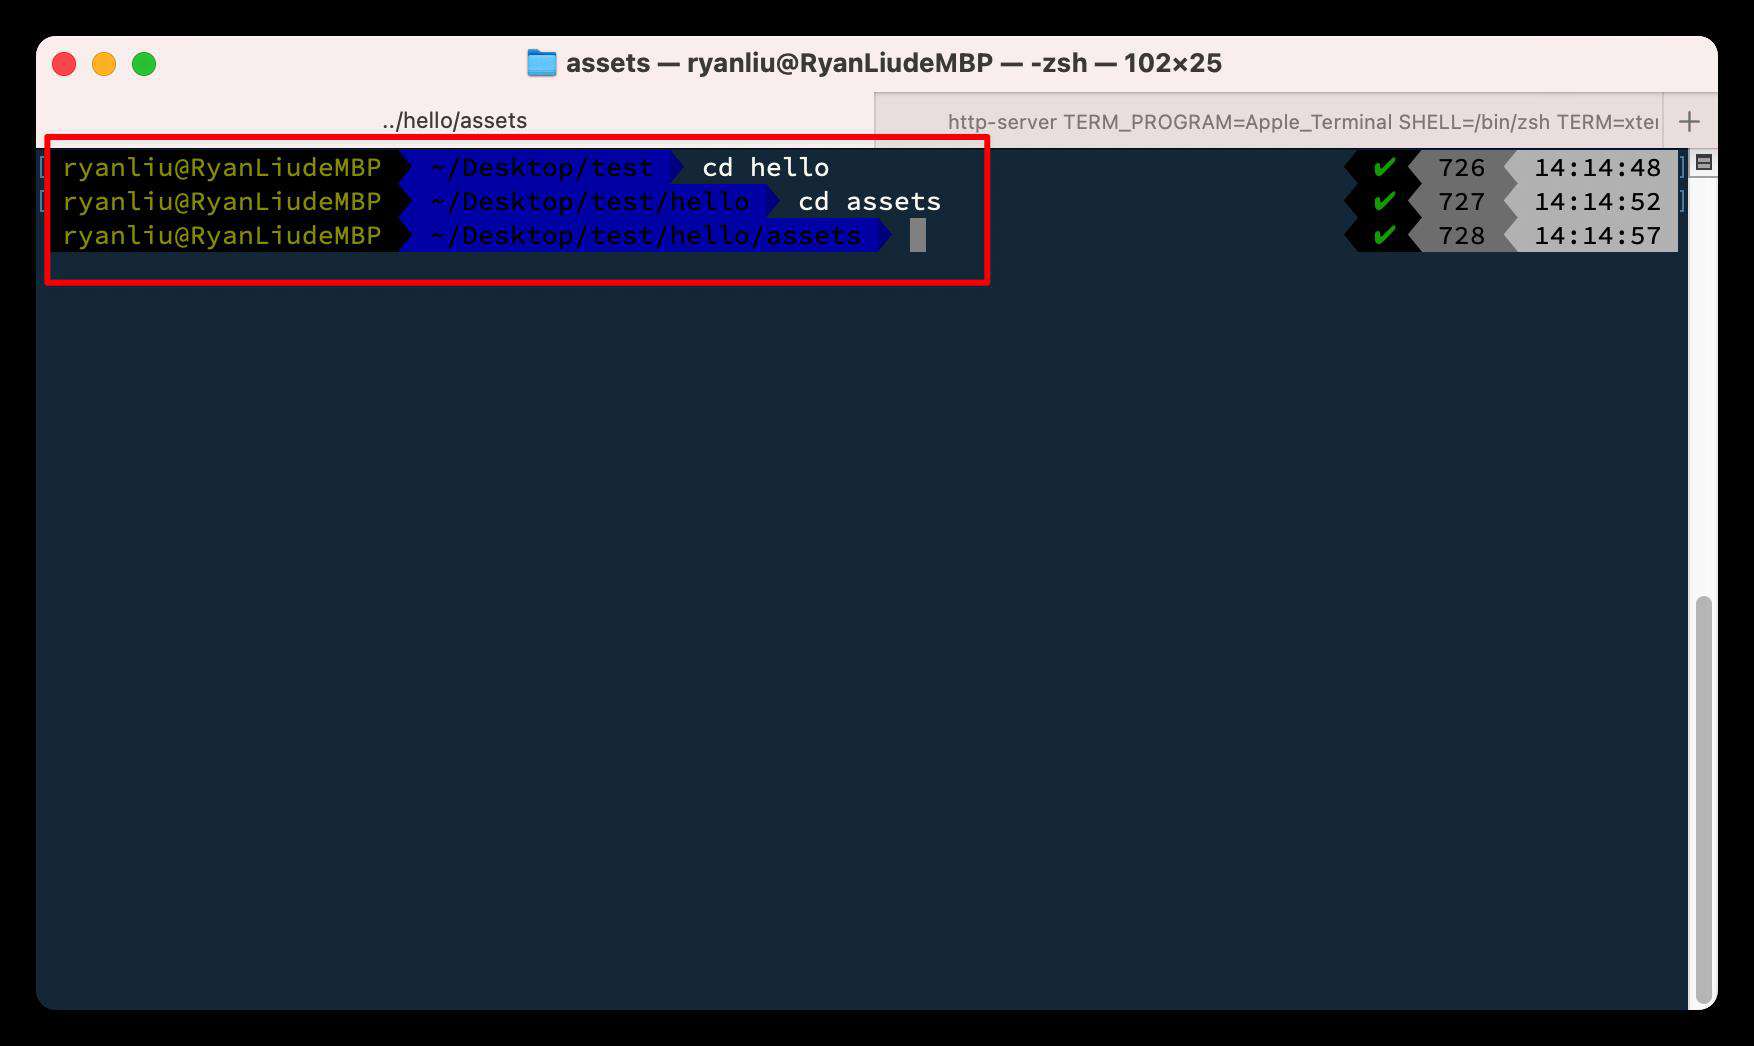
然后在terminal输入:http-server -c -1
结果如下:
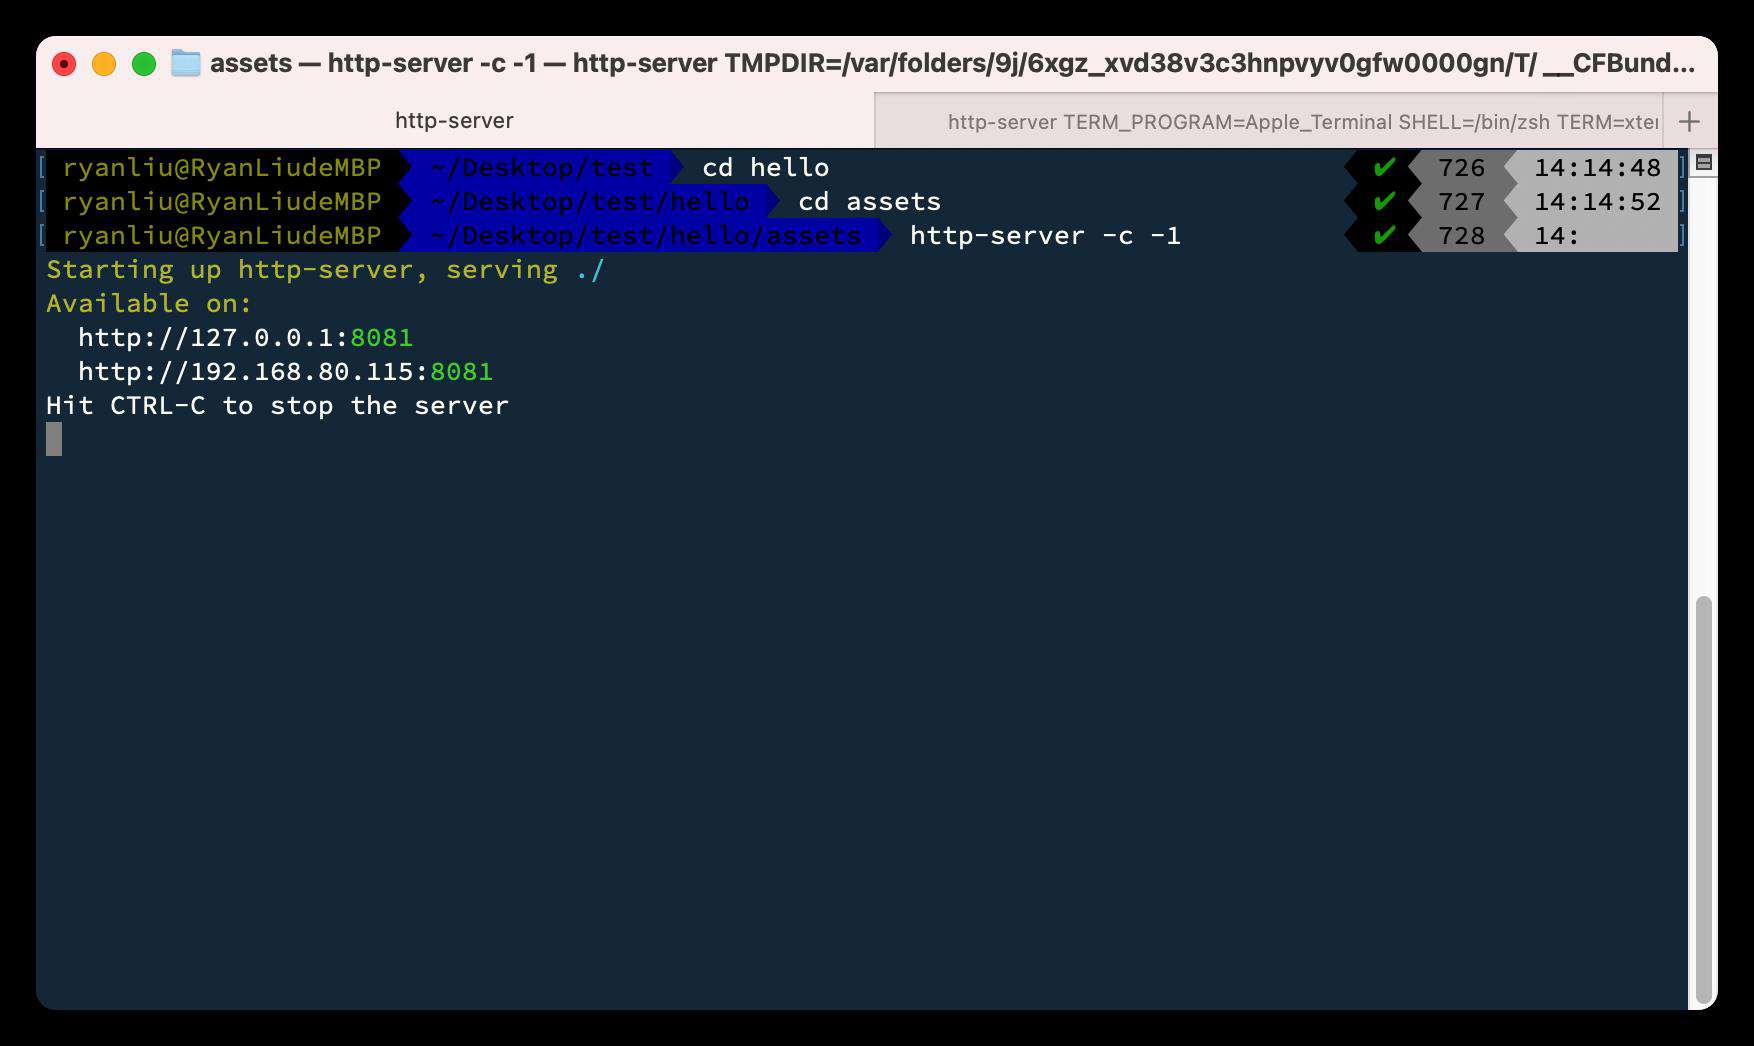
复制http-server下面的链接,我的是http://192.168.80.115:8080,用来修改main.dart里的
String downloadUrl = "http://yourlocalhost/hello.bin";
修改成:
String downloadUrl = "http://192.168.80.115:8080/hello.bin";
到此为止整个的接入过程已经告一段落了。
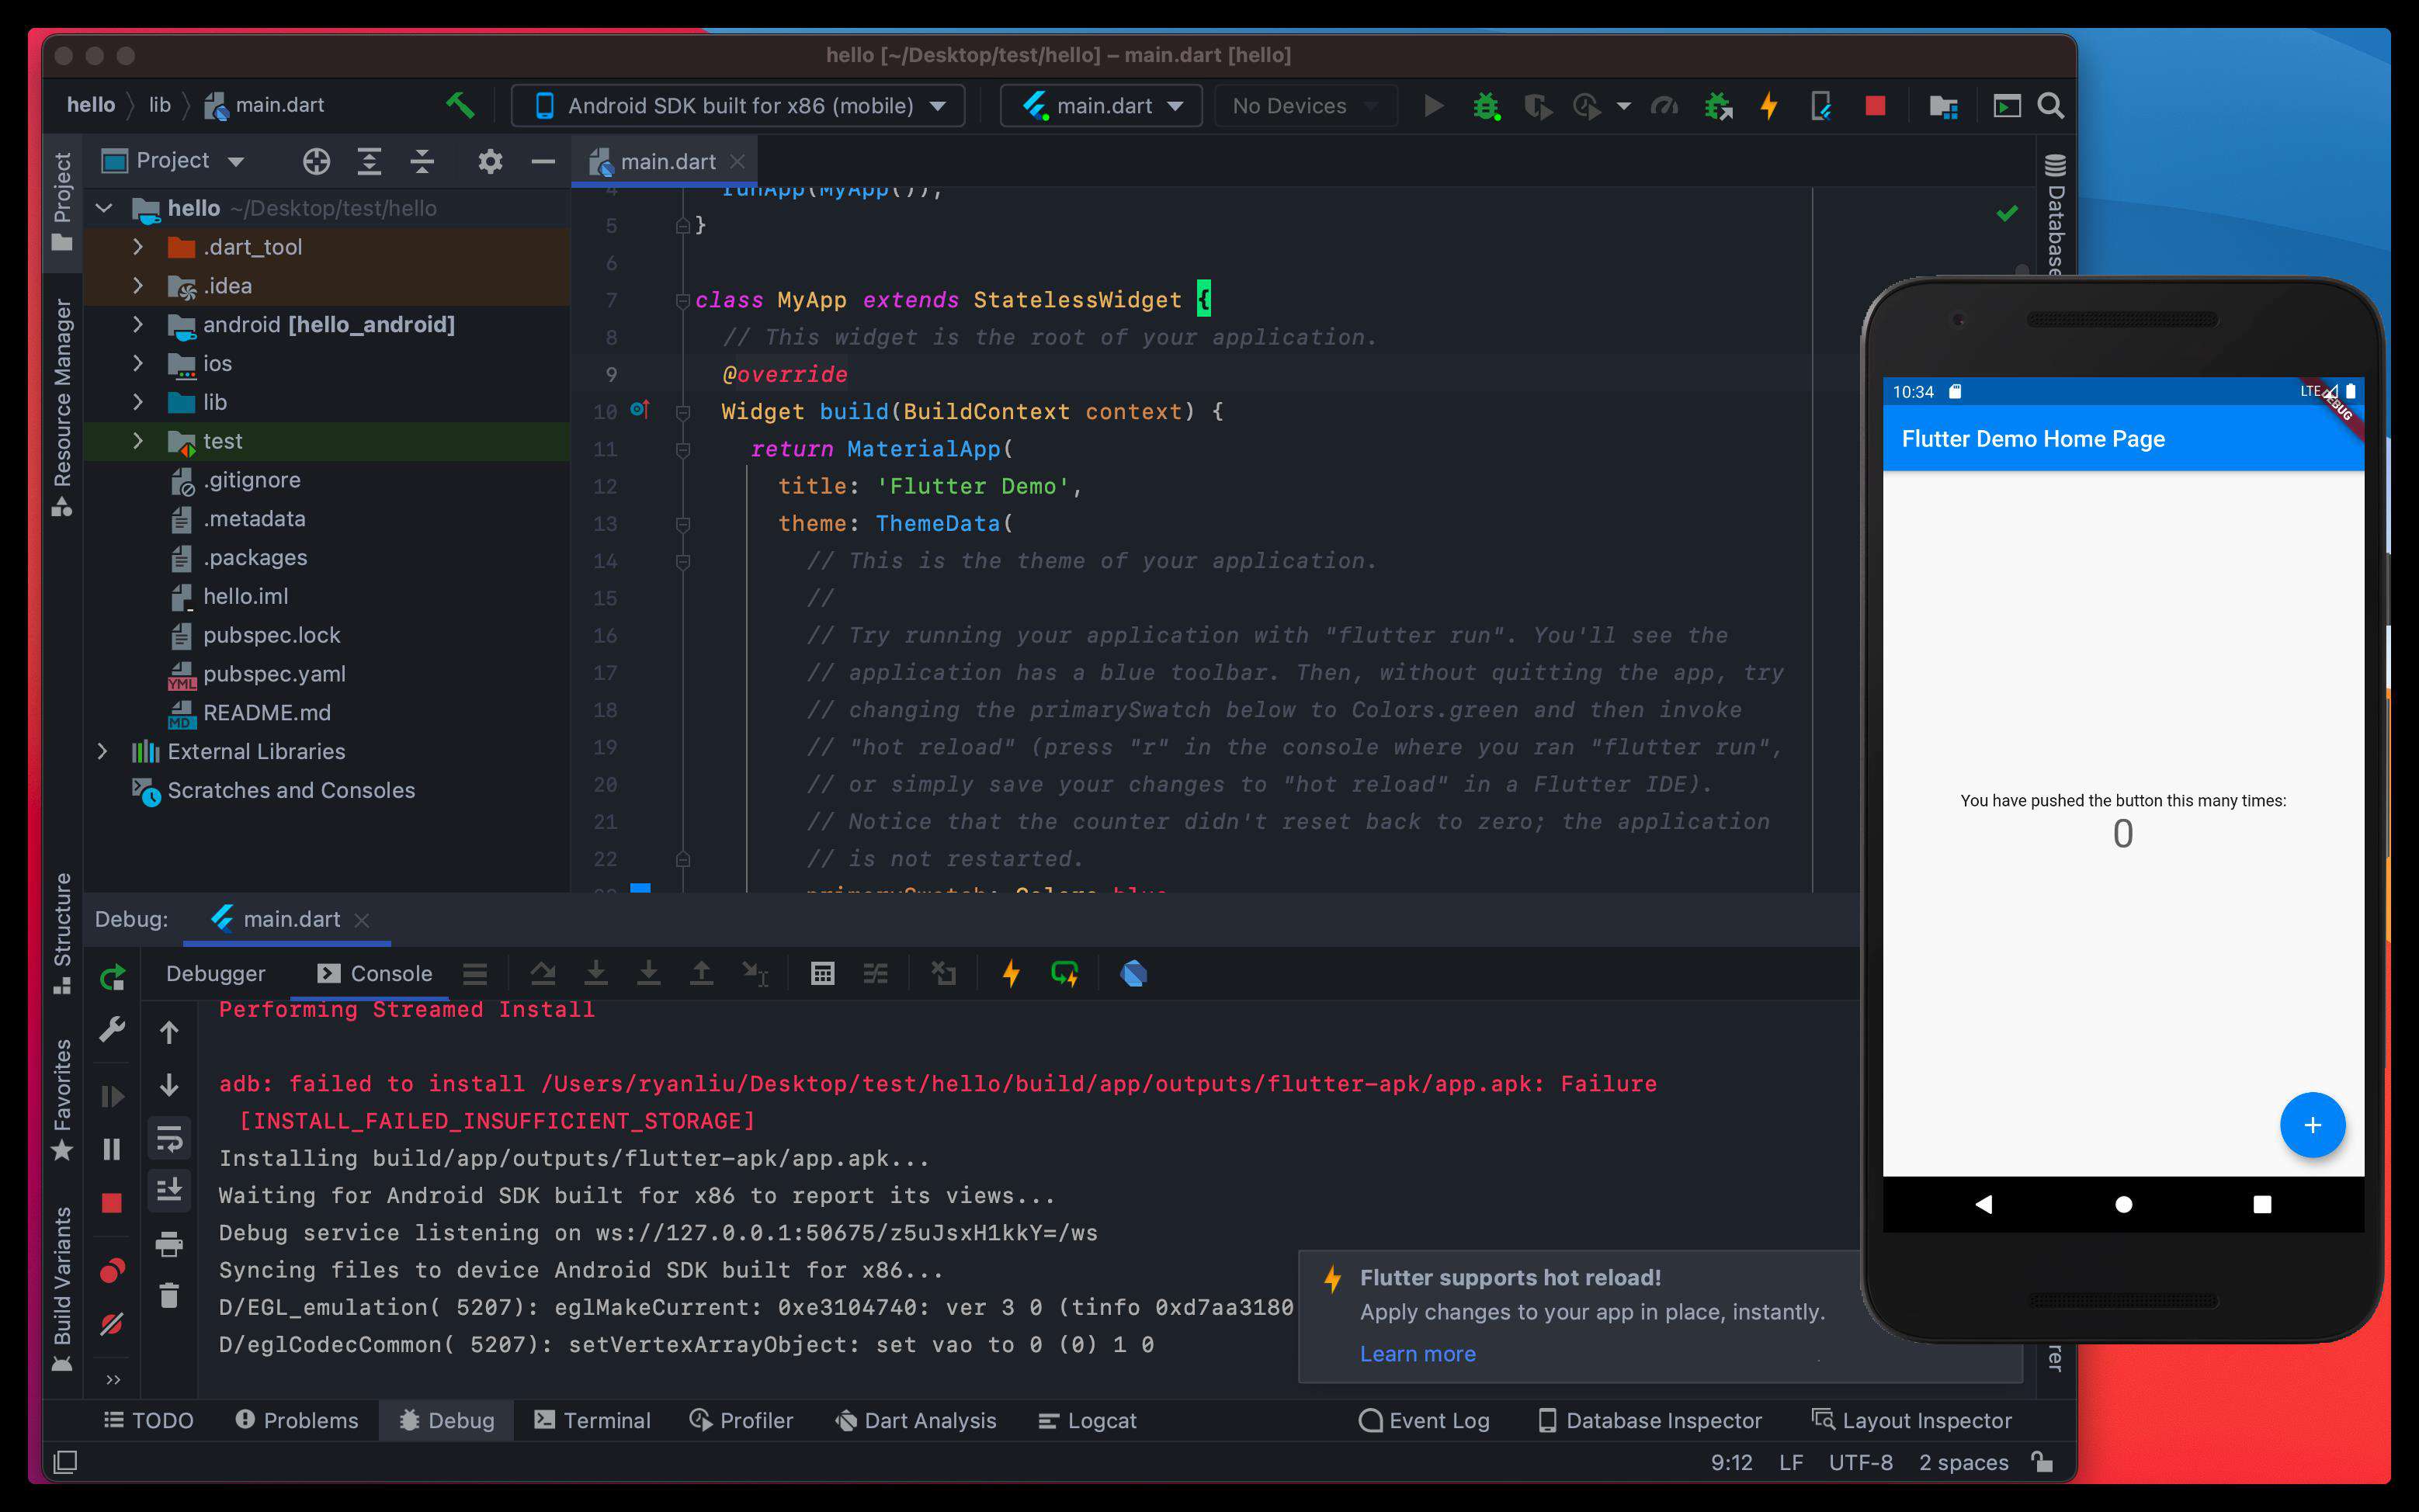
- 下面的事情就是从IDE运行一下你的APP,方法就是点击那个绿虫子。
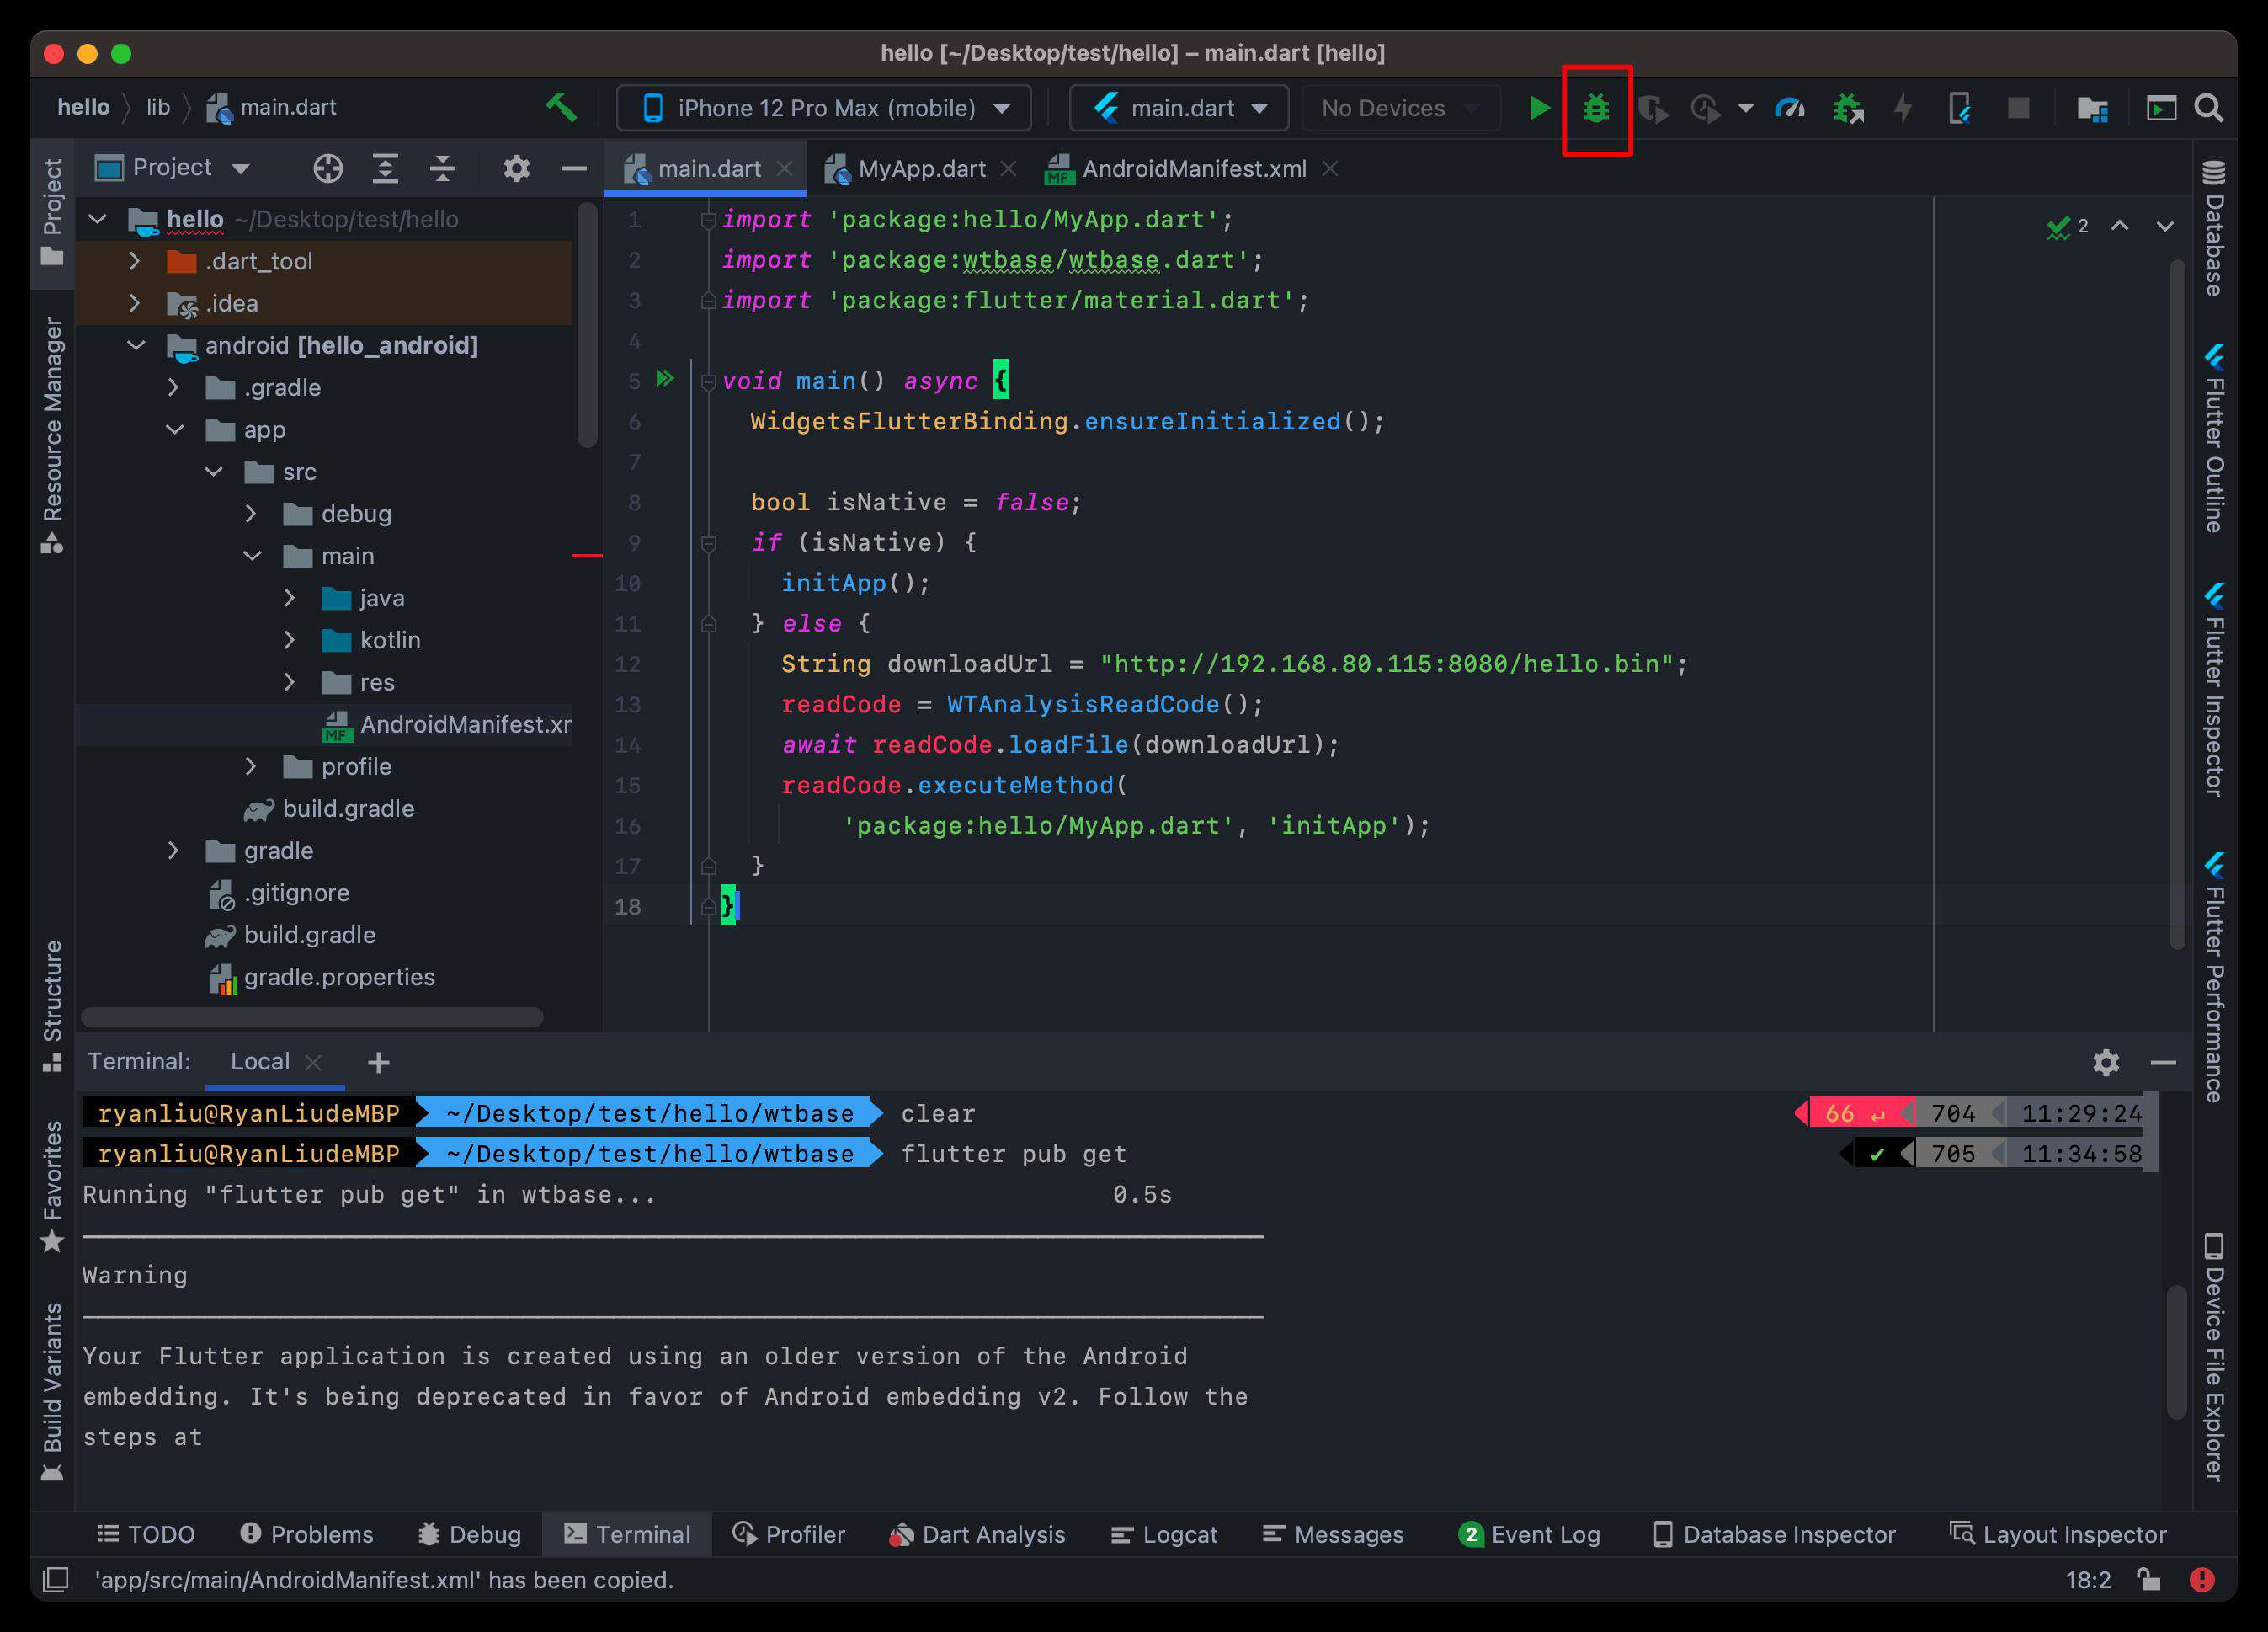
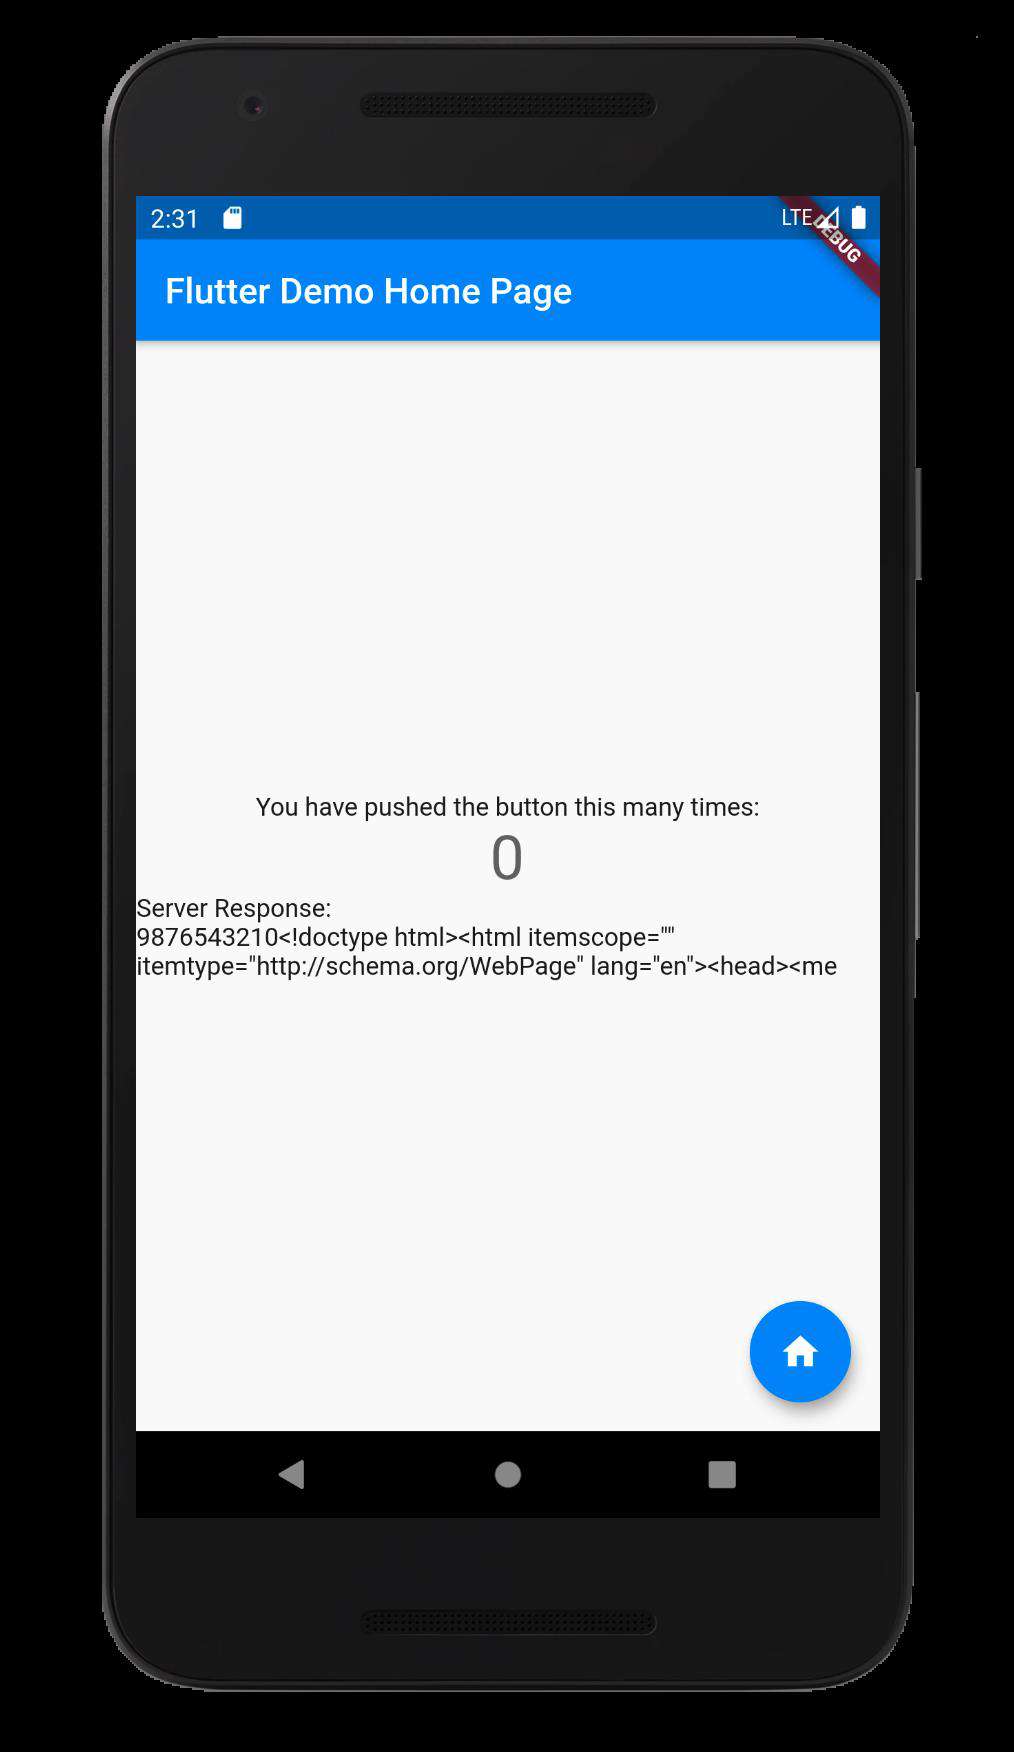
不出任何意外,IDE的编译不会出现任何问题。模拟器上的显示是这样的。

DE的debug console log如下:
            Launching lib/main.dart on Android SDK built for x86 in debug mode...
            Running Gradle task 'assembleDebug'...
            ✓ Built build/app/outputs/flutter-apk/app-debug.apk.
            Installing build/app/outputs/flutter-apk/app.apk...
            Waiting for Android SDK built for x86 to report its views...
            Debug service listening on ws://127.0.0.1:65046/r1MGSW-wdg4=/ws
            Syncing files to device Android SDK built for x86...
            W/m.example.hell( 6898): Accessing hidden method Lsun/misc/Unsafe;->getUnsafe()Lsun/misc/Unsafe; (greylist,core-platform-api, linking, allowed)
            W/m.example.hell( 6898): Accessing hidden method Lsun/misc/Unsafe;->objectFieldOffset(Ljava/lang/reflect/Field;)J (greylist,core-platform-api, linking, allowed)
            W/m.example.hell( 6898): Accessing hidden method Lsun/misc/Unsafe;->compareAndSwapObject(Ljava/lang/Object;JLjava/lang/Object;Ljava/lang/Object;)Z (greylist, linking, allowed)
            W/m.example.hell( 6898): Accessing hidden method Lsun/misc/Unsafe;->putObject(Ljava/lang/Object;JLjava/lang/Object;)V (greylist, linking, allowed)
            D/EGL_emulation( 6898): eglMakeCurrent: 0xd7a8e900: ver 3 0 (tinfo 0xdaf0f820)
            D/eglCodecCommon( 6898): setVertexArrayObject: set vao to 0 (0) 1 0
            I/flutter ( 6898): download file!
            I/flutter ( 6898): vmClassName: MyApp className: WTStatelessWidget1
            I/flutter ( 6898): vmClassName: MyHomePage className: WTStatefulWidget1
            I/flutter ( 6898): vmClassName: _MyHomePageState className: WTState1
- 后面的事情就是任由你自己发挥了。比如我们修改
MyApp.dart里的代码试一下。修改floatingActionButton的icon试一下吧:
            floatingActionButton: FloatingActionButton(
                    onPressed: _incrementCounter,
                    tooltip: 'Increment',
                    child: Icon(Icons.add),
                  ),
把Icons.add修改为Icons.home。完成后是这样的:
            floatingActionButton: FloatingActionButton(
                    onPressed: _incrementCounter,
                    tooltip: 'Increment',
                    child: Icon(Icons.home),
                  ),
保存你所做的修改,然后回到terminal,进入你的编译器目录,运行./rust_compile:
运行这个命令后,等待一段时间,最终效果如下:
这里亲请注意了,我们到此不需要IDE来做什么了,只需要在模拟器里关掉当前运行的app,重新打开它,你就会发现它变成了下面的样子:
再次强调一下到此为止我们上面的这一步操作没有使用IDE的任何功能,我们只是用我们自己的编译器编译了新的hello.bin文件,然后通过模拟器远程加载了这个bin文件。
###这就是一个可以完整热更新的APP了。
到此为止,你已经开发了一个带有热更新功能的App了,是不是很神奇?! 你现在可以随意去改一些代码试试,改过你的代码后记得要再次编译哦(重复第10步)。
喜欢的话就给我们点个星星吧✨!
##注意事项:
第一: 对于android app发布:
第二: 对于iOS app发布:
对于Android apk发布,可能会遇到的问题:
在发布android apk的时候,如果你使用flutter build apk 的时候会报错如下:
This application cannot tree shake icons fonts. It has non-constant instances of IconData at the following locations:
  - file:///Users/ryanliu/Desktop/test/hello/wtbase/lib/generate/mapping/WTVMIconData.dart:31:12
请使用如下执行命令发布apk:
flutter build apk --no-tree-shake-icons
你就不会再遇见上面那个错误了。
相关的介绍资料
更多的信息我们随后会放在一下链接:
- Chimera Flutter Code Push Instruction
?️ 我们 2021 的计划
- 春天·开源在 2021的高铁上
- 项目 启动 ✅
- 介绍文档 ✅
- Github 开源 github.com/Waytoon/chi… ✅
- 下一代的神奇 V2 in 2021
- 实现差异化更新
- 全面AOT支持
- AI 智能编译器
⚠️不支持的内容??
- 现在不谦虚的说我们支持了所有的Flutter语法和Pub库.
- 可能会有一些意外的bug,我们也不想,那就请大家一起去把它们杀光吧,德玛西亚!
?如果你喜欢可以加入我们!
我们在此热烈欢迎来自五湖四海的兄弟姐妹加入我们,我们需要社区里大家的支持和帮忙,真诚欢迎大家来到我们的github主页:github.com/Waytoon/chi… 欢迎大家点赞转发评论。再次感谢!
欢迎扫描下面的码子加入我们:
- 可以添加SDK群主WX: 搜索
novolei
常见问题FAQ
- 免费下载或者VIP会员专享资源能否直接商用?
- 本站所有资源版权均属于原作者所有,这里所提供资源均只能用于参考学习用,请勿直接商用。若由于商用引起版权纠纷,一切责任均由使用者承担。更多说明请参考 VIP介绍。
- 提示下载完但解压或打开不了?
- 找不到素材资源介绍文章里的示例图片?
- 模板不会安装或需要功能定制以及二次开发?


发表评论
还没有评论,快来抢沙发吧!