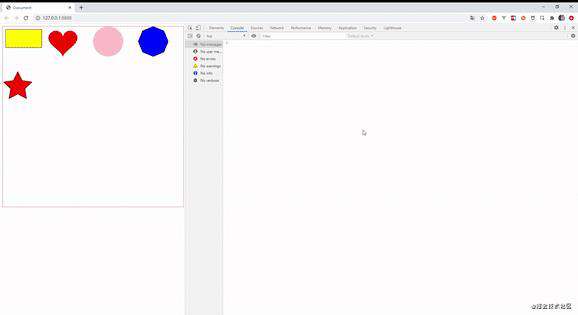
一. demo预览
二.前置知识
1. isPointInPath + Path2D API (存在极大的兼容性)
- CanvasRenderingContext2D.isPointInPath()是 Canvas 2D API 用于判断在当前路径中是否包含检测点的方法。
- 方法为: CanvasRenderingContext2D.isPointInPath(x, y, fillRule, path)
- 参数:
- x : 检测点的X坐标
- y : 检测点的Y坐标
- fillRule: 用来决定点在路径内还是在路径外的算法。允许的值:"nonzero": 非零环绕规则 ,默认的规则。"evenodd": 奇偶环绕原则 。
- path: Path2D应用的路径,或者当前绘制的路径。
- 返回值: 一个Boolean值,当检测点包含在当前或指定的路径内,返回 true;否则返回 false。
2. 角度法
- 说明:如果一个点在多边形内部,则该点与多边形所有顶点两两构成的夹角,相加应该刚好等于360°。
- 局限性: 图形必须是凸多边形,其他类型的图形都不可以。
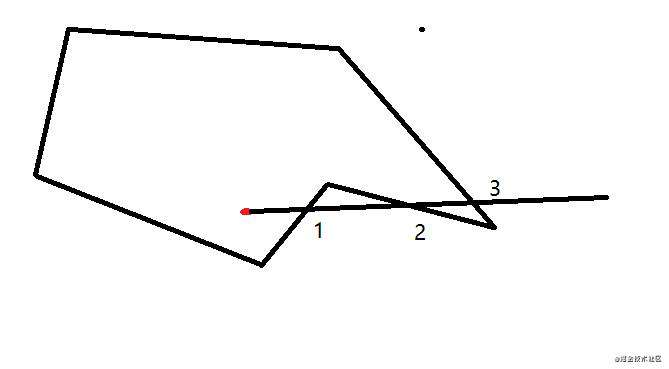
3. 射线法
- 说明:判断点与多边形一侧的交点个数为奇数,则点在多边形内部。
- 该方法不局限于图形的类型,凸多边形,凹多边形,环形等都可以,边界条件处理方式预览具体情况具体分析
- 难度:每个图形都需要有相应的函数判断射线边界
4.像素法
-
canvas中的图形分别离屏绘制,通过判断事件的位置数据(getImageData()方法获取),是否跟事件的唯一id一致来dispatch事件
-
当前文章demo使用方式为像素法
5. 其他...
三. 一些特别注明
1. OffscreenCanvas
- 构造函数OffscreenCanvas 创建一个新的OffscreenCanvas对象。 提供了一个可以脱离屏幕渲染的canvas对象。它在窗口环境和web worker环境均有效。
- 存在兼容性,并且该API之后可能废弃,demo未作兼容处理,兼容性处理方式可以是用一个隐藏的Canvas对象代替 new OffscreenCanvas()
2. getImageData
- CanvasRenderingContext2D.getImageData(sx, sy, sw, sh) 返回一个ImageData对象,用来描述canvas区域隐含的像素数据,这个区域通过矩形表示,起始点为(sx, sy)、宽为sw、高为sh。
- 参数:sx, sy:将要被提取的图像数据矩形区域的左上角 x,y 坐标。 sw, sh:将要被提取的图像数据矩形区域的宽度, 高度
- 注意这里getImageData().data 的取值范围为(0,255)所以这里 rgba中 a 按照0-> 0 , 1->255的范围。
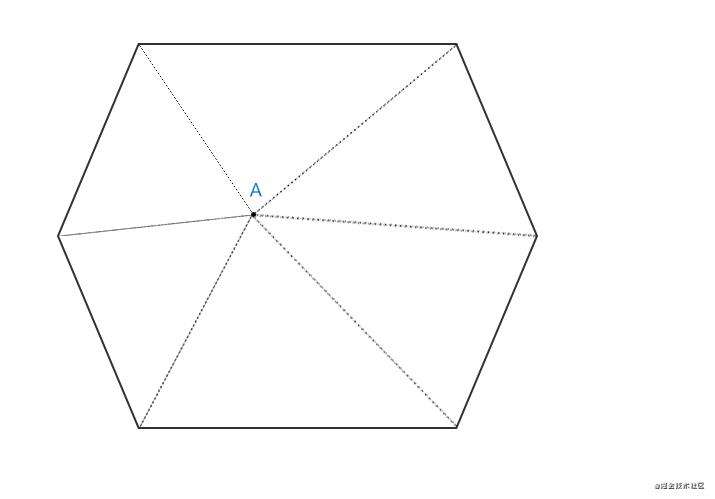
3.正多边形绘制方式
- 原理是中心点到所有角顶点的集合加起来为360度
4.五角星绘制方式
- 可以理解成内部一个正五边形,外部一个正五边形,并且每个角度固定
5.心绘制方式
- 公式: x = 16 * (sint)**3; y = 13cost - 5cons2t - 2cos3t - cos4t
6. 关于demo中取名
- 画的图案小部件取名为 widget
- 舞台取名为 Mural
- 隐藏canvas实例为 hideCtx
四.设计思路以及具体代码
- canvas事件模拟的原理是,我们知道用户事件在哪个目标canvas绘制的图形之中触发, 所以我们只需要判断在canvas 节点上触发event的x,y坐标值,所对应的图案是否有绑定事件,如果有那么促发该事件.
于是 可以写出触发事件的伪代码.
import { Widget, Mural } from './canvasEvent'

const Mural = new Mural(canvas对象)

const widget1 = new Widget(options)
const widget2 = new Widget(options)
const widget3 = new Widget(options)

widget1.on('事件名1', callback1)
widget2.on('事件名2', callback2)
widget3.on('事件名3', callback3)

Mural.add(widget1) // 如果在widget1上促发事件1 调用callback1
Mural.add(widget2) // 如果在widget2上促发事件2 调用callback2
Mural.add(widget3) // 如果在widget3上促发事件3 调用callback3
这里的widget是很多各种类型所要监听图案实例的总称,所以这里可以设计一个base类,抽离公共方法, 子类继承父类的方法,并且自定义方法形成多种形态. 贴出wiget Base类的代码.
export class Base {

  constructor(props){
    this.id = createId()
    this.listeners = {}
    this.isAnimation = props.isAnimation || false // 这个元素是否需要移动位置,以及是否需要重叠
  }

  draw (){
    throw new Error('this widget not have draw methods')
  }

  on(eventName, listenerFn) {
    if(this.listeners[eventName]){
      this.listeners[eventName].push(listenerFn)
    }else{
      this.listeners[eventName] = [listenerFn]
    }
  }

  getListeners() {
    return this.listeners
  }

  getId(){
    return this.id
  }

  getIsAnimation(){
    return this.isAnimation
  }
}
- 在base类的基础上,我们可以定义各种形态的widget,列如最简单的rect.
import { Base } from './Base';
export class Rect extends Base {
  constructor(props) {
    super(props);
    this.options = {
      x: props.x,
      y: props.y,
      width: props.width,
      height: props.height,
      fillColor: props.fillColor || '#fff',
      strokeColor: props.strokeColr || '#000',
      strokeWidth: props.strokeWidth || 1
    };
  }

  draw(ctx, hideCtx) {
    const { x, y, width, height, fillColor, strokeColor, strokeWidth } = this.options;
    ctx.save();
    ctx.beginPath();
    ctx.strokeStyle = strokeColor;
    ctx.lineWidth = strokeWidth;
    ctx.fillStyle = fillColor;
    ctx.rect(x, y, width, height);
    ctx.fill();
    ctx.stroke();
    ctx.restore();
    ....
  }
}
写出Mural代码的架构.
export class Mural {
  constructor(canvas) {
    // canvas 在不同dpr屏幕上的模糊问题
    const dpr = window.devicePixelRatio;
    canvas.width = parseInt(canvas.style.width) * dpr;
    canvas.height = parseInt(canvas.style.height) * dpr;

    this.canvas = canvas;
    this.ctx = this.canvas.getContext('2d');
    this.ctx.scale(dpr, dpr); // 根据dpr 缩放画布

    this.canvas.addEventListener('mousedown', callback);
    this.canvas.addEventListener('mouseup', callback);
    this.canvas.addEventListener('mousemove', callback);
  }

  add(widget) {
    widget.draw(this.ctx);
  }
}
那么怎么通过 this.canvas.addEventListener('事件名', callback); 促发widget.on中的回调函数呢? 于是有下一步代码.
Mural
export class Mural {
  constructor(canvas) {
    // canvas 在不同dpr屏幕上的模糊问题
    const dpr = window.devicePixelRatio;
    canvas.width = parseInt(canvas.style.width) * dpr;
    canvas.height = parseInt(canvas.style.height) * dpr;

    // 如果无法使用这个API可以画在一个隐藏的canvas上
    this.hidecanvas = new OffscreenCanvas(canvas.width, canvas.height);

    this.canvas = canvas;
    this.ctx = this.canvas.getContext('2d');
    this.hideCtx = this.hidecanvas.getContext('2d');
    this.ctx.scale(dpr, dpr); // 根据dpr 缩放画布
    this.hideCtx.scale(dpr, dpr); // 根据dpr 缩放画布
    this.dpr = dpr;

    this.canvas.addEventListener('mousedown', this.handleCreator(ActionTypes.down));
    this.canvas.addEventListener('mouseup', this.handleCreator(ActionTypes.up));
    this.canvas.addEventListener('mousemove', this.handleCreator(ActionTypes.move));

    this.widgets = new Set(); // 将所有的部件放入Set容器中

    this.eventAnglogies = new EventAnglogies();
  }

  add(widget) {
    const id = widget.getId();
    this.eventAnglogies.addListeners(id, widget.getListeners());
    this.widgets.add(id);
    widget.draw(this.ctx, this.hideCtx);
  }

  handleCreator = (type) => (ev) => {
    const x = ev.offsetX;
    const y = ev.offsetY;
    const id = this.getHideId(x, y);
    this.eventAnglogies.addAction({ type, id }, ev);
  };

  getHideId(x, y) {
    const rgba = [ ...this.hideCtx.getImageData(x * this.dpr, y * this.dpr, 1, 1).data ];

    const id = rgbaToId(rgba);

    return this.widgets.has(id) ? id : undefined;
  }
}
Rect
import { idToRgba } from '../lib/helper';
import { Base } from './Base';

export class Rect extends Base {
  constructor(props) {
    super(props);
    this.options = {
      x: props.x,
      y: props.y,
      width: props.width,
      height: props.height,
      fillColor: props.fillColor || '#fff',
      strokeColor: props.strokeColr || '#000',
      strokeWidth: props.strokeWidth || 1
    };
  }

  draw(ctx, hideCtx) {
    const { x, y, width, height, fillColor, strokeColor, strokeWidth } = this.options;
    ctx.save();
    ctx.beginPath();
    ctx.strokeStyle = strokeColor;
    ctx.lineWidth = strokeWidth;
    ctx.fillStyle = fillColor;
    ctx.rect(x, y, width, height);
    ctx.fill();
    ctx.stroke();
    ctx.restore();

    const [ r, g, b, a ] = idToRgba(this.getId());

    hideCtx.save();
    hideCtx.beginPath();
    hideCtx.strokeStyle = `rgba(${r}, ${g}, ${b}, ${a})`;
    hideCtx.fillStyle = `rgba(${r}, ${g}, ${b}, ${a})`;
    hideCtx.rect(x, y, width, height);
    hideCtx.fill();
    hideCtx.stroke();
    hideCtx.restore();
  }
}
helper.js
export const rgbaToId = (rgba) => rgba.join('-');

// 这里最多可以绘制图形 256*256*256个  16,777,216 约1600万个
const idPool = {};

export const createId = () => {
  let id = createOnceId();

  while (idPool[id]) {
    id = createOnceId();
  }
  // console.log(id)
  return id;
};

export const createOnceId = () => Array(3).fill(0).map(() => Math.ceil(Math.random() * 255)).concat(255).join('-');

// 判断两个set容器相等,注意这里只判断字符串类型的set容器
export const equalSet = (a, b)=> [...a].join('') === [...b].join('')

// set容器的差值
export const diffSet = (a, b) => new Set([...a].filter(x => !b.has(x)));
-
不难发现有一个核心的关键点,通过在隐藏画布上画纯色的rgba值,然后通过事件得到x,y坐标,在隐藏的画布上获取x,y坐标的rgba值,这里的rgba值就是对应的id值,就可以通过该id值,和事件绑定比较,从而触发函数。
-
那么如何解决多个图案重叠的问题,以及当图案需要变化的问题?这里采用了绘制多个离屏canvas方案,在多个离屏canvas画布中画固定rgba值,通过比较促发的idSet容器,得到所要促发的事件。
进一步Mural代码
import { EventAnglogies, ActionTypes } from './EventAnglogies';
import { rgbaToId } from './lib/helper';

export class Mural {
  constructor(canvas) {
    // canvas 在不同dpr屏幕上的模糊问题
    const dpr = window.devicePixelRatio;
    canvas.width = parseInt(canvas.style.width) * dpr;
    canvas.height = parseInt(canvas.style.height) * dpr;


    this.canvas = canvas;
    this.ctx = this.canvas.getContext('2d');
    this.ctx.scale(dpr, dpr); // 根据dpr 缩放画布

    // 创建一个隐藏的ctx 如果无法使用这个API可以画在一个隐藏的canvas上
    this.hideCtx = this.createHideCtx(canvas.width, canvas.height, dpr)


    this.dpr = dpr;
    // 需要即时移动的canvas隐藏画布
    this.moveHideCtxMap = new Map()

    this.canvas.addEventListener('mousedown', this.handleCreator(ActionTypes.down));
    this.canvas.addEventListener('mouseup', this.handleCreator(ActionTypes.up));
    this.canvas.addEventListener('mousemove', this.handleCreator(ActionTypes.move));

    this.widgets = new Set(); // 将所有静态部件放入Set容器中
    this.widgetsMap = new Map()

    this.eventAnglogies = new EventAnglogies();
  }

  createHideCtx(width, height, dpr) {
    const hidecanvas = new OffscreenCanvas(width, height);
    const hideCtx = hidecanvas.getContext('2d');
    hideCtx.scale(dpr, dpr);
    return hideCtx
  }


  add(widget, isOld = false) {
    // 这里代表了动画,或者其他,就是事件已经绑定好了,只是一些位置发生改变
    if(isOld){
      this.drawAll(widget)
      return
    }
    const id = widget.getId();
    const isAnimation = widget.getIsAnimation()
    this.eventAnglogies.addListeners(id, widget.getListeners());
    this.widgets.add(id);
    this.widgetsMap.set(id, widget)
    let hideCtx = this.hideCtx

    // 如果该widget需要移动的话或者覆盖, 存在的话加上,不存在的话new, 防止用户多次add
    if (isAnimation) {
      if (this.moveHideCtxMap.get(id)) hideCtx = this.moveHideCtxMap.get(id)
      else {
        hideCtx = this.createHideCtx(this.canvas.width, this.canvas.height, this.dpr)
        this.moveHideCtxMap.set(id, hideCtx)
      }
    }

    widget.draw(this.ctx, hideCtx);
  }

  handleCreator = (type) => (ev) => {
    const x = ev.offsetX;
    const y = ev.offsetY;
    const idSet = this.getHideIdSet(x, y);
    // 不能在这里遍历idSet
    this.eventAnglogies.dispatchAction({ type, idSet }, ev)
  };

  getHideIdSet(x, y) {
    const rgba = [...this.hideCtx.getImageData(x * this.dpr, y * this.dpr, 1, 1).data];
    const staticRgbaToId = rgbaToId(rgba);

    const staticId = this.widgets.has(staticRgbaToId) ? staticRgbaToId :[]

    let animationId = []

    this.moveHideCtxMap.forEach((hCtx, id)=>{
      if(rgbaToId([...hCtx.getImageData(x * this.dpr, y * this.dpr, 1, 1).data]) === id){
        animationId.push(id)
      }
    })
    // 获取到所有当前位置的关于动静态id的组合
    return new Set(animationId.concat(staticId))
  }

  // 产生动画重绘所有的图案
  drawAll(moveWidget){
    // 清空视口画布
    this.ctx.clearRect(0, 0 , this.canvas.height, this.canvas.width)
    this.widgetsMap.forEach((widget, id)=>{
      const hideCtx = this.moveHideCtxMap.get(id) || this.hideCtx
      // 如果不是当前widget 直接画,如果是当前widget 清空隐藏的Rect
      // 因为重新draw之后又会有一次hideCtx记录
      if(moveWidget !== widget) widget.draw(this.ctx, hideCtx);
      else hideCtx.clearRect(0, 0 , this.canvas.height, this.canvas.width)
    })
    const moveId = moveWidget.getId();
    const moveCtx = this.moveHideCtxMap.get(moveId)
    moveWidget.draw(this.ctx, moveCtx)
  }
}
EventAnglogies.js
import { equalSet, diffSet } from './lib/helper'

export const ActionTypes = {
  down: 'down',
  up: 'up',
  move: 'move'
};

export const EventNames = {
  click: 'click',
  mousedown: 'mousedown',
  mousemove: 'mousemove',
  mouseup: 'mouseup',
  mouseenter: 'mouseenter',
  mouseleave: 'mouseleave'
};

export class EventAnglogies {
  listenersMap = {};
  lastDownIdSet = new Set(); // 最后一个按下的一堆idSet
  lastMoveIdSet = new Set(); // move的idSet

  dispatchAction(action, ev) {

    const { type, idSet } = action;

    if (type === ActionTypes.move) {
      // mousemove
      this.fire(idSet, EventNames.mousemove, ev);

      // mouseenter
      const enterSet = diffSet(idSet, this.lastMoveIdSet)
      enterSet.size && this.fire(enterSet, EventNames.mouseenter, ev)

      // mouseleave
      const leaveSet = diffSet(this.lastMoveIdSet, idSet)
      leaveSet && this.fire(leaveSet, EventNames.mouseleave, ev)
    }

    // mousedown
    if (type === ActionTypes.down) {
      this.fire(idSet, EventNames.mousedown, ev);
    }

    // mouseup
    if (type === ActionTypes.up) {
      this.fire(idSet, EventNames.mouseup, ev);
    }

    // click
    if (type === ActionTypes.up && equalSet(this.lastDownIdSet, idSet)) {
      this.fire(idSet, EventNames.click, ev);
    }

    if (type === ActionTypes.move) this.lastMoveIdSet = action.idSet;
    else if (type === ActionTypes.down) this.lastDownIdSet = action.idSet;
  }

  addListeners(id, listeners) {
    this.listenersMap[id] = listeners;
  }

  fire(idSet, eventName, ev) {
    idSet.forEach(id => {
      if (this.listenersMap[id] && this.listenersMap[id][eventName]) {
        this.listenersMap[id][eventName].forEach((listener) => listener(ev));
      }
    })
  }
}
到此为止步,再回头看看预览的demo 图示
这里再贴出入口文件的代码,就一目了然了。
import { Circle, Mural, Rect, Heart, FivePointedStar, Polygon } from './canvasEvent';
import { EventNames } from './canvasEvent/EventAnglogies';

const canvas = document.querySelector('#canvas');

const mural = new Mural(canvas);

const circle = new Circle({
  x: 350,
  y: 50,
  radius: 50,
  fillColor: 'pink'
});

const rect = new Rect({
  x: 10,
  y: 10,
  width: 120,
  height: 60,
  fillColor: 'yellow'
});

const heart = new Heart({
  x: 200,
  y: 50,
  heartA: 3,
  fillColor: 'red'
});

const polygon = new Polygon({
  x:500,
  y: 50,
  n: 8,
  size: 50,
  fillColor: 'blue',
  isAnimation: true
})

const fivePoint = new FivePointedStar({
  x: 50,
  y: 200,
  minSize: 25,
  maxSize: 50,
  fillColor: 'red',
  isAnimation: true
});

rect.on(EventNames.click, () => {
  alert('点击了矩形');
});

heart.on(EventNames.mouseenter, () => {
  console.log('进入心');
});
heart.on(EventNames.mouseleave, () => {
  console.log('离开心');
});

circle.on(EventNames.click, () => {
  alert('点击了圆');
});

circle.on(EventNames.mouseleave, () => {
  console.log('离开了圆形');
});


polygon.on(EventNames.mousedown, (e) => {
  console.log(polygon)
  let baseX = e.pageX
  let baseY = e.pageY
  document.onmousemove = (event) =>{
    const moveX = event.pageX - baseX
    const moveY = event.pageY - baseY
    baseX = event.pageX
    baseY = event.pageY
    polygon.options.x = polygon.options.x + moveX
    polygon.options.y = polygon.options.y + moveY
    mural.add(polygon);
  }
})

fivePoint.on(EventNames.mouseenter, () => {
  console.log('进入了五角星');
});

fivePoint.on(EventNames.mouseleave, () => {
  console.log('离开了五角星');
});

fivePoint.on(EventNames.mousedown, (e) => {
  let baseX = e.pageX
  let baseY = e.pageY
  document.onmousemove = (event) =>{
    const moveX = event.pageX - baseX
    const moveY = event.pageY - baseY
    baseX = event.pageX
    baseY = event.pageY
    fivePoint.options.x = fivePoint.options.x + moveX
    fivePoint.options.y = fivePoint.options.y + moveY
    mural.add(fivePoint, true);
  }
})


document.addEventListener('mouseup', function() {
  document.onmousemove = null
}, false)

mural.add(circle);
mural.add(rect);
mural.add(heart);
mural.add(polygon);
mural.add(fivePoint);
以上总共解决了canvas事件模拟:
- mousedown事件
- mouseup事件
- mouseenter事件
- mousemove事件
- click事件
- 多个图案重叠事件监听
- 图片变动后的事件监听
到这里,canvas事件模拟像素点法就介绍到这,具体业务,要根据实际业务中方案选择。
五.未做的一些兼容性处理
- e = e || window.event
- OffscreenCanvas
- ...
若有不明之处, github地址, 可运行demo调试。
参考文档
- juejin.cn/post/688820…
- juejin.cn/post/684490…
- blog.csdn.net/qq_21118431…
常见问题FAQ
- 免费下载或者VIP会员专享资源能否直接商用?
- 本站所有资源版权均属于原作者所有,这里所提供资源均只能用于参考学习用,请勿直接商用。若由于商用引起版权纠纷,一切责任均由使用者承担。更多说明请参考 VIP介绍。
- 提示下载完但解压或打开不了?
- 找不到素材资源介绍文章里的示例图片?
- 模板不会安装或需要功能定制以及二次开发?


发表评论
还没有评论,快来抢沙发吧!