本文提纲:
- 什么是 JSI
- 在 v8 中注入方法和变量
1.v8 运行 js 代码步骤
2.向 js 中注入方法 3.向 js 中注入变量 - 从 React-native 源码看 js 和 native 的通讯 1.js 到 native 的通讯 2.native 到 js 的通信
- 简述 JSI 的实现
本文强烈建议打开react-native 源码对照着看,因为很多地方的代码我没有贴全,并且由于仓库更新频繁,本文写于 2020-11-17,react-native 版本为 v0.63.3。
什么是 JSI
JSI 普遍翻译成 javascript interface,其作用是在 js 引擎(例如 v8)和 native 之间建立一层适配层,有了 JSI 这一层在 react-native 中提到了两个提升:
- 1.可以更换引擎,react-native 默认的 js 引擎是 JSC,可以方便的更换成为 V8,或者 hermes(facebook 自研的 js 引擎),甚至 jerry-script 等。
- 2.在 javascript 中可以直接引用并调用 C++注入到 js 引擎中的方法,这使得 native 和 js 层能够“相互感知”,不再像以前需要将数据 JSON 化,然后通过 bridge 在 js 和 native 之间传递。
1中的 improvement 很好理解,2中的内容更深层的解释是:react-native 在以前的架构中,如下图
 是通过中间层 bridge 进行通讯,当在 js 中需要调用 native 层的方法的时候,需要将消息做 json 序列化,然后发送给 native。由于数据是异步发送,可能会导致阻塞以及一些优化的问题(正如我们 js 异步中的 microtask 和 macrotask),与此同时因为 native 和 js 层无法相互感知(js 中没有对 native 的引用),当我们需要从 js 侧调用 native 的方法(比方说蓝牙)之前,需要先将蓝牙模块初始化,即使你可能在你的整个 app 中并没有用到这个模块。新的架构允许对于原生模块的按需加载,即需要的时候再加载, 并且在 js 中能够有对于该模块的引用, 意味着不需要通过 JSON 通讯了,这大大提高了启动的效率。
现在 react-native 的新架构如下:左下侧的 Fabric 是原生渲染模块,右侧的 turbo modules 是原生的方法模块,可以看出现在 JSI 连接这 native 和 JS 两层。
是通过中间层 bridge 进行通讯,当在 js 中需要调用 native 层的方法的时候,需要将消息做 json 序列化,然后发送给 native。由于数据是异步发送,可能会导致阻塞以及一些优化的问题(正如我们 js 异步中的 microtask 和 macrotask),与此同时因为 native 和 js 层无法相互感知(js 中没有对 native 的引用),当我们需要从 js 侧调用 native 的方法(比方说蓝牙)之前,需要先将蓝牙模块初始化,即使你可能在你的整个 app 中并没有用到这个模块。新的架构允许对于原生模块的按需加载,即需要的时候再加载, 并且在 js 中能够有对于该模块的引用, 意味着不需要通过 JSON 通讯了,这大大提高了启动的效率。
现在 react-native 的新架构如下:左下侧的 Fabric 是原生渲染模块,右侧的 turbo modules 是原生的方法模块,可以看出现在 JSI 连接这 native 和 JS 两层。
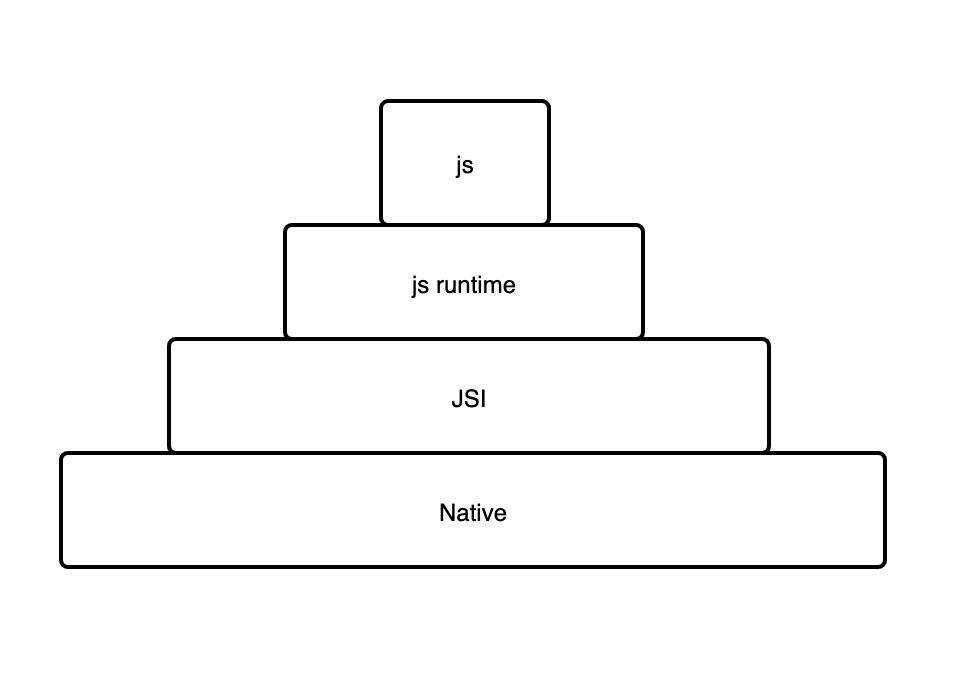
 简单画一下 jsi 和 js 引擎的关系如下:
在 V8 中注入方法和变量
大家都知道的是有一些方法比如说console.log,setInterval,setTimeout等方法实际上是浏览器(chrome)或者 node 为我们注入的方法,js 引擎本身是没有这些方法的,也就是说很多方法都是在 js 引擎外侧注入的。那么我们有必要先了解一下如何 v8 中注入方法和变量:
- 首先编译 V8 生成静态/动态库,在你的 C++文件中引入该库,具体操作请看这里,这是 v8 的官方教程,会指导你从编译 v8 开始,到运行一个可以输出“Hello world”的 js 代码片段,有点像是在 c++中执行
eval("'Hello ' + 'World'") - 经过上一步骤我们简单得出如何通过 v8 库运行 js 代码的步骤:
运行 js 代码步骤
-- 步骤 1. 第一步将 js 字符串通过 v8 中的NewFromUtf8Literal方法转换成为Local类型的v8::String, 其中 isolate 是一个 v8 实例,Local 类型为了方便垃圾回收。
  v8::Local<v8::String> source =
     v8::String::NewFromUtf8Literal(isolate, "'Hello' + 'World'");
-- 步骤 2. 第二步将 js 代码进行编译,其中的 Context 是 js 执行的上下文,source 是1中的代码
  v8::Local<v8::Script> script =
          v8::Script::Compile(context, source).ToLocalChecked();
-- 步骤 3. 第三步运行 js 代码。
v8::Local<v8::Value> result = script->Run(context).ToLocalChecked();
总共分三步:1.字符串类型转换 2.编译 3.运行
向 js 中注入方法
- emmm。。不过如此,那么如果我们向 js 中注入方法和变量,当然需要对
上面的步骤2中 context(JS 执行上下文)做些手脚了,下面我们注入一个 print 方法,首先 print 方法的 C++实现如下,我们不关注具体实现。
   // 这段代码不重要,就知道是C++实现的print方法即可
  void Print(const v8::FunctionCallbackInfo<v8::Value>& args) {
    bool first = true;
    for (int i = 0; i < args.Length(); i++) {
       v8::HandleScope handle_scope(args.GetIsolate());
       if (first) {
         first = false;
       } else {
         printf(" ");
       }
       v8::String::Utf8Value str(args.GetIsolate(), args[i]);
       const char* cstr = ToCString(str);
       printf("%s", cstr);
    }
  printf("\n");
  fflush(stdout);
}
- Print 方法已经创建完毕,下面需要将该方法加入的 js 的执行上下文中(global)
// 根据v8实例isolate创建一个类型为ObjectTemplate的名字为global的object
v8::Local<v8::ObjectTemplate> global=v8::ObjectTemplate::New(isolate);

// 向上面创建的global中set一个名字为print的方法。简单理解为global.print = Print
global->Set(v8::String::NewFromUtf8(isolate, "print", v8::NewStringType::kNormal).ToLocalChecked(),v8::FunctionTemplate::New(isolate, Print));

// 根据这个global创建对应的context,即js的执行上下文,然后以这个Context再去执行上面的步骤1,步骤2,步骤3.
v8::Local<v8::Context> context = v8::Context::New(isolate, NULL,global);
此时如果再执行
     v8::Local<v8::String> source =
     v8::String::NewFromUtf8Literal(isolate, "print('Hello World')");
     // 三步曲中的Compoile.....
     // 三步曲中的Run....
就能够在 terminal 中看到输出Hello World了。
向 js 中注入变量
和注入方法类似,也是需要向 context(js 执行上下文)中注入变量,但是需要做的是将 C++中的“Object”转换成为 js 中的“Object”。类型转换,前端开发者永远的痛。。
    //和注入方法时一样,先创建Context
   v8::Local<v8::ObjectTemplate> global=v8::ObjectTemplate::New(isolate);
   v8::Local<v8::Context> context = v8::Context::New(isolate, NULL,global);
   // 创建对应的ObjectTemplate,名字为temp1
   Local<v8::ObjectTemplate> templ1 = v8::ObjectTemplate::New(isolate, fun);
   // temp1上加入x属性
   templ1->Set(isolate, "x", v8::Number::New(isolate, 12));
   // temp1上加入y属性
   templ1->Set(isolate, "y",v8::Number::New(isolate, 10));
   // 创建ObjectTemplate的实例instance1
   Local<v8::Object> instance1 =
     templ1->NewInstance(context).ToLocalChecked();
   // 将instance1的内容加入到global.options中
   context->Global()->Set(context, String::NewFromUtf8Literal(isolate, "options"),instance1).FromJust();
此时如果再执行
v8::Local<v8::String> source = v8::String::NewFromUtf8Literal(isolate, "options.x");
// 三步曲中的Compoile.....
// 三步曲中的Run....
就能够在 terminal 中看到输出12了。
从 React-native 源码看 js 和 native 的通讯
现在我们知道了什么是 jsi,也知道了基本的向 js 引擎中注入方法和变量的方法,下一步 We need to dig deeper。
js 到 native 的通讯
- react-native 的启动流程请看这里有大神详解大神详解,因为我们只关注 JSI 部分,所以直接来到
JSIExecutor::initializeRuntime方法。(RN 一顿启动之后会来到这里初始化 runtime),我们将其他几个具体实现省略,只留下第一个nativeModuleProxy的实现。
  void JSIExecutor::initializeRuntime() {
  runtime_->global().setProperty(
      *runtime_,
      "nativeModuleProxy",
      Object::createFromHostObject(
          *runtime_, std::make_shared<NativeModuleProxy>(nativeModules_)));

  runtime_->global().setProperty(
      *runtime_,
      "nativeFlushQueueImmediate",
      Function::createFromHostFunction(
         //具体实现,省略代码
         }));

  runtime_->global().setProperty(
      *runtime_,
      "nativeCallSyncHook",
      Function::createFromHostFunction(
          *runtime_,
          PropNameID::forAscii(*runtime_, "nativeCallSyncHook"),
          1,
           //具体实现,省略代码
           ));

  runtime_->global().setProperty(
      *runtime_,
      "globalEvalWithSourceUrl",
       //具体实现,省略代码
      );
}
代码很容易看懂,就是在 runtime 上面利用 global().setProperty 设置几个模块,以第一个为例,利用 global 的 setProperty 方法在 runtime 的 js context 上加入一个叫做nativeModuleProxy的模块,nativeModuleProxy模块是一个类型为nativeModuleProxy的 Object,里面有一个 get 和 set 方法,就像是我们前端的 proxy 一样,并且所有从 JS to Native 的调用都需要其作为中间代理。
    class JSIExecutor::NativeModuleProxy : public jsi::HostObject {
  public:
  NativeModuleProxy(std::shared_ptr<JSINativeModules> nativeModules)
      : weakNativeModules_(nativeModules) {}

  Value get(Runtime &rt, const PropNameID &name) override {
    if (name.utf8(rt) == "name") {
      return jsi::String::createFromAscii(rt, "NativeModules");
    }

    auto nativeModules = weakNativeModules_.lock();
    if (!nativeModules) {
      return nullptr;
    }
    // 调用getModule
    return nativeModules->getModule(rt, name);
  }

  void set(Runtime &, const PropNameID &, const Value &) override {
    throw std::runtime_error(
        "Unable to put on NativeModules: Operation unsupported");
  }

 private:
  std::weak_ptr<JSINativeModules> weakNativeModules_;
};
在 get 方法中有 getModule 方法,如果你再跳转到 getModule 中能看到其中为 createModule:
 Value JSINativeModules::createModule(Runtime &rt, const PropNameID &name) {
 	//此方法省略了很多。只留一句关键语句,从runtime.global中获得__fbGenNativeModule
 	rt.global().getPropertyAsFunction(rt, "__fbGenNativeModule");
 }
在这个 createModule 中,返回全局定义的__fbGenNativeModule,我们全局搜一下能够搜到在 nativeModules.js 文件中,有定义的__fbGenNativeModule:
global.__fbGenNativeModule = genModule;
接下来再去看 genModule(未贴代码),里面的 genMethod
    function genMethod(moduleID: number, methodID: number, type: MethodType) {
    // 此方法省略至只有return
      return new Promise((resolve, reject) => {
        BatchedBridge.enqueueNativeCall(
          moduleID,
          methodID,
          args,
          data => resolve(data),
          errorData =>
            reject(
              updateErrorWithErrorData(
                (errorData: $FlowFixMe),
                enqueueingFrameError,
              ),
            ),
        );
      });
}
其中的 enqueueNativeCall,再进去看大概就是这样一个方法:
   enqueueNativeCall(xxx) {
       const now = Date.now();
       // MIN_TIME_BETWEEN_FLUSHES_MS = 5
        if (
          global.nativeFlushQueueImmediate &&
          now - this._lastFlush >= MIN_TIME_BETWEEN_FLUSHES_MS
        ) {
          const queue = this._queue;
          this._queue = [[], [], [], this._callID];
          this._lastFlush = now;
          global.nativeFlushQueueImmediate(queue);
        }
   }
这里大概做了一个 throttle,如果上次执行 native 和这次执行之间相差大于 5ms,直接执行nativeFlushQueueImmediate。然后再看nativeFlushQueueImmediate
    nativeFlushQueueImmediate() {
          [this](jsi::Runtime &,
          const jsi::Value &,
          const jsi::Value *args,
          size_t count) {
            if (count != 1) {
              throw std::invalid_argument(
                  "nativeFlushQueueImmediate arg count must be 1");
            }
            callNativeModules(args[0], false);
            return Value::undefined();
          }
    }
直接执行的是 callnativeModules 这个方法,这个方法就像是它的名字所述,调用 native 的方法。
综上从 js 到 native 的调用链为:initializeRuntime -> js 侧 setProperty(nativeModuleProxy) -> 在调用 nativeModuleProxy 的时候 -> 触发 nativeModuleProxy 中 get 方法中的 getModule -> createModule -> genModule -> genMethod -> enqueueNativeCall(控制 native 执行频率) -> nativeFlushQueueImmediate -> callNativeModules。
native 到 js 的通讯
我们直接来到 NativeToJsBridge::callFunction 方法,之前的启动顺序可以参考这里,由名字就知道这是一个 native 到 js 的桥,所有从 Native 到 JS 的调用都是从 NativeToJsBridge 中的接口发出去的,看其中调用了 JSCExecutor::callFunction
        // 其中executor是JSExecutor类型的指针,这里指向的是JSIExecutor
       executor->callFunction(module, method, arguments);
再去看 JSIExecutor::callFunction:
void JSIExecutor::callFunction(){
    if (!callFunctionReturnFlushedQueue_) {
      bindBridge();
    }
    scopedTimeoutInvoker_(
      [&] {
          ret = callFunctionReturnFlushedQueue_->call(
              *runtime_,
              moduleId,
              methodId,
              valueFromDynamic(*runtime_, arguments));
        },
        std::move(errorProducer));


     callNativeModules(ret, true);
  }
其中看出如果没有callFunctionReturnFlushedQueue_就会去 bindBridge,如果有的话就回去执行callFunctionReturnFlushedQueue_,那么我们再去看看 bindBridge 中的callFunctionReturnFlushedQueue_到底是什么
    void JSIExecutor::bindBridge() {
    // 省略了大部分代码
    Value batchedBridgeValue =
        runtime_->global().getProperty(*runtime_, "__fbBatchedBridge");
    }
发现和__fbBatchedBridge这个东西有关,全局搜一下,得到:
const BatchedBridge: MessageQueue = new MessageQueue();
Object.defineProperty(global, '__fbBatchedBridge', {
  configurable: true,
  value: BatchedBridge,
});
所以__fbBatchedBridge是一个MessageQueue,打开 messageQueue.js 文件查看 MessageQueue 的callFunctionReturnFlushedQueue方法如下
  callFunctionReturnFlushedQueue(
    module: string,
    method: string,
    args: mixed[],
  ): null | [Array<number>, Array<number>, Array<mixed>, number] {
    this.__guard(() => {
      this.__callFunction(module, method, args);
    });

    return this.flushedQueue();
  }
然后看最终执行是this.__callFunction,再看下这个方法内:
      __callFunction(module: string, method: string, args: mixed[]): void {
            // 省略了大部分代码
            moduleMethods[method].apply(moduleMethods, args);
    }
重要找到了执行 js 方法的地方。。。。 综上从 native 到 js 的调用链为:NativeToJsBridge::callFunction->JSIExecutor::callFunction -> MessageQueue::callFunctionReturnFlushedQueue -> MessageQueue::__callFunction
简述 JSI 的实现
上面我们总结了从 js 到 native 侧相互的调用链,在查看调用链源码的时候,注意到很多方法的参数都有一个名为“runtime”的地址,那么这个 runtime 其实指的就是不同的 JS 引擎,比方说 native 侧需要调用注册在 js 侧的 test 方法,jsi 接口中只是定义了 test 方法,在其内部根据 js 引擎的不同调用不同 runtime 的具体 test 方法的实现,我们拿一个最容易理解的 setProperty 方法为例:首先打开react-native/ReactCommon/jsi/jsi/jsi-inl.h文件看一下 jsi 中定义的setProperty接口方法。
void Object::setProperty(Runtime& runtime, const String& name, T&& value) {
  setPropertyValue(
      runtime, name, detail::toValue(runtime, std::forward<T>(value)));
}
然后再看setPropertyValue,其实现为:
   void setPropertyValue(Runtime& runtime, const String& name, const Value& value) {
    return runtime.setPropertyValue(*this, name, value);
  }
从上面的代码可以看出最终调用的是 runtime(js 引擎)的setPropertyValue方法。
然后我们打开react-native/ReactCommon/jsi/JSCRuntime.cpp文件,该文件为 react-native 默认的 JSC 引擎中 JSI 各方法的具体实现:
    // 具体实现我们不看。只需知道在JSCRuntime中需要实现setPropertyValue方法
    void JSCRuntime::setPropertyValue(
    jsi::Object &object,
    const jsi::PropNameID &name,
    const jsi::Value &value) {
      JSValueRef exc = nullptr;
      JSObjectSetProperty(
      ctx_,
      objectRef(object),
      stringRef(name),
      valueRef(value),
      kJSPropertyAttributeNone,
      &exc);
  checkException(exc);
}
然后我们再打开react-native-v8仓库,该仓库由网上大神实现的 v8 的 react-native runtime 实现,我们打开文件react-native/react-native-v8/src/v8runtime/V8Runtime.cpp看下在 v8 下的具体实现:
    void V8Runtime::setPropertyValue(
    jsi::Object &object,
    const jsi::PropNameID &name,
    const jsi::Value &value) {
    // 具体实现我们不看。只需知道在V8runtime中需要实现setPropertyValue方法
      v8::HandleScope scopedIsolate(isolate_);
      v8::Local<v8::Object> v8Object =
          JSIV8ValueConverter::ToV8Object(*this, object);

      if (v8Object
          ->Set(
              isolate_->GetCurrentContext(),
              JSIV8ValueConverter::ToV8String(*this, name),
              JSIV8ValueConverter::ToV8Value(*this, value))
          .IsNothing()) {
      throw jsi::JSError(*this, "V8Runtime::setPropertyValue failed.");
  }
}
最后我们再打开 hermes 的repo,查看文件/hermes/hermes/API/hermes/hermes.cpp看下在 hermes 下的具体实现:
     void HermesRuntimeImpl::setPropertyValue(
         // 具体实现我们不看。只需知道在hermes中需要实现setPropertyValue方法
        jsi::Object &obj,
        const jsi::String &name,
        const jsi::Value &value) {
      return maybeRethrow([&] {
        vm::GCScope gcScope(&runtime_);
        auto h = handle(obj);
        checkStatus(h->putComputed_RJS(
                         h,
                         &runtime_,
                         stringHandle(name),
                         vmHandleFromValue(value),
                         vm::PropOpFlags().plusThrowOnError())
                        .getStatus());
      });
    }
由此得出在三个引擎上需要分别实现setPropertyValue方法,并在 JSI 接口中声明setProperty方法。
常见问题FAQ
- 免费下载或者VIP会员专享资源能否直接商用?
- 本站所有资源版权均属于原作者所有,这里所提供资源均只能用于参考学习用,请勿直接商用。若由于商用引起版权纠纷,一切责任均由使用者承担。更多说明请参考 VIP介绍。
- 提示下载完但解压或打开不了?
- 找不到素材资源介绍文章里的示例图片?
- 模板不会安装或需要功能定制以及二次开发?


发表评论
还没有评论,快来抢沙发吧!