前言
nodejs系列文章传送门:
- nodejs可以说的秘密之node index.js到底做了什么
- npm源码分析(一)之npm启动
- npm源码分析(二)之npm install执行逻辑
前面已经分析了npm如何启动,启动的核心就是拿到整个完整的运行时配置信息,这个过程对于所有的命令执行非常重要,如果还不了解npm如何解析命令行参数拿到整个运行时配置,先看下npm源码分析(一),可以从上面的传送门过去先看一遍,这样也有助于来分析其他npm命令。
在npm启动逻辑分析中,我们知道npm7.0里的所有命令的导出方式都是如下这样的形式,而且都可以以命令名为文件名在lib目录下轻松找到。
const cmd = (args, cb) => command(args).then(() => cb()).catch(cb)
这里我用这个command变量来代替具体的npm命令,如install、config等等。
前面在npm源码分析(二)中,已经分析了npm install,今天我们来看一下npm config,首先我们先跑一下npm config --usage,其实--help/-u/-h都是一样的效果,这个简写不是本文重点,先不赘述,后续另起文章好好分析它。
我们看到npm config的使用帮助有如下几种,ok,话不多说,直接进到npm config的源码核心逻辑看一下。
npm config set <key>=<value> [<key>=<value> ...]
npm config get [<key> [<key> ...]]
npm config delete <key> [<key> ...]
npm config list [--json]
npm config edit
npm set <key>=<value> [<key>=<value> ...]
npm get [<key> [<key> ...]]

alias: c
参数解析
在介绍npm config子命令前,我们先在npm源码目录lib下找到config.js,并找到config方法,
const config = async ([action, ...args]) => {
    npm.log.disableProgress()
    try {
        switch (action) {
            case 'set':
                await set(args)
                break
            case 'get':
                await get(args)
                break
            case 'delete':
            case 'rm':
            case 'del':
                await del(args)
                break
            case 'list':
            case 'ls':
                await (npm.flatOptions.json ? listJson() : list())
                break
            case 'edit':
                await edit()
                break
            default:
                throw UsageError()
        }
    } finally {
        npm.log.enableProgress()
    }
}
这里收到的action参数就是所有npm config可用的子命令名称。args则是所有配置项kv对。
从上面的使用帮助中我们可以知道npm config主要有对运行时配置项的增删改查,我们先来看下如何“改”,也就是npm config set。
Set
从config方法逻辑分支我们发现,set过程主要在set方法中,对所有的配置项kv对进行处理。
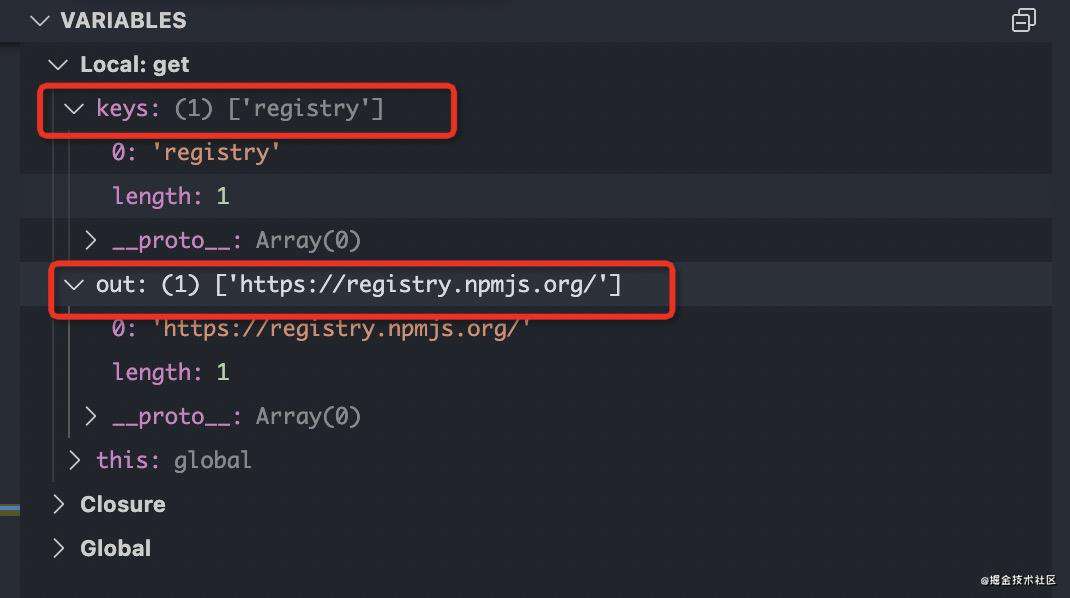
假设我们运行npm config set registry=https://registry.npmjs.org/来设置registry,这个是我们最经常用的,应该很有体感。
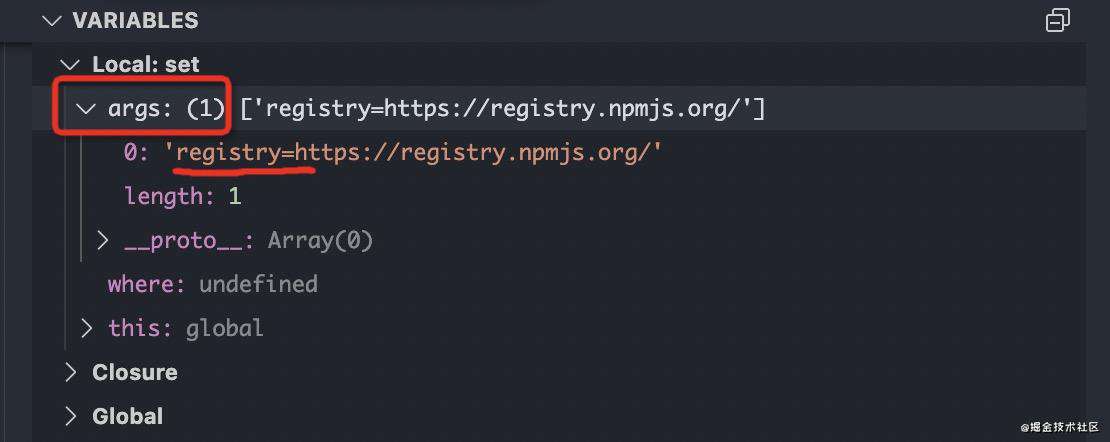
从图中我们能看到args里面现在只有一个kv对registry=https://registry.npmjs.org/
const set = async (args) => {
    if (!args.length) throw UsageError()
    const where = npm.flatOptions.global ? 'global' : 'user'
    for (const [key, val] of Object.entries(keyValues(args))) {
        npm.log.info('config', 'set %j %j', key, val)
        npm.config.set(key, val || '', where)
        if (!npm.config.validate(where))
            npm.log.warn('config', 'omitting invalid config values')
    }
    await npm.config.save(where)
}
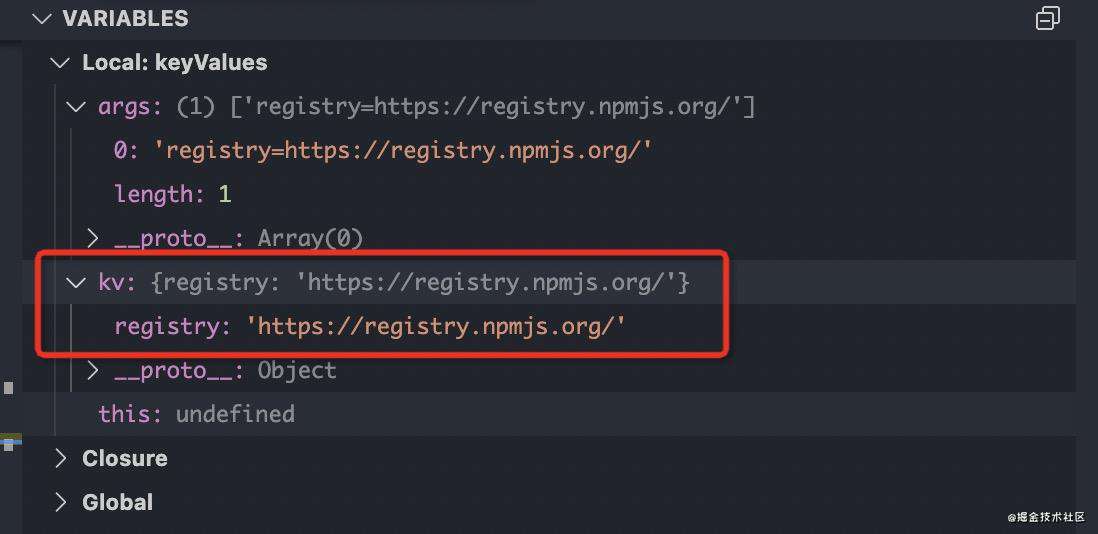
从set方法源码中,会根据args里的原始kv对来获取真正的kv map,在keyValues(args)里对registry=https://registry.npmjs.org/进行解析得到
这里顺便提一下,
const keyValues = args => {
    const kv = {}
    for (let i = 0; i < args.length; i++) {
        const arg = args[i].split('=')
        const key = arg.shift()
        const val = arg.length ? arg.join('=')
            : i < args.length - 1 ? args[++i]
            : ''
        kv[key.trim()] = val.trim()
    }
    return kv
}
其实keyValues这个方法里,是可以将[key, value, k2=v2, k3, v3, ...]转换成{ key: value, k2: v2, k3: v3 },这意味着我们在npm config set后面输入的kv对是可以用空格符隔开的,大家可以自行验证下这个keyValues方法。
我们拿到这个真正的kv map之后,就需要对其进行遍历设置:
npm.config.set(key, val || '', where)
逐个调用npm.config.set进行设置
set (key, val, where = 'cli') {
    ...

    this.data.get(where).data[key] = val
    // this is now dirty, the next call to this.valid will have to check it
    this.data.get(where)[_valid] = null
}
最后再保存配置项。
await npm.config.save(where)
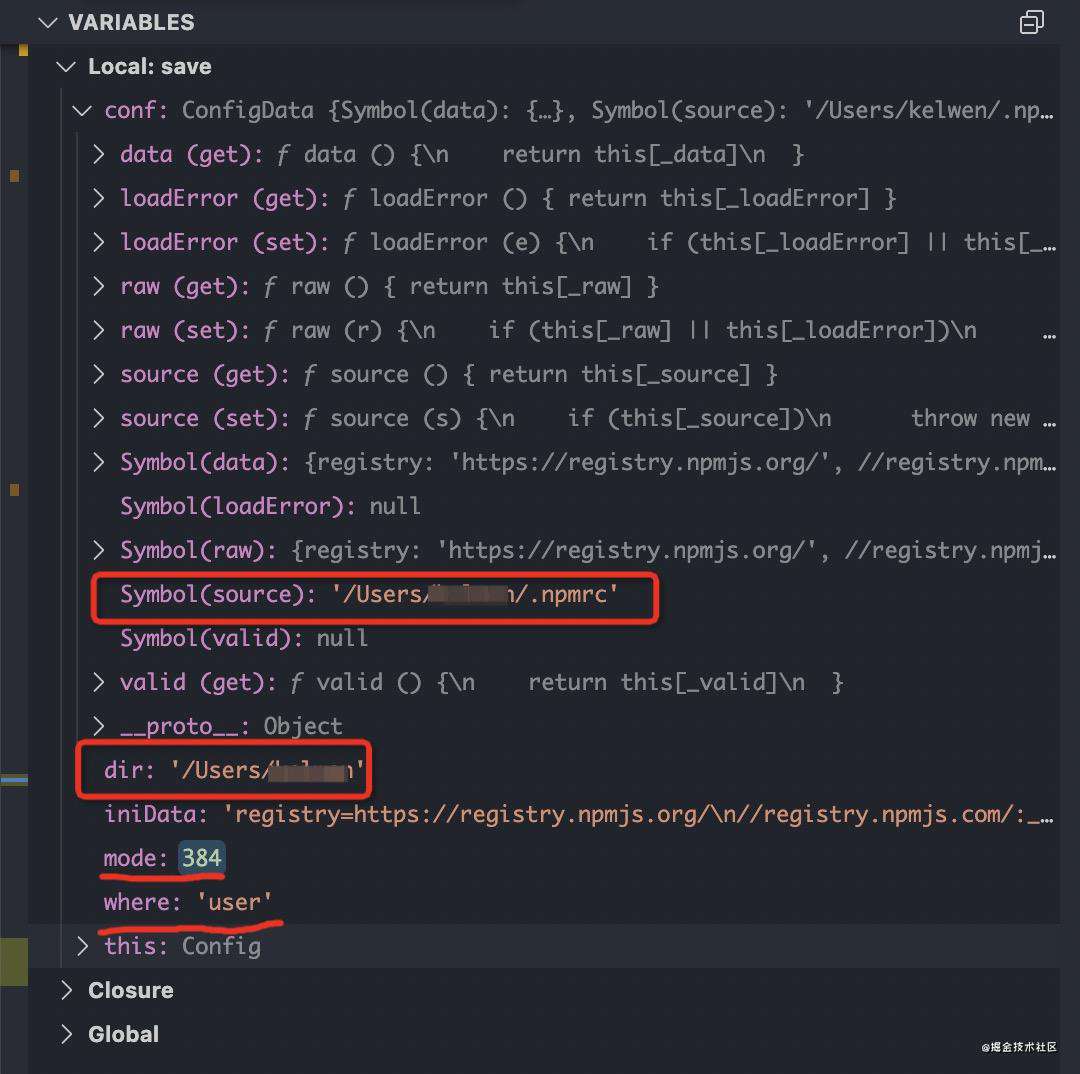
Config实例的save方法是整个设置过程的核心:
- 当设置
user命名空间配置项时,会先更新当前鉴权配置 - 创建
source目录,mkdirp(dir),生成当前命名空间下的.npmrc文件,writeFile(conf.source, iniData, 'utf8'),因为npm启动的时候,读取的也是对应命名空间下的.npmrc文件。(结合下图的conf信息看)
对照下面的源码
async save (where) {
    ...
    // upgrade auth configs to more secure variants before saving
    if (where === 'user') {
        const reg = this.get('registry')
        const creds = this.getCredentialsByURI(reg)
        // we ignore this error because the failed set already removed
        // anything that might be a security hazard, and it won't be
        // saved back to the .npmrc file, so we're good.
        try { this.setCredentialsByURI(reg, creds) } catch (_) {}
    }
    const iniData = ini.stringify(conf.data).trim() + '\n'
    if (!iniData.trim()) {
        // ignore the unlink error (eg, if file doesn't exist)
        await unlink(conf.source).catch(er => {})
        return
    }
    const dir = dirname(conf.source)
    await mkdirp(dir)    // 创建目录
    await writeFile(conf.source, iniData, 'utf8')    // 生成.npmrc文件
    // don't leave a root-owned config file lying around
    if (myUid === 0) {
        const st = await stat(dir).catch(() => null)
        if (st && (st.uid !== myUid || st.gid !== myGid))
            await chown(conf.source, st.uid, st.gid).catch(() => {})
    }
    const mode = where === 'user' ? 0o600 : 0o666
    await chmod(conf.source, mode)
}
至此,npm config set的执行完成。总体上就是围绕着npm实例的Config实例来完成运行时配置项的设置。
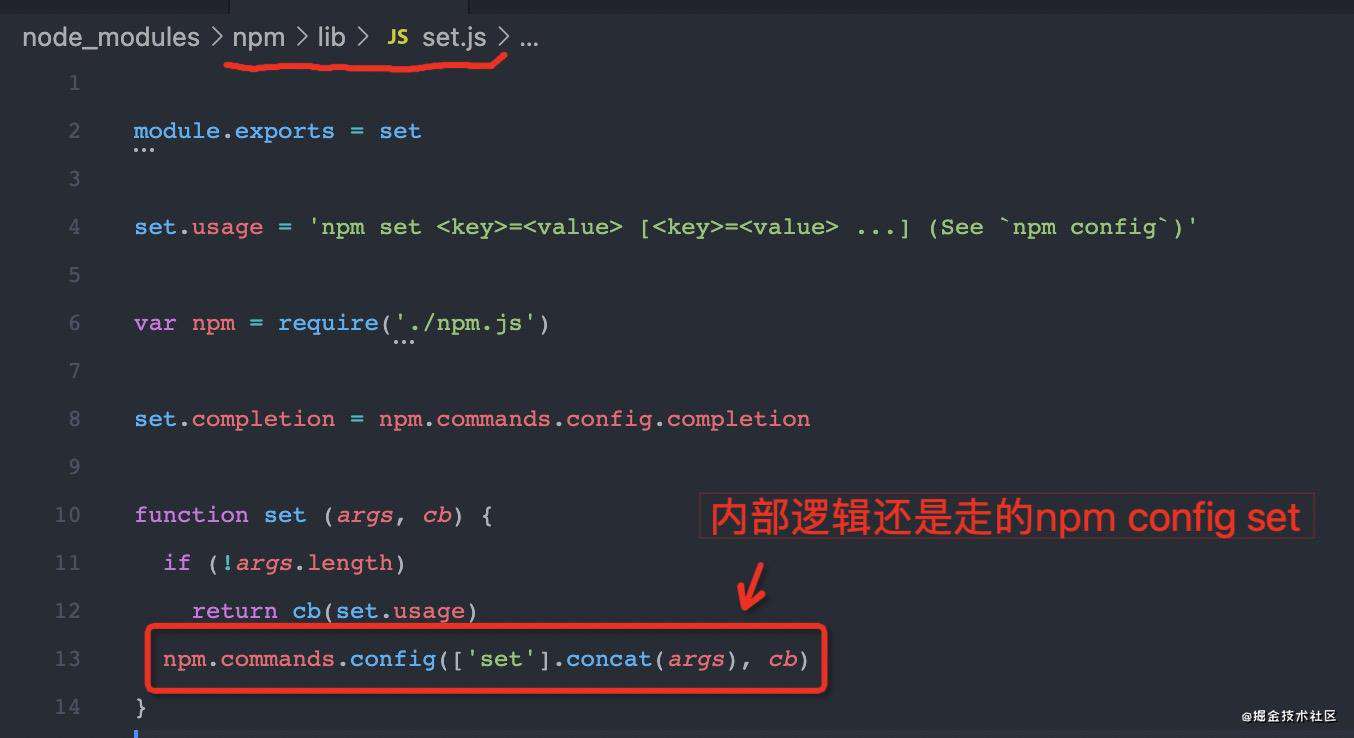
加个小插曲,不知道大家有没有发现在npm config的使用帮助里有一条是npm set。npm set作为npm的一个命令,其本质就是npm config set,npm set可以作为npm config set的一个快捷方式。
Get
相对与Set子命令,Get子命令就简单很多。它的用处就是展示对应配置项或所有配置项。
还是拿registry举个例子,这次换成我们获取registry这个配置项的值,npm config get registry。
const get = async keys => {
    if (!keys.length) return list()
    const out = []
    for (const key of keys) {
        if (!publicVar(key))
            throw `The ${key} option is protected, and cannot be retrieved in this way`
        const pref = keys.length > 1 ? `${key}=` : ''
        out.push(pref + npm.config.get(key))
    }
    output(out.join('\n'))
}
从上面的源码里大家肯定发现了npm config get可以不传参数,此时就会fallback到npm config list,也就是展示所有的配置项信息。大家只要了解npm config get等价于npm config list,list方法我们下面再说,先聚焦到get方法上来。
这里参数keys就是["registry"]。如果要获取多个key对应的配置项信息,这里就会出现对应的key值。
get方法内部逻辑非常简单,就是遍历keys,从Config实例里获取对应的值,拼接成out输出字符串,最后输出到终端上。
至此,Get子命令执行完成,逻辑比较简单。
上面留了一个伏笔,也就是npm config get不传参时,事实上就是npm config list,那我们趁热打铁,看看list方法做了什么。
从源码上看到list子命令也有一个别名,ls,同时我们发现它根据json标志位来决定具体的展示方式,当npm config list --json时,它会以listJson来展示,否则就是普通的list展示。
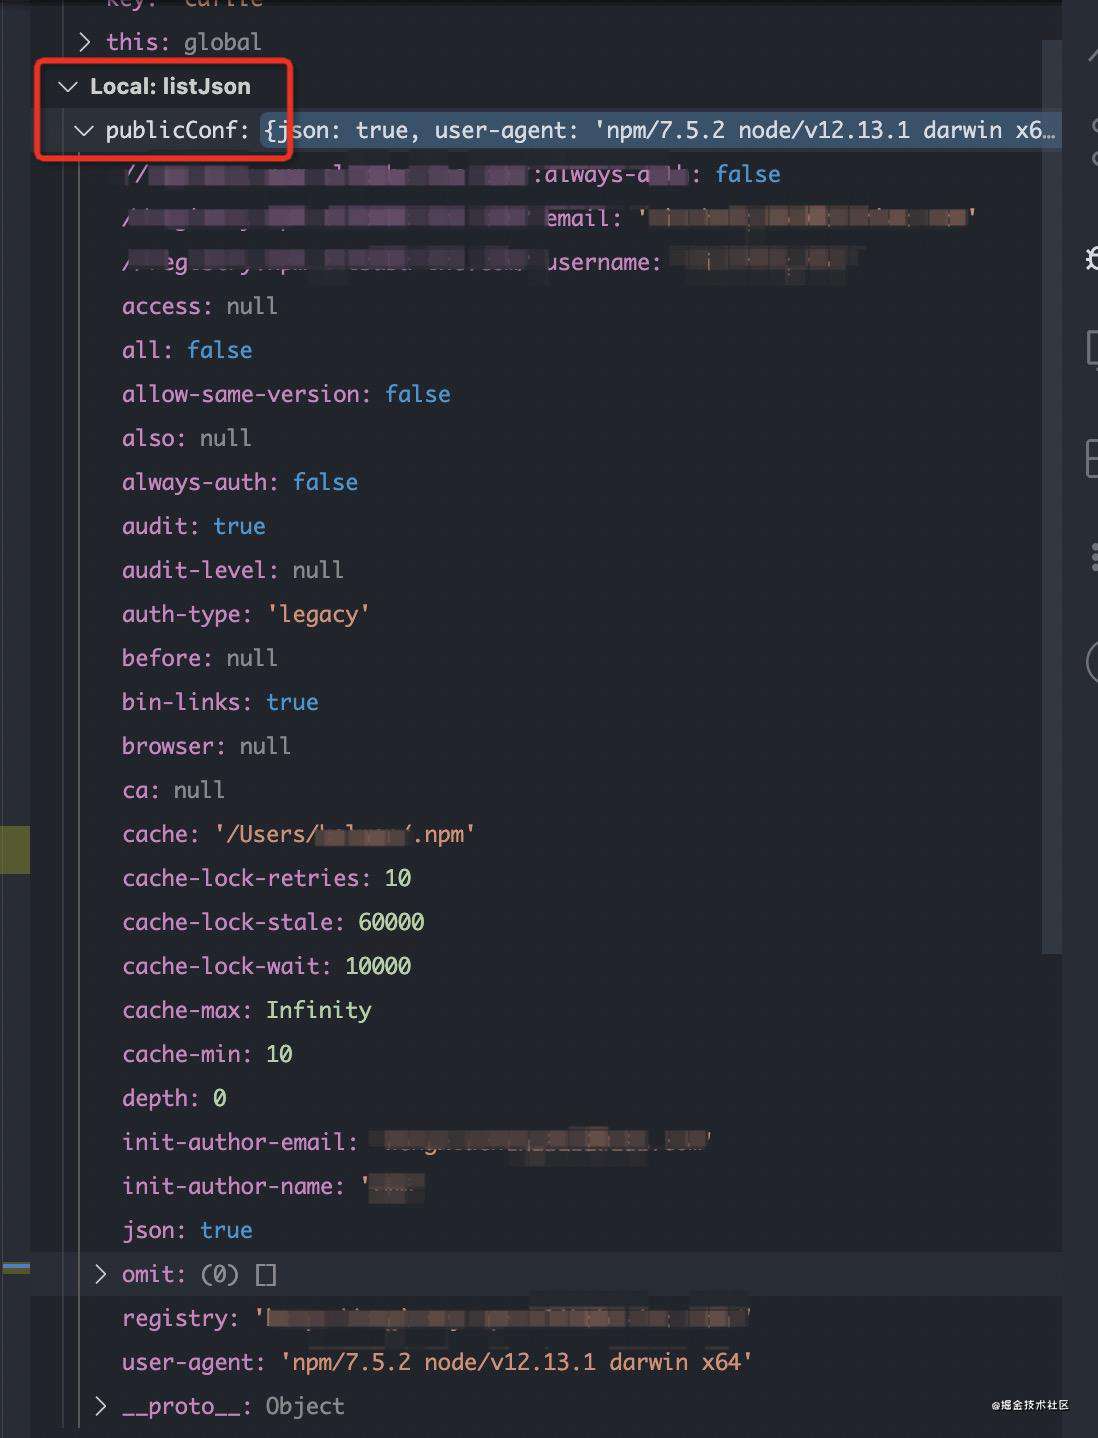
先来看下listJson,
const listJson = async () => {
    const publicConf = {}
    for (const key in npm.config.list[0]) {
        if (!publicVar(key))
            continue
        publicConf[key] = npm.config.get(key)
    }
    output(JSON.stringify(publicConf, null, 2))
}
npm.config.list里存放的就是配置数据ConfigData原型链,listJson并没有复杂的逻辑,就是遍历配置数据原型链,把所有配置项key对应的值都取出来,放到同一个对象上来,最后JSON.stringify输出。
再来看普通list展示:
直接贴上源码,从源码里看,普通list有几个特殊处理
- 特殊命令行option标志位
--long,它是用来控制是否展示默认配置项。 - 会对所有的配置项key进行排序
- 会议
key=value的形式逐行展示,而不同于listJson的json串形式展示
对照下面源码
const list = async () => {
    const msg = []
    const { long } = npm.flatOptions
    for (const [where, { data, source }] of npm.config.data.entries()) {
        if (where === 'default' && !long)
            continue
        const keys = Object.keys(data).sort((a, b) => a.localeCompare(b))
        if (!keys.length)
            continue
        msg.push(`; "${where}" config from ${source}`, '')
        for (const k of keys) {
            const v = publicVar(k) ? JSON.stringify(data[k]) : '(protected)'
            const src = npm.config.find(k)
            const overridden = src !== where
            msg.push((overridden ? '; ' : '') +
                    `${k} = ${v} ${overridden ? `; overridden by ${src}` : ''}`)
        }
        msg.push('')
    }
    ...
    output(msg.join('\n').trim())
}
List子命令和Get子命令本质上是比较像的,一个是展示所有配置项key的值,一个是展示一个或多个配置项key的值,当然Get也可以一次展示所有的key。
Delete
接下来就是delete,从源码里我们可以发现delete子命令有两个等价的别名,分别是rm、del。
直接来看del方法:
const del = async keys => {
    if (!keys.length)
        throw UsageError()
    const where = npm.flatOptions.global ? 'global' : 'user'
    for (const key of keys)
        npm.config.delete(key, where)
    await npm.config.save(where)
}
颇有点与set方法类似,同样我们以npm config delete registry为例。这里keys里就是["registry"]
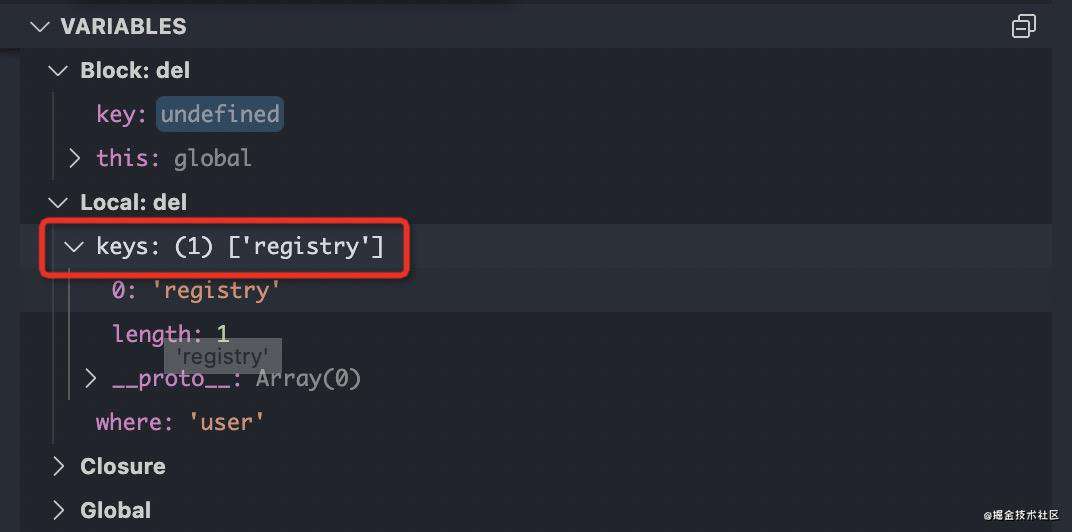
还是要遍历keys并逐个key进行删除,同样配置项所在命名空间有-g这个option决定。
npm.config.delete(key, where)
核心逻辑还是走的Config实例的delete方法,大家应该也发现了,npm config命令及其子命令都是关于npm实例的Config实例的。
delete (key, where = 'cli') {
    if (!this.loaded)
        throw new Error('call config.load() before deleting values')
    if (!confTypes.has(where))
        throw new Error('invalid config location param: ' + where)
    delete this.data.get(where).data[key]
}
npm.config.delete的核心逻辑就是把对应命名空间的对应key移除掉,直接delete掉这个key
delete this.data.get(where).data[key]
最后同样的是保存配置当前配置,和Set子命令一样,这里就不在赘述了。
await npm.config.save(where)
这样,Delete子命令的执行逻辑就完成了。
总结
npm config在日常开发中需要灵活运用,依靠它我们能搭一些不同的npm运行时,比如设置默认安装prefix、registry;设置包初始化init时的用户信息等等。npm7.0的代码重构,一定程度上把npm实例的运行时配置Config的作用的重要性更加凸显出来,同时把npm运行时核心更加内聚化,对于npm命令的扩展和维护提供了坚实的基础。
常见问题FAQ
- 免费下载或者VIP会员专享资源能否直接商用?
- 本站所有资源版权均属于原作者所有,这里所提供资源均只能用于参考学习用,请勿直接商用。若由于商用引起版权纠纷,一切责任均由使用者承担。更多说明请参考 VIP介绍。
- 提示下载完但解压或打开不了?
- 找不到素材资源介绍文章里的示例图片?
- 模板不会安装或需要功能定制以及二次开发?


发表评论
还没有评论,快来抢沙发吧!