前言
nodejs系列文章传送门:
- nodejs可以说的秘密之node index.js到底做了什么
- npm源码分析(-)之npm启动
在npm启动中我们已经了解了npm启动时的整体执行逻辑,包括如何获取所有运行时配置信息。在npm.load之后,就会根据这些配置信息进行具体的命令执行逻辑调用。今天我们就先来看看日常开发中最最常见的命令npm install是如何工作的,接下来就以npm install为例来看看它内部到底是如何对我们的包进行安装的。话不多说,直接进入正题,以下源码分析都是基于npm@7.0。
执行过程
在开始我们的分析前,同样我们一边debug,一边分析它的整个执行过程,vscode launch.json走起。
{
  "version": "0.2.0",
  "configurations": [
    {
      "type": "node",
      "runtimeExecutable": "/usr/local/bin/node",
      "request": "launch",
      "name": "Launch Program",
      "skipFiles": [
        "<node_internals>/**"
      ],
      "program": "index.js",
      "args": ["i", "nopt", "--no-package-lock"]
    }
  ]
}
直接进到lib/install.js,在install方法里收到的args就是我们要安装的所有包名的列表,这里就是['nopt']。
const install = async args => {
    ...
  const arb = new Arborist({
    ...npm.flatOptions,
    path: where,
  })

  await arb.reify({
    ...npm.flatOptions,
    add: args,
  })
  ...
  await reifyFinish(arb)
}
我们去掉其他一些非核心逻辑代码,聚焦一下发现在install方法的核心逻辑是获取Arborist实例,我特定查了一下这个类Arborist的中文翻译是"树木研究者"。真的非常贴切,在install命令的整个执行过程里,就是对我们所有项目依赖进行整理并构建一棵完美的node_modules依赖文件树的过程,因此我们就必须好好看一下类Arborist的构造器。
const mixins = [
  require('../tracker.js'),
  require('./pruner.js'),
  require('./deduper.js'),
  require('./audit.js'),
  require('./build-ideal-tree.js'),
  require('./load-workspaces.js'),
  require('./load-actual.js'),
  require('./load-virtual.js'),
  require('./rebuild.js'),
  require('./reify.js'),
]

const Base = mixins.reduce((a, b) => b(a), require('events'))

class Arborist extends Base {
现在被统一封装抽离到scope@npmcli下的arborist包里,在基类EventEmitter的基础上compose之后形成一条比较长的继承链,经过这样的重构之后,逻辑更加清晰,分而治之,各司其职,而且从各个模块的名称我们也能大概了解整个执行过程了。
- 包括包整理(reify)
- 加载虚拟节点树(loadVirtual/loadActual)
- 加载工作区(loadWorkspaces)
- 构建文件目录树(buildIdealTree)
- 审核/去重/修剪(audit/deduper/pruner)
- 重构(rebuild)
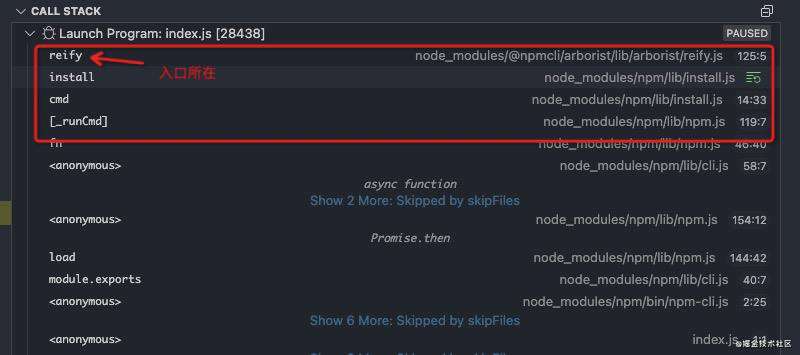
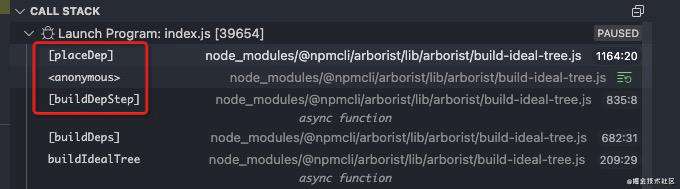
执行逻辑入口就是从Arborist实例的reify方法开始,也就是这个继承链的底部的./reify.js,因为compose之后的调用顺序是从底向上的。从下图的call stack里也能看到先是进入到了./reify.js。
reify内部的核心逻辑如下:
async reify (options = {}) {
    ...
    await this[_validatePath]()
      .then(() => this[_loadTrees](options))
      .then(() => this[_diffTrees]())
      .then(() => this[_reifyPackages]())
      .then(() => this[_saveIdealTree](options))
      .then(() => this[_copyIdealToActual]())
      .then(() => this[_awaitQuickAudit]())
        ...
  }
依赖整理
在reify方法里,核心逻辑就是整理并去重所有项目用到的依赖,包括在package.json里的dependencies、devDependencies、peerDependencies、bundleDependencies等等这些字段下的所有包,同时会递归处理依赖的依赖,最后构建完成的node_modules依赖树,也就是我们node_modules目录下的文件目录结构。下面我们来看一下详细的处理逻辑。
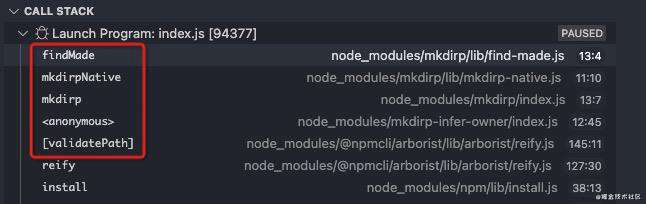
目录校验
首先校验当前目录路径是否有效,判断当前目录路劲是否已经创建,若未创建则创建之。
加载依赖树
一般项目安装依赖时都不是全局安装,因此这个时候会同时进行loadActual和buildIdealTree,至于为什么要这样同时进行这两个操作呢?先带着这个问题,继续往下。
if (!this[_global]) {
      return Promise.all([this.loadActual(actualOpt), this.buildIdealTree(bitOpt)])
        .then(() => process.emit('timeEnd', 'reify:loadTrees'))
    }
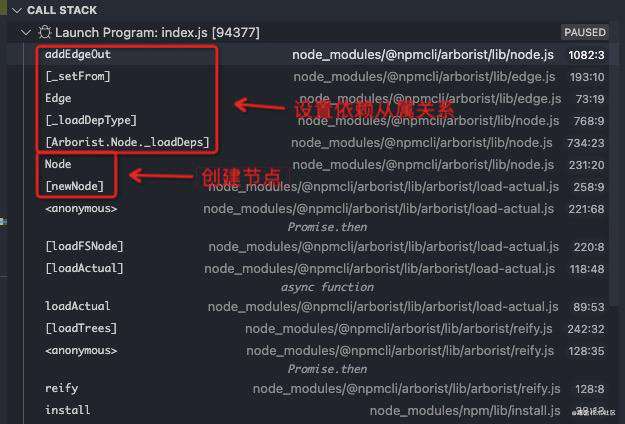
在loadActual时,
this[_actualTree] = await this[_loadFSNode]({
      path: this.path, // 此时并没有传递 parent 和 root 参数,因为现在还处在项目目录级别
      real: await realpath(this.path, this[_rpcache], this[_stcache]),
    })
首先就是创建以当前目录为root的根节点,因为此时还不存在parent和root。方式就是通过rpj读取package.json信息创建root节点并设置缓存。在创建节点时会同时加载节点依赖信息,不过此时并没有创建依赖子节点。
[_loadFSNode] ({ path, parent, real, root }) {
  const p = rpj(join(real, 'package.json'))
        // soldier on if read-package-json raises an error
        .then(pkg => [pkg, null], error => [null, error])
        .then(([pkg, error]) => {
          return this[normalize(path) === real ? _newNode : _newLink]({
            legacyPeerDeps: this.legacyPeerDeps,
            path,
            realpath: real,
            pkg,
            error,
            parent,
            root,
          })
        })
        .then(node => {
          this[_cache].set(path, node)
          return node
        })

    this[_cache].set(path, p)
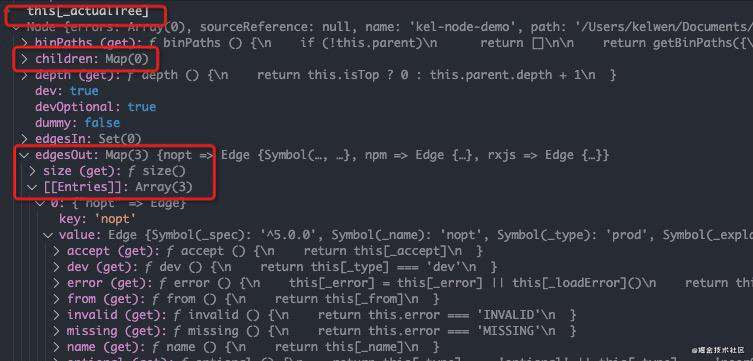
在创建完root节点之后,此时得到的actualTree是这样的,如下图所示:
此时并没有创建叶子节点,也就是node.children是空的,而所有的依赖信息存储在node.edgesOut中。
接下来就是Shrinkwrap类登场的时候了,该类的作用就是从lockfile中加载依赖。
const meta = await Shrinkwrap.load({
      path: this[_actualTree].path,
      hiddenLockfile: true,
    })
    if (meta.loadedFromDisk) {
      this[_actualTree].meta = meta
      return this[_loadActualVirtually]({ root }) // 这里的root就是上面创建的根节点
    } else {
      const meta = await Shrinkwrap.load({
        path: this[_actualTree].path,
      })
      this[_actualTree].meta = meta
      return this[_loadActualActually]({ root, ignoreMissing })
    }
我们看下Shrinkwrap.load方法,
load () {
    // we don't need to load package-lock.json except for top of tree nodes,
    // only npm-shrinkwrap.json.
    return this[_maybeRead]().then(([sw, lock, yarn]) => {
      const data = sw || lock || ''

      // use shrinkwrap only for deps, otherwise prefer package-lock
      // and ignore npm-shrinkwrap if both are present.
      // TODO: emit a warning here or something if both are present.
      this.filename = resolve(this.path,
        (this.hiddenLockfile ? 'node_modules/.package-lock'
        : this.shrinkwrapOnly || sw ? 'npm-shrinkwrap'
        : 'package-lock') + '.json')
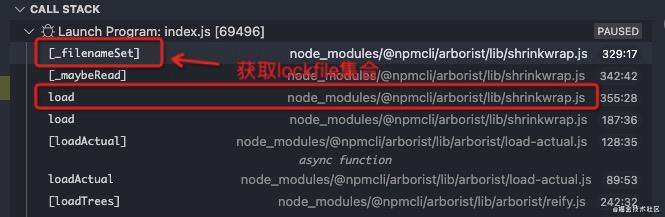
我们着重看下[_maybeRead]方法,来分析下npm内部都用了哪些lockfile。结合下图call stack来看,通过[_filenameSet]方法,我们能拿到所有的lockfile集合,包括:
- npm-shrinkwrap.json,在
shrinkwrapOnly:true时单独生效 - /node_modules/.package-lock.json,在
hiddenLockfile:true时单独生效 - /package-lock.json,其他情况下
- /yarn.lock,其他情况下
总而言之,是[npm-shrinkwrap, package-lock, yarn.lock],这三者组成的一个列表,这三个lockfile的值确定了loadedFromDisk字段是否为真。
[_filenameSet] () {
    return this.shrinkwrapOnly ? [
      this.path + '/npm-shrinkwrap.json',
    ] : this.hiddenLockfile ? [
      null,
      this.path + '/node_modules/.package-lock.json',
    ] : [
      this.path + '/npm-shrinkwrap.json',
      this.path + '/package-lock.json',
      this.path + '/yarn.lock',
    ]
  }
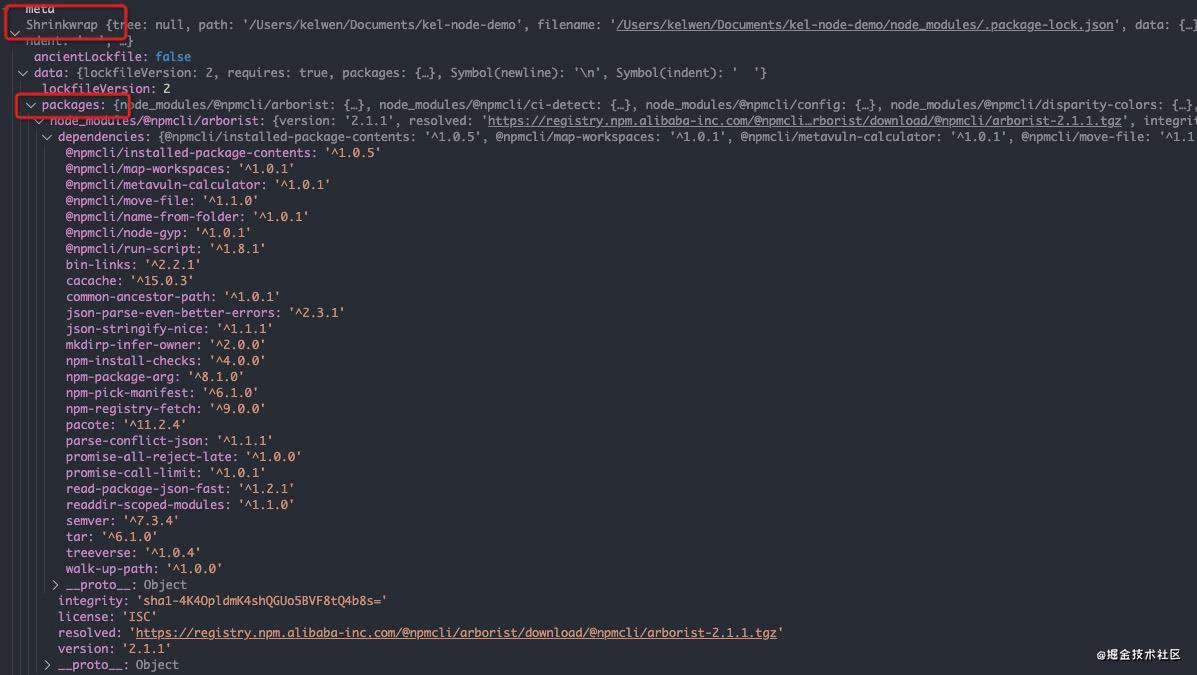
经过Shrinkwrap.load,我们就能获取到关于项目依赖的所有meta信息,它实际上就是一个Shrinkwrap实例信息,如下图所示:
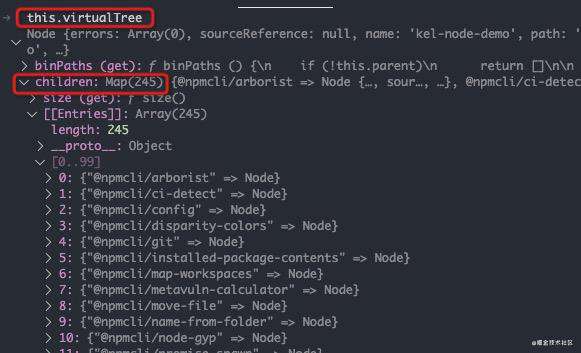
根据项目依赖meta元信息里的meta.data.packages解析所有包并创建子节点Node实例,最后把新得到的子节点Node实例添加到root.children里,这样一棵关于项目全部依赖的完整虚拟节点树就构建好了。

大家可以看下virtualTree长什么样:
构建依赖树
在生成虚拟节点树的同时,会获取idealTree这棵依赖节点树,那它和虚拟节点树有什么关系呢?那就让我们来看下buildIdealTree这个方法:
 async buildIdealTree (options = {}) {
    if (this.idealTree)
      return Promise.resolve(this.idealTree)

      ...

    this[_parseSettings](options)

    ...
    await this[_initTree]()
    await this[_applyUserRequests](options)
    await this[_inflateAncientLockfile]()
    await this[_buildDeps]()
    await this[_fixDepFlags]()
    await this[_pruneFailedOptional]()
    await this[_checkEngineAndPlatform]()

    ...
    return treeCheck(this.idealTree)
  }
[_initTree],实际上和前面的[_loadActual]异曲同工,都是为了获得虚拟节点树,不同的是,此时得到的是idealTree,其实这个idealTree和virtualTree没有任何区别,都是关于依赖节点Node实例的树,后续就是根据这个idealTree来构建node_modules文件目录树。
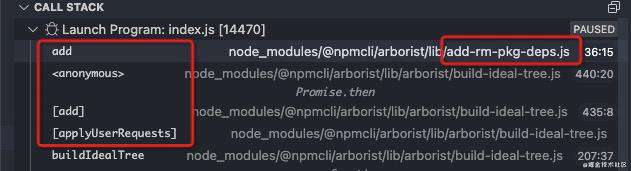
[_applyUserRequests],顾名思义,就是把待安装的包添加到请求队列[_explicitRequests]里,等待被安装,如下图所示。
[_inflateAncientLockfile],这个方法的作用是,当存在版本不一致的lockfile时,需要根据这个lockfile获取当前节点树里的所有节点的manifest并用这个manifest重新设置每一个节点的package信息。
[_buildDeps],接下来就是关键的构建依赖环节,这个方法的源码比较长,所有关于依赖包的解析都在这里进行,大家可以好好看看这个方法的注释,注释里解释了很多的执行逻辑。
- 根据如下图所示的
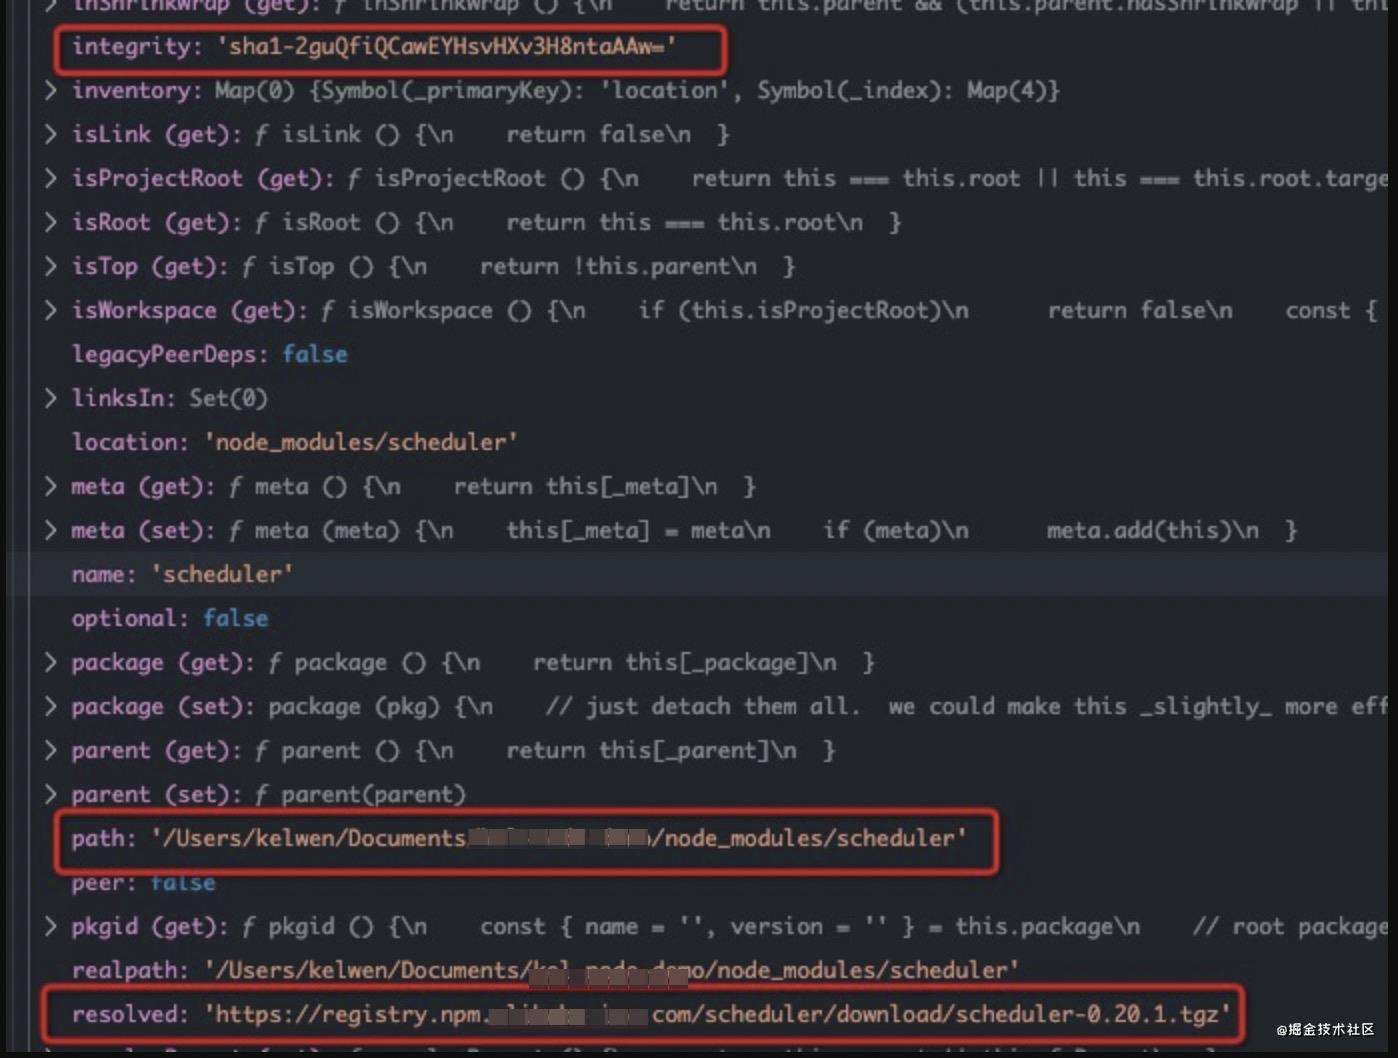
node.resolved提取tarball,存放在临时目录下

-
递归从lockfile中加载当前依赖的节点子树
await cacache.tmp.withTmp(this.cache, opt, async path => { await pacote.extract(node.resolved, path, opt) // 提取tarball
    if (hasShrinkwrap) {
      await new Arborist({ ...this.options, path })
        .loadVirtual({ root: node })
    }

    if (hasBundle) {
      await new Arborist({ ...this.options, path })
        .loadActual({ root: node, ignoreMissing: true })
    }
  })
[_fixDepFlags],重置所有依赖标志位。
[_pruneFailedOptional],修剪掉所有加载失败的依赖。
[_checkEngineAndPlatform],校验每个依赖package.json下的engines及os字段是否满足当前node版本及平台类型要求。
对比依赖树
拿actualTree和idealTree做对比,得到需要移除的节点列表,然后遍历将其移除。其对应的diff逻辑也比较简单。将actualTree及idealTree中所有依赖的包路径path为键并全部去重放到一个Set中,再根据对应的path来判断actualTree与idealTree中是否包含当前解析的依赖,从而来确定diff动作。
- 如果
actualTree中存在而idealTree中不存在则代表要移除REMOVE该path对应的依赖 - 如果
actualTree中不存在而idealTree不存在则代表添加ADD - 如果都存在则是修改
CHANGE
整理packages
这部分的重构也是7.0版本的一大亮点。将所有整理步骤中rollback和action一一对应起来处理,一旦action执行失败则rollback。
async [_reifyPackages] () {
    ...

    // [rollbackfn, [...actions]]
    // after each step, if the process was terminated, execute the rollback
    // note that each rollback *also* calls the previous one when it's
    // finished, and then the first one throws the error, so we only need
    // a new rollback step when we have a new thing that must be done to
    // revert the install.
    const steps = [
      [_rollbackRetireShallowNodes, [
        _retireShallowNodes,
      ]],
      [_rollbackCreateSparseTree, [
        _createSparseTree,
        _addOmitsToTrashList,
        _loadShrinkwrapsAndUpdateTrees,
        _loadBundlesAndUpdateTrees,
        _submitQuickAudit,
        _unpackNewModules,
      ]],
      [_rollbackMoveBackRetiredUnchanged, [
        _moveBackRetiredUnchanged,
        _build,
      ]],
    ]
    for (const [rollback, actions] of steps) {
      for (const action of actions) {
        try {
          await this[action]()
          if (reifyTerminated)
            throw reifyTerminated
        } catch (er) {
          await this[rollback](er)
          /* istanbul ignore next - rollback throws, should never hit this */
          throw er
        }
      }
    }

    ...
  }
该方法中,其他细节总结起来都还是围绕虚拟节点树做最后的完善,这些方法大家可以结合源码看一下,我在这里就不赘述了:
- _createSparseTree
- _addOmitsToTrashList
- _loadShrinkwrapsAndUpdateTrees
- _loadBundlesAndUpdateTrees
最最关键的处理逻辑是在[_unpackNewModules]方法里,从名字上我们也能明白这个方法就是最后安装新依赖的地方。

从上面的call stack可以看出,对树的所有节点开始遍历,逐个提取tarball或做软连接symlink,就如下面[_extractOrLink]方法里的核心逻辑所示,结合下面的节点实例信息图来看,最后就会在我们项目目录中生成对应的依赖包文件。
[_extractOrLink] (node) {
    ...
    return node.isLink
      ? rimraf(node.path).then(() => this[_symlink](node))
      : pacote.extract(res, node.path, {
        ...this.options,
        resolved: node.resolved,
        integrity: node.integrity,
      })
  }
经过这一波的虚拟节点树遍历,我们的node_modules依赖目录就生成好了。最后的最后,
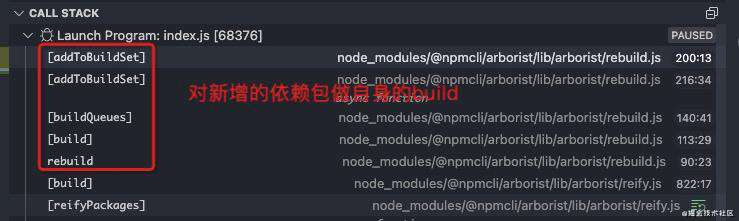
_moveBackRetiredUnchanged_build,对新增的依赖包做自身的build逻辑,也就是执行对应所有的**install hooks**逻辑
[_buildQueues]方法里,构建好这些hooks执行队列,
for (const node of queue) {
      const { package: { bin, scripts = {} } } = node
      const { preinstall, install, postinstall, prepare } = scripts
      const tests = { bin, preinstall, install, postinstall, prepare }
      for (const [key, has] of Object.entries(tests)) {
        if (has)
          this[_queues][key].push(node)
      }
    }
最后在[_runScripts]里分别执行对应hook名称的队列,而且在遍历过程中,对于每一个节点都会spawn一个新的子进程来跑相关的逻辑:
具体的runScript逻辑我就不赘述了,大家有兴趣可以自行去看下源码了解下。
async [_runScripts] (event) {
    const queue = this[_queues][event]
        ...
    await promiseCallLimit(queue.map(node => async () => {
      const {
        path,
        integrity,
        resolved,
        optional,
        peer,
        dev,
        devOptional,
        package: pkg,
        location,
      } = node.target || node
            ...
      const env = { // 构建所有的环境变量,通过spawn传递进去,这些都是npm命令所需的环境变量参数
        npm_package_resolved: resolved,
        npm_package_integrity: integrity,
        npm_package_json: resolve(path, 'package.json'),
        npm_package_optional: boolEnv(optional),
        npm_package_dev: boolEnv(dev),
        npm_package_peer: boolEnv(peer),
        npm_package_dev_optional:
          boolEnv(devOptional && !dev && !optional),
      }
      const runOpts = {
        event,
        path,
        pkg,
        stdioString: true,
        stdio,
        env,
        scriptShell: this[_scriptShell],
      }
      const p = runScript(runOpts)
      ...
    }), limit)
  }
总结
至此,整个npm install的处理逻辑已经分析完啦,其实还有挺多逻辑分支没细细讲到,这部分后续还是会再详细起一篇文章来讲一下。有了上面的分析,希望给大家在看源码的时候思路上提供一点帮助,同时对于我自己来说,会给后面完善install命令的逻辑细节起到很大帮助。欢迎大家评论,互相学习进步。

常见问题FAQ
- 免费下载或者VIP会员专享资源能否直接商用?
- 本站所有资源版权均属于原作者所有,这里所提供资源均只能用于参考学习用,请勿直接商用。若由于商用引起版权纠纷,一切责任均由使用者承担。更多说明请参考 VIP介绍。
- 提示下载完但解压或打开不了?
- 找不到素材资源介绍文章里的示例图片?
- 模板不会安装或需要功能定制以及二次开发?


发表评论
还没有评论,快来抢沙发吧!