引言
从React的渲染流程我们知道,JSX 会先转为一颗 Fiber Tree,然后通过 Renderer 渲染成页面。对于 Web 平台,这个 Renderer 就是 react-dom,对于 Native 平台,这个 Renderer 就是 react-native。当然,我们也可以创建我们自己的 Renderer,将 React 应用渲染到其他目标平台,比如本文中的 Canvas:

下面就来剖析下 Canvas Renderer 的实现方式。
Canvas Renderer
组件
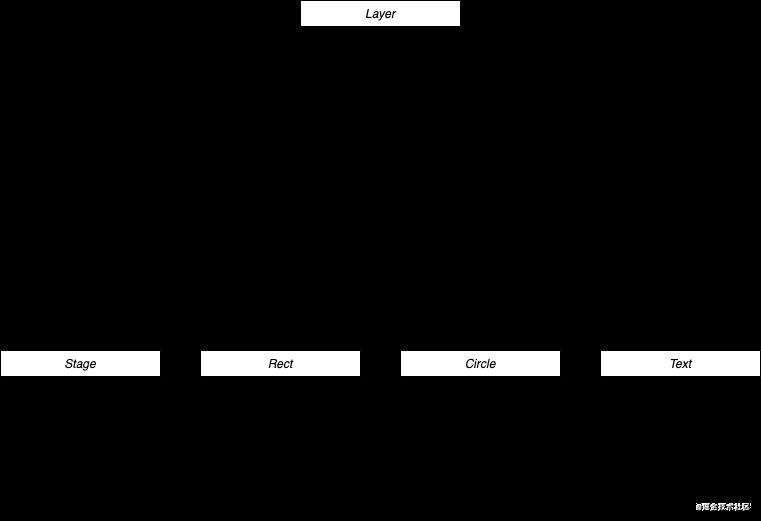
如图,我们的 Canvas Renderer 包括 Stage,Rect,Circle,Text 这些组件,其中将他们一些公共的特征抽离成了一个父类 Layer。
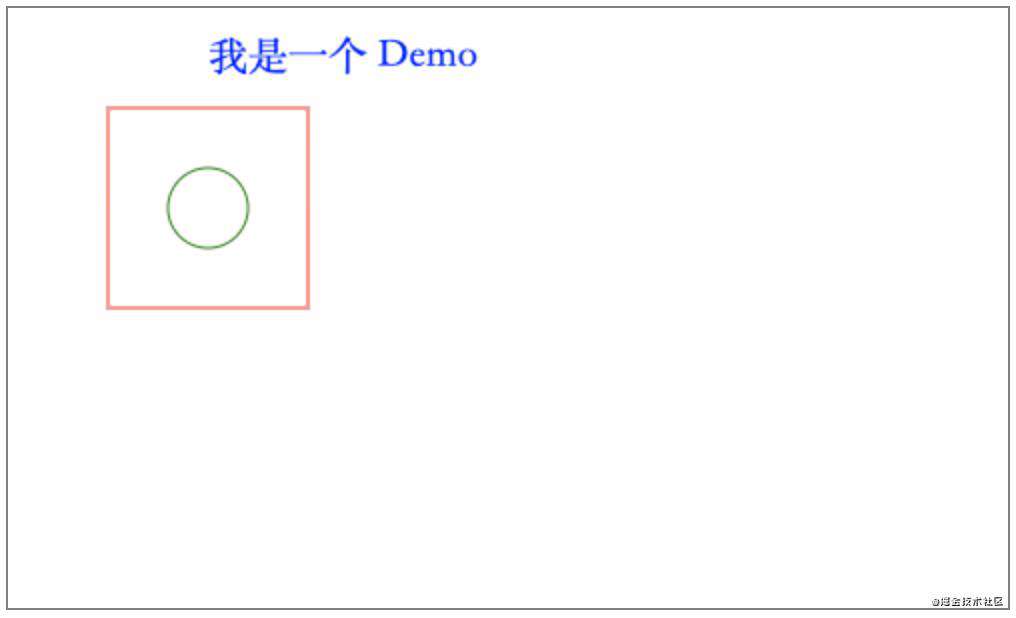
不需要 React,现在的 Canvas Renderer 已经可以渲染出内容了,比如:
const renderDom = document.getElementById('demo')

const stage = new Stage({
  renderDom,
  width: 500,
  height: 300,
  style: {border: '1px solid gray'},
})
const rect = new Rect({x: 50, y: 50, width: 100, height: 100, color: 'red'})
const circle = new Circle({x: 50, y: 50, radius: 20, color: 'green'})
const text = new Text({
  content: '我是一个 Demo',
  fillStyle: 'blue',
  x: 100,
  y: 30,
  font: '20px serif',
})
rect.appendChild(circle)
stage.appendChild(text)
stage.appendChild(rect)
stage.render()
Canvas Renderer 实现方式
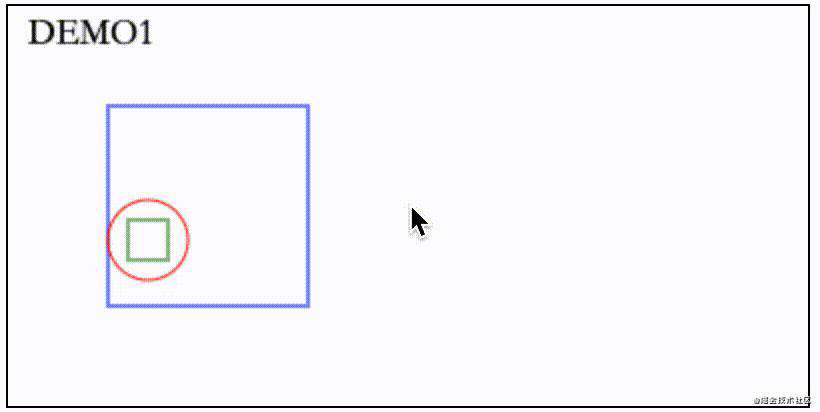
我们通过引言中第一个 Demo 来分析 Canvas Renderer 的实现方式:
// Demo1.jsx
import {useEffect, useState} from 'react'

const R = 20
const W = 100
const H = 100

function Demo1() {
  const [x, setX] = useState(R)
  const [y, setY] = useState(R)
  useEffect(() => {
    setTimeout(() => {
      if (y === R && x < W - R) {
        setX(x + 1)
      } else if (x === W - R && y < H - R) {
        setY(y + 1)
      } else if (y === H - R && x > R) {
        setX(x - 1)
      } else {
        setY(y - 1)
      }
    }, 10)
  }, [x, y])
  return (
    <>
      <text x={10} y={20} content='DEMO1' font='18px serif' fillStyle='black' />
      <rect x={50} y={50} width={W} height={H} color='blue'>
        <circle x={x} y={y} radius={R} color='red'>
          <rect x={-10} y={-10} width={20} height={20} color='green' />
        </circle>
      </rect>
    </>
  )
}

export default Demo1

// index.js
import CanvasRenderer from './CanvasRenderer'
import Demo1 from './Demo1'

CanvasRenderer.render(<Demo1 />, document.getElementById('demo1'), {
  width: 400,
  height: 200,
  style: {
    backgroundColor: 'white',
    border: '1px solid gray',
  },
})
Demo1 是一个函数组件,返回了 text、rect、 circle 这些标签,这些标签需要我们 Canvas Renderer 来进行渲染,接下来看看 render 函数做了啥:
const reconcilerInstance = Reconciler(HostConfig)
const CanvasRenderer = {
  render(element, renderDom, {width, height, style}, callback) {
    const stage = new Stage({renderDom, width, height, style})
    const isAsync = false // Disables async rendering
    const container = reconcilerInstance.createContainer(stage, isAsync) // Creates root fiber node.
    const parentComponent = null // Since there is no parent (since this is the root fiber). We set parentComponent to null.

    reconcilerInstance.updateContainer(
      element,
      container,
      parentComponent,
      callback
    ) // Start reconcilation and render the result
  },
}
该函数主要是创建了一个 Stage 对象作为 Reconciler 对象 reconcilerInstance 的 container,最后调用 reconcilerInstance.updateContainer() 将 Demo1 组件通过 Canvas Renderer 进行渲染。我们知道 Reconciler 在 React 渲染流程中充当着非常重要的作用,它会计算出哪些组件需要更新,并会将需要更新的信息提交给 Renderer 来处理,而将 Reconciler 和 Renderer 连接起来的秘诀就在 HostConfig 之中:
const HostConfig = {
  supportsMutation: true,
  // 通过 FiberNode 创建 instance,会保存在 FiberNode 的 stateNode 属性上
  createInstance(
    type,
    newProps,
    rootContainerInstance,
    currentHostContext,
    workInProgress
  ) {
    let element
    switch (type) {
      case 'rect':
        element = new Rect(newProps)
        break
      case 'circle':
        element = new Circle(newProps)
        break
      case 'text':
        element = new Text(newProps)
        break
      default:
        break
    }
    return element
  },

  /* 操作子组件相关 */
  appendInitialChild(parent, child) {
    parent.appendChild(child)
  },
  appendChildToContainer(parent, child) {
    parent.appendChild(child)
  },
  appendChild(parent, child) {
    parent.appendChild(child)
  },
  insertBefore(parent, child, beforeChild) {
    parent.insertBefore(child, beforeChild)
  },
  removeChild(parent, child) {
    parent.removeChild(child)
  },

  /* 组件属性发生变化时会调用该方法 */
  commitUpdate(
    instance,
    updatePayload,
    type,
    oldProps,
    newProps,
    finishedWork
  ) {
    instance.update(newProps)
  },

  // react 流程结束后,调用此方法,我们可以在这里触发我们的渲染器重新渲染
  // 此处参考 remax:https://github.com/remaxjs/remax/blob/80606f640b08c79b9fc61d52a03355f0282c5e14/packages/remax-runtime/src/hostConfig/index.ts#L63
  resetAfterCommit(container) {
    container.render()
  },
  getRootHostContext(nextRootInstance) {
    const rootContext = {}
    return rootContext
  },
  getChildHostContext(parentContext, fiberType, rootInstance) {
    const context = {}
    return context
  },
  prepareForCommit(rootContainerInstance) {
    return null
  },
  prepareUpdate(
    instance,
    type,
    oldProps,
    newProps,
    rootContainerInstance,
    currentHostContext
  ) {
    return {}
  },
  // 暂时不需要实现的接口
  finalizeInitialChildren() {},
  appendAllChildren(...args) {},
  commitTextUpdate(textInstance, oldText, newText) {},
  removeChildFromContainer(container, child) {},
  commitMount(domElement, type, newProps, fiberNode){},
  clearContainer(...args) {},
  createTextInstance(
    newText,
    rootContainerInstance,
    currentHostContext,
    workInProgress
  ) {},
  shouldSetTextContent(...args) {},
}
HostConfig 中是我们的 Canvas Renderer 需要实现的一些接口,这里来说明一下:
supportsMutation
当前渲染器是否支持修改节点,毫无疑问这里必须是 true。
createInstance
该函数会在通过 FiberNode 创建宿主相关的元素时进行调用,返回的元素会保存在 FiberNode 的 stateNode 属性上,参考React的渲染流程。对于 Canvas Renderer 来说,这里会根据 type 值创建出不同的组件。
appendInitialChild、appendChild、appendChildToContainer、insertBefore
这几个接口都涉及到元素的插入操作,前三个是把元素插到最后面,其中 appendInitialChild 在首次渲染时调用,appendChild 在更新的时候调用,而 appendChildToContainer 则在把元素插入到 container 时使用,对于 Canvas Renderer 来说,这些接口中均调用 parent.appendChild(child) 即可:
  appendChild(child) {
    this.__children.push(child)
    child.parent = this
  }
而 insertBefore 则是把元素插入到某个元素前面,同样,Canvas Renderer 也有对应的实现:
  insertBefore(child, beforeChild) {
    for (let i = 0; i < this.__children.length; i++) {
      if (this.__children[i] === beforeChild) {
        this.__children.splice(i, 0, child)
        child.parent = this
        break
      }
    }
  }
commitUpdate
当组件属性发生变化的时候会调用该函数,Canvas Renderer 对应的实现方法也比较简单,即更新 instance 的属性即可:
  update(props) {
    Object.keys(props).forEach((k) => {
      this[k] = props[k]
    })
  }
resetAfterCommit
在React 源码解读之一首次渲染流程这篇文章中已阐明 React 的每次更新过程包括 Render 和 Commit 两大阶段,其中 Render 阶段会计算出 Effect 链表供 Commit 阶段处理,而 resetAfterCommit 这个函数就是在 Commit 阶段执行完 commitMutationEffects 函数后进行调用,此时所有对元素的更新操作已处理完毕,所以这里是一个适合 Canvas Renderer 调用 container.render() 进行重新渲染的地方。该函数中首先清空了整个画布,然后依次调用子组件的 render 方法:
// Stage.js
  render() {
    this.context.clearRect(0, 0, this.width, this.height)
    this.renderChildren()
  }
// Layer.js
  renderChildren() {
    for (let child of this.__children) {
      child.render()
    }
  }
// Rect.js
  render() {
    const {x, y, stage} = this.resolvePosAndStage()
    if (!stage) return
    stage.context.beginPath()
    stage.context.rect(x, y, this.width, this.height)
    stage.context.strokeStyle = this.color
    stage.context.stroke()
    this.renderChildren()
  }
// Circle.js
  render() {
    const {x, y, stage} = this.resolvePosAndStage()
    if (!stage) return
    stage.context.beginPath()
    stage.context.arc(x, y, this.radius, 0, 2 * Math.PI, true)
    if (this.fill) {
      stage.context.fillStyle = this.color
      stage.context.fill()
    } else {
      stage.context.strokeStyle = this.color
      stage.context.stroke()
    }
    this.renderChildren()
  }
// Text.js
  render() {
    const {x, y, stage} = this.resolvePosAndStage()
    if (!stage) return
    stage.context.font = this.font
    stage.context.fillStyle = this.fillStyle
    stage.context.fillText(this.content, x, y)
  }
值得一提的是,Remax 也是在这里触发了小程序的更新。
至此,我们的 Canvas Renderer 的核心实现原理就分析完了,更多内容及 Demo 详见源码。
欢迎关注公众号「前端游」,让我们一起在前端的海洋里遨游。

常见问题FAQ
- 免费下载或者VIP会员专享资源能否直接商用?
- 本站所有资源版权均属于原作者所有,这里所提供资源均只能用于参考学习用,请勿直接商用。若由于商用引起版权纠纷,一切责任均由使用者承担。更多说明请参考 VIP介绍。
- 提示下载完但解压或打开不了?
- 找不到素材资源介绍文章里的示例图片?
- 模板不会安装或需要功能定制以及二次开发?


发表评论
还没有评论,快来抢沙发吧!