
目录
- 背景
- 搭建环境
- 搭建简易后台提供接口
- 安装原生Axios并使用
- 查看效果
- 分析传参和返回值
- 实现Axios
- createInstance
- 类型定义
- Axios类实现GET方法
- 类型声明小插曲
- Axios类实现POST方法
- 实现错误处理机制
- 模拟网络异常
- 模拟超时异常
- 模拟错误状态码
- 客户端调用超时接口
- 拦截器功能
- 使用拦截器
- 实现拦截器
- 合并配置项
- 实现请求与响应的转换
- 取消任务功能
- 使用取消任务
- 实现取消任务
- 总结
文章首发于@careteen/axios(存放了下文涉及所有代码),转载注明来源即可。
背景
axios是尤雨溪大大推荐使用的。有如下几大优势
- 支持
node端和浏览器端- 同样的
API,node和浏览器全支持,平台切换无压力
- 同样的
- 支持
Promise- 使用
Promise管理异步,告别传统callback方式
- 使用
- 丰富的配置项
- 自动转换JSON数据
- 支持请求/响应拦截器配置
- 支持转换请求和响应数据
- 支持取消请求
工作中Vue项目都一直使用axios做请求,最近才有点时间研究其底层思路。研究的目的一方面是自身能更好驾驭他,另一方面也是面试会考察的点(急功近利:))。
下面将从使用到简易实现一层层剥开Axios。
搭建环境
本次实现先简易借助create-react-app快速创建可以快速预览的项目
npm i -g create-react-app
create-react-app axios --typescript
搭建简易后台提供接口
于此同时使用express在本地搭建一个配合axios的简易后台
npm i -g nodemon
yarn add express body-parser
在根目录下编写server.js文件
// server.js
const express = require('express')
const bodyParser = require('body-parser')

const app = express()

app.use(bodyParser.json())
app.use(bodyParser.urlencoded({
  extended: true,
}))

// set cors
app.use((req, res, next) => {
  res.set({
    'Access-Control-Allow-Origin': 'http://localhost:3000',
    'Access-Control-Allow-Credentials': true,
    'Access-Control-Allow-Methods': 'GET, POST, PUT, DELETE, OPTIONS',
    'Access-Control-Allow-Headers': 'Content-Type',
  })
  if (req.method === 'OPTIONS') {
    return res.sendStatus(200)
  }
  next()
})

app.get('/get', (req, res) => {
  res.json(req.query)
})

app.listen(8080)
由于create-react-app启动默认端口为3000,使用express启动服务端口为8080,所以需要设置cors,以及先提供一个http://localhost:8080/get接口将传参直接返回。
安装原生Axios并使用
然后安装原生axios先查看简易使用
yarn add axios @types/axios qs @types/qs parse-headers
更改src/index.tsx文件
// src/index.tsx
import axios, { AxiosResponse } from 'axios'
const BASE_URL = 'http://localhost:8080'
interface User {
name: string;
age: number;
}
const user: User = {
name: 'Careteen',
age: 25,
}
axios({
method: 'GET',
url: `${BASE_URL}/get`,
params: user,
}).then((res: AxiosResponse) => {
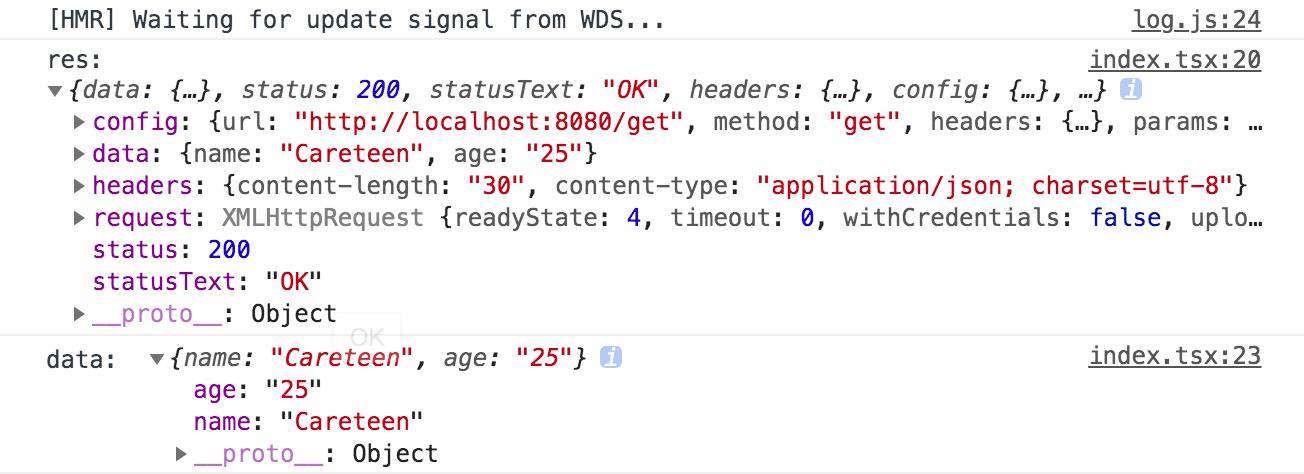
console.log('res: ', res);
return res.data
}).then((data: User) => {
console.log('data: ', data);
}).catch((err: any) => {
console.log('err: ', err);
})
查看效果
# 1. 启动后台服务
yarn server
# 2. 启动客户端
yarn start
浏览器访问 http://localhost:3000/ 打开控制台查看打印结果
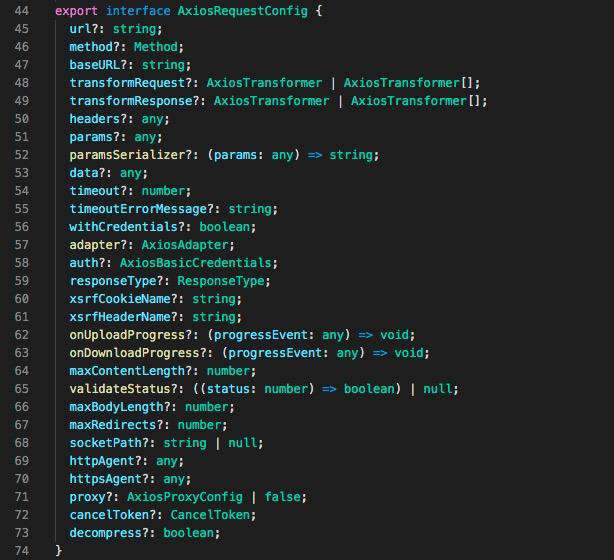
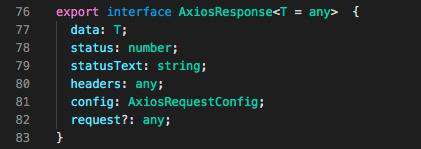
分析传参和返回值
查看aixos/index.d.ts文件可得知axios所需参数和返回值类型定义如下
实现Axios
通过观察源码axios/lib/axios.js以及其使用,可以发现axios是一个promise函数并且有axios.interceptors.request拦截器功能。
createInstance
// axios/index.ts
import Axios from './Axios'
import { AxiosInstance } from './types'

const createInstance = (): AxiosInstance => {
  const context = new Axios()
  let instance = Axios.prototype.request.bind(context)
  instance = Object.assign(instance, Axios.prototype, context)
  return instance as unknown as AxiosInstance
}

const axios = createInstance()

export default axios
源码实现的方式较为巧妙
- 入口文件向外暴露
createInstance函数;其内部核心主要是new一个Axios类实例context的同时,将Axios原型上的方法request(主要逻辑)的this始终绑定给context。目的是防止this指向出问题。 - 将
Axios类原型上的所有属性以及实例context拷贝给上面bind后生成的新函数instance。目的是s可以在axios函数上挂载对象类似于拦截器的功能axios.interceptors.request方便使用方调用。
类型定义
从分析传参和返回值的截图可得知需定义的类型
// axios/types.ts
export type Methods =
  | 'GET' | 'get'
  | 'POST' | 'post'
  | 'PUT' | 'put'
  | 'DELETE' | 'delete'
  | 'PATCH' | 'patch'
  | 'HEAD' | 'head'
  | 'OPTIONS' | 'options'

export interface AxiosRequestConfig {
  url: string;
  methods: Methods;
  params?: Record<string, any>;
}

export interface AxiosInstance {
  (config: AxiosRequestConfig): Promise<any>;
}

export interface AxiosResponse<T> {
  data: T;
  status: number;
  statusText: string;
  headers: any;
  config: AxiosRequestConfig;
  request?: any;
}
Axios类实现GET方法
从上面的类型定义以及使用方式,再借助XMLHttpRequest去实现真正的发送请求。
步骤也是大家熟悉的四部曲
- 创建
XMLHttpRequest实例request - 调用
request.open()配置methods,url - 监听
request.onreadystatechange()获取响应 - 调用
request.send()发送请求
// axios/Axios.ts
import qs from 'qs'
import parseHeaders from 'parse-headers'
import { AxiosRequestConfig, AxiosResponse } from './types'

export default class Axios {
  request(config: AxiosRequestConfig): Promise<any> {
    return this.dispatchRequest(config)
  }
  dispatchRequest(config: AxiosRequestConfig) {
    return new Promise((resolve, reject) => {
      let {
        url,
        methods = 'GET',
        params
      } = config
      const request: XMLHttpRequest = new XMLHttpRequest()
      if (params) {
        const paramsStr = qs.stringify(params)
        if (url.indexOf('?') === -1) {
          url += `?${paramsStr}`
        } else {
          url += `&${paramsStr}`
        }
      }
      request.open(methods, url, true)
      request.responseType = 'json'
      request.onreadystatechange = () => {
        if (request.readyState === 4) {
          if (request.status >= 200 && request.status < 300) {
            const response: AxiosResponse<any> = {
              data: request.response,
              status: request.status,
              statusText: request.statusText,
              headers: parseHeaders(request.getAllResponseHeaders()),
              config,
              request,
            }
            resolve(response)
          } else {
            reject(`Error: Request failed with status code ${request.status}`)
          }
        }
      }
      request.send()
    })
  }
}
上面代码已经可以满足安装原生Axios并使用章节,下面将继续扩展其他方法。
类型声明小插曲
由于使用的第三方库parse-headers目前没有@types/parse-headers,所以使用时会报TS错。一方面由于时间问题不会去为此写声明文件,另一方面此次核心是实现axios,故在当前项目根目录下新建typings/parse-headers.d.ts
// typings/parse-headers.d.ts
declare module 'parse-headers'
然后再修改tsconfig.json配置
// tsconfig.json
"include": [
  "src",
  "typings" // +
]
Axios类实现POST方法
首先在服务端扩展接口
// server.js
app.post('/post', (req, res) => {
  res.json(req.body)
})
然后在使用时替换接口
// src/index.tsx
axios({
  method: 'POST',
  url: `${BASE_URL}/post`,
  data: user,
  headers: {
    'Content-Type': 'application/json',
  },
}).then((res: AxiosResponse) => {
  console.log('res: ', res);
  return res.data
}).then((data: User) => {
  console.log('data: ', data);
}).catch((err: any) => {
  console.log('err: ', err);
})
接着扩展类型
export interface AxiosRequestConfig {
  // ...
  data?: Record<string, any>;
  headers?: Record<string, any>;
}
最后扩展发请求核心逻辑
// axios/Axios.ts
let {
  // ...
  data,
  headers,
} = config
// ...
if (headers) {
  for (const key in headers) {
    if (Object.prototype.hasOwnProperty.call(headers, key)) {
      request.setRequestHeader(key, headers[key])
    }
  }
}
let body: string | null = null;
if (data && typeof data === 'object') {
  body = JSON.stringify(data)
}
request.send(body)
实现错误处理机制
主要错误场景有以下三种
- 网络异常。断网
- 超时异常。接口耗时大于配置的
timeout - 错误状态码。
status < 200 || status >= 300
// axios/Axios.ts
// 处理网络异常
request.onerror = () => {
  reject('net::ERR_INTERNET_DISCONNECTED')
}
// 处理超时异常
if (timeout) {
  request.timeout = timeout
  request.ontimeout = () => {
    reject(`Error: timeout of ${timeout}ms exceeded`)
  }
}
// 处理错误状态码
request.onreadystatechange = () => {
  if (request.readyState === 4) {
    if (request.status >= 200 && request.status < 300) {
      // ...
      resolve(response)
    } else {
      reject(`Error: Request failed with status code ${request.status}`)
    }
  }
}
模拟网络异常
刷新页面打开控制台Network,在5s内将Online改为Offline模拟断网。
// src/index.tsx
setTimeout(() => {
  axios({
    method: 'POST',
    url: `${BASE_URL}/post`,
    data: user,
    headers: {
      'Content-Type': 'application/json',
    },
  }).then((res: AxiosResponse) => {
    console.log('res: ', res)
    return res.data
  }).then((data: User) => {
    console.log('data: ', data)
  }).catch((err: any) => {
    console.log('err: ', err)
  })
}, 5000);
可正常捕获到错误

模拟超时异常
扩展服务端接口添加配置超时接口
// server.js
app.post('/post_timeout', (req, res) => {
  let { timeout } = req.body
  if (timeout) {
    timeout = parseInt(timeout, 10)
  } else {
    timeout = 0
  }
  setTimeout(() => {
    res.json(req.body)
  }, timeout)
})
// src/index.tsx
axios({
  method: 'POST',
  url: `${BASE_URL}/post_timeout`,
  data: {
    timeout: 3000,
  },
  timeout: 1000,
  headers: {
    'Content-Type': 'application/json',
  },
}).then((res: AxiosResponse) => {
  console.log('res: ', res)
  return res.data
}).then((data: User) => {
  console.log('data: ', data)
}).catch((err: any) => {
  console.log('err: ', err)
})
可正常捕获到错误

模拟错误状态码
扩展服务端接口添加配置错误状态码接口
// server.js
app.post('/post_status', (req, res) => {
  let { code } = req.body
  if (code) {
    code = parseInt(code, 10)
  } else {
    code = 200
  }
  res.statusCode = code
  res.json(req.body)
})
客户端调用错误状态码接口
// src/index.tsx
axios({
  method: 'POST',
  url: `${BASE_URL}/post_status`,
  data: {
    code: 502,
  },
  headers: {
    'Content-Type': 'application/json',
  },
}).then((res: AxiosResponse) => {
  console.log('res: ', res)
  return res.data
}).then((data: User) => {
  console.log('data: ', data)
}).catch((err: any) => {
  console.log('err: ', err)
})
可正常捕获到错误

拦截器功能
使用拦截器
服务端设置cors时为Access-Control-Allow-Headers添加一项name,方便后续使用拦截器设置请求头。
// server.js
app.use((req, res, next) => {
  res.set({
    // ...
    'Access-Control-Allow-Headers': 'Content-Type, name',
  })
  // ...
})
在客户端使用request和response拦截器
// src/index.tsx
axios.interceptors.request.use((config: AxiosRequestConfig): AxiosRequestConfig => {
  config.headers.name += '1'
  return config
})
axios.interceptors.request.use((config: AxiosRequestConfig): AxiosRequestConfig => {
  config.headers.name += '2'
  return config
})
axios.interceptors.request.use((config: AxiosRequestConfig): AxiosRequestConfig => {
  config.headers.name += '3'
  return config
})

axios.interceptors.response.use((response: AxiosResponse): AxiosResponse => {
  response.data.name += '1'
  return response
})
axios.interceptors.response.use((response: AxiosResponse): AxiosResponse => {
  response.data.name += '2'
  return response
})
axios.interceptors.response.use((response: AxiosResponse): AxiosResponse => {
  response.data.name += '3'
  return response
})

axios({
  method: 'GET',
  url: `${BASE_URL}/get`,
  params: user,
  headers: {
    'Content-Type': 'application/json',
    'name': 'Careteen',
  },
}).then((res: AxiosResponse) => {
  console.log('res: ', res)
  return res.data
}).then((data: User) => {
  console.log('data: ', data)
}).catch((err: any) => {
  console.log('err: ', err)
})
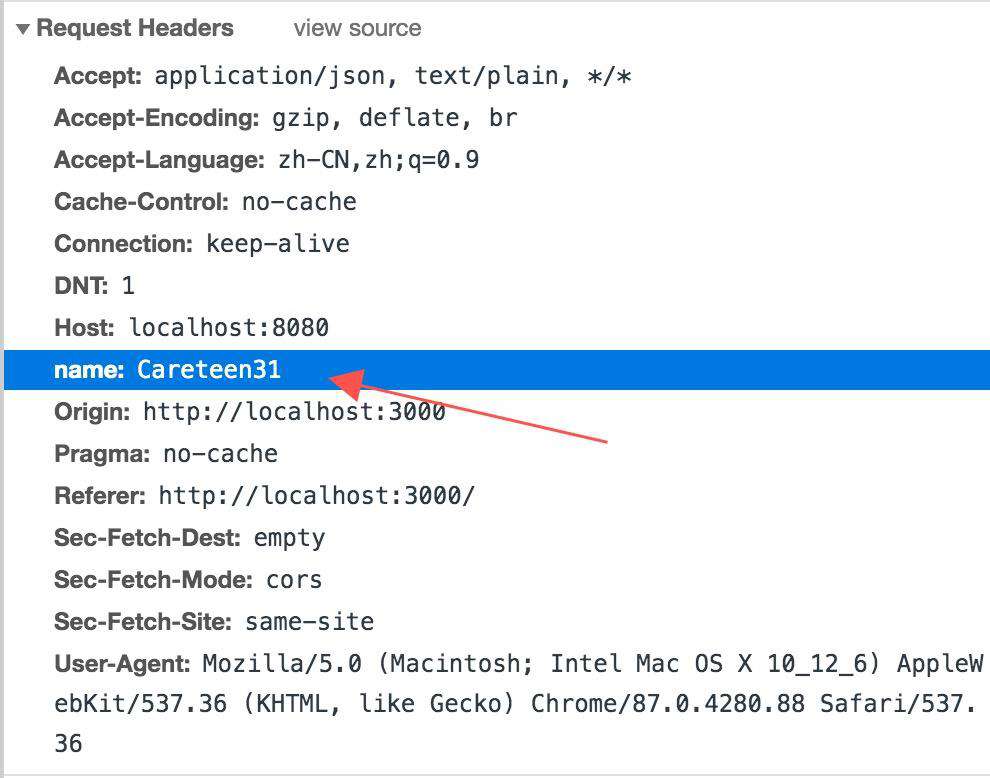
查看请求头和响应体
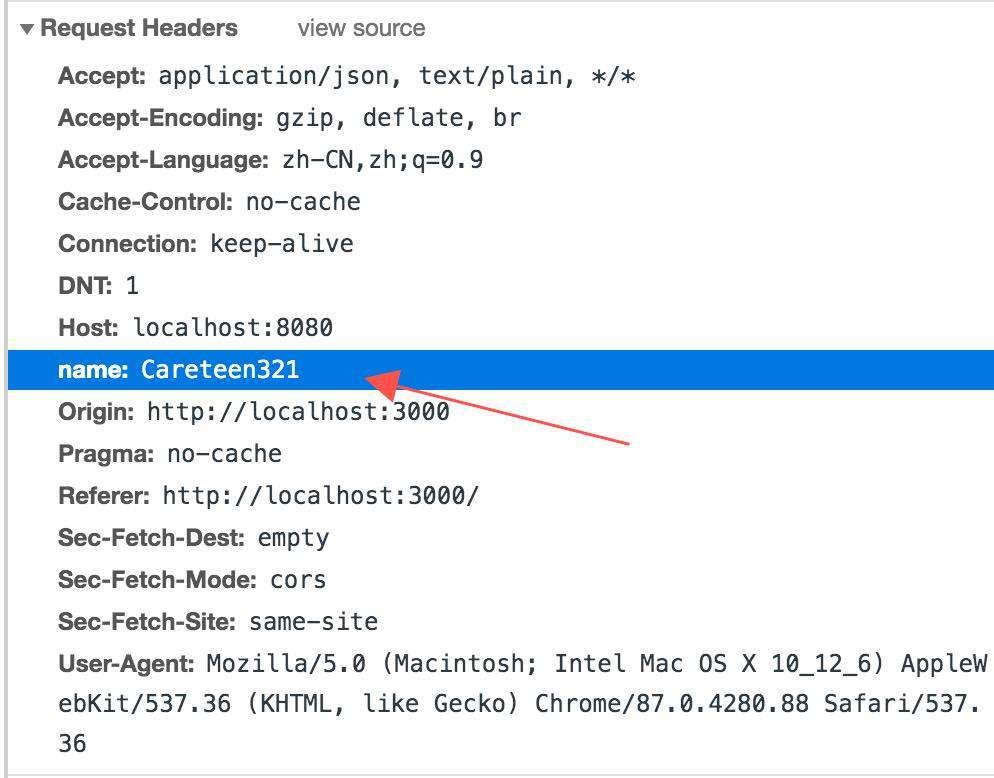

得出拦截器的规律是
- 请求拦截器先添加的后执行
- 响应拦截器先添加的先执行
使用axios.interceptors.request.eject取消指定的拦截器
// src/index.tsx
axios.interceptors.request.use((config: AxiosRequestConfig): AxiosRequestConfig => {
  config.headers.name += '1'
  return config
})
const interceptor_request2 = axios.interceptors.request.use((config: AxiosRequestConfig): AxiosRequestConfig => {
  config.headers.name += '2'
  return config
})
// + 从同步改为异步
axios.interceptors.request.use((config: AxiosRequestConfig) => {
  return new Promise((resolve) => {
    setTimeout(() => {
      config.headers.name += '3'
      resolve(config)
    }, 2000)
  })
})
// + 弹出`interceptor_request2`
axios.interceptors.request.eject(interceptor_request2)

axios.interceptors.response.use((response: AxiosResponse): AxiosResponse => {
  response.data.name += '1'
  return response
})
const interceptor_response2 = axios.interceptors.response.use((response: AxiosResponse): AxiosResponse => {
  response.data.name += '2'
  return response
})
axios.interceptors.response.use((response: AxiosResponse): AxiosResponse => {
  response.data.name += '3'
  return response
})
// + 弹出`interceptor_response2`
axios.interceptors.response.eject(interceptor_response2)
2s后查看请求头和响应体

实现拦截器
通过使用拦截器axios.interceptors.request.use推导类型定义。
// axios/types.ts
import AxiosInterceptorManager from "./AxiosInterceptorManager";
export interface AxiosInstance {
  (config: AxiosRequestConfig): Promise<any>;
  interceptors: {
    request: AxiosInterceptorManager<AxiosRequestConfig>;
    response: AxiosInterceptorManager<AxiosResponse>
  };
}
主要是定义AxiosInterceptorManager类以及use、eject方法。
// axios/AxiosInterceptorManager.ts
export interface OnFulfilled<V> {
  (value: V): V | PromiseLike<V> | undefined | null;
}

export interface OnRejected {
  (error: any): any;
}

export interface Interceptor<V> {
  onFulfilled?: OnFulfilled<V>;
  onRejected?: OnRejected;
}

export default class AxiosInterceptorManager<V> {
  public interceptors: Array<Interceptor<V> | null> = []
  use(onFulfilled?: OnFulfilled<V>, onRejected?: OnRejected): number {
    this.interceptors.push({
      onFulfilled,
      onRejected
    })
    return this.interceptors.length - 1
  }
  eject(id: number) {
    if (this.interceptors[id]) {
      this.interceptors[id] = null
    }
  }
}
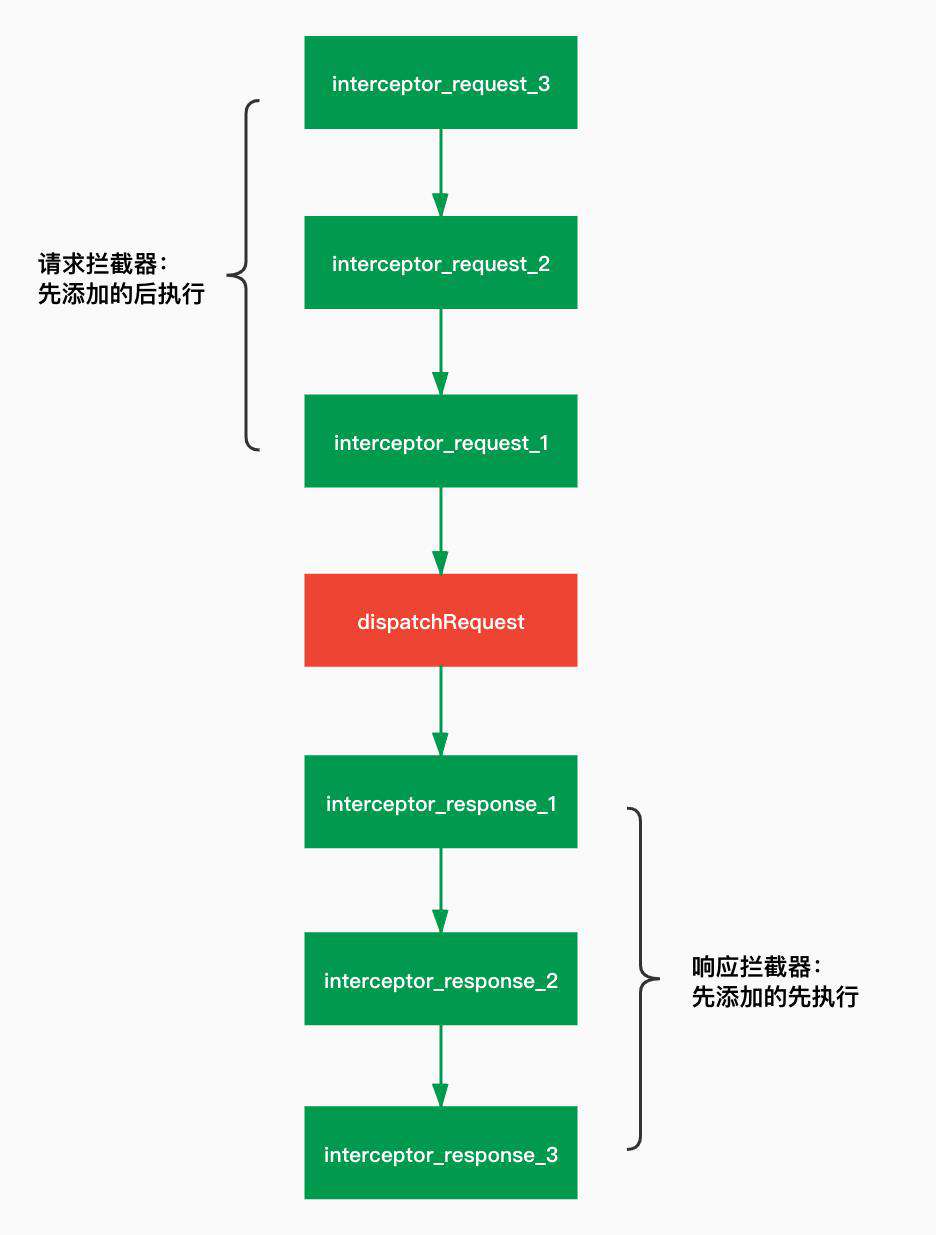
通过上一节使用拦截器使用方定义的拦截器构造如下图所示队列
// axios/Axios.ts
export default class Axios<T = any> {
  public interceptors = {
    request: new AxiosInterceptorManager<AxiosRequestConfig>(),
    response: new AxiosInterceptorManager<AxiosResponse<T>>(),
  }
  request(config: AxiosRequestConfig): Promise<any> {
    const chain: Array<Interceptor<AxiosRequestConfig> | Interceptor<AxiosResponse<T>>> = [
      {
        onFulfilled: this.dispatchRequest as unknown as OnFulfilled<AxiosRequestConfig>,
      }
    ]
    // 1. 请求拦截器 - 先添加后执行
    this.interceptors.request.interceptors.forEach((interceptor: Interceptor<AxiosRequestConfig> | null) => {
      interceptor && chain.unshift(interceptor)
    })
    // 2. 响应拦截器 - 先添加先执行
    this.interceptors.response.interceptors.forEach((interceptor: Interceptor<AxiosResponse<T>> | null) => {
      interceptor && chain.push(interceptor)
    })
    // 3. 按构造后的顺序执行
    let promise: Promise<any> = Promise.resolve(config)
    while (chain.length) {
      const { onFulfilled, onRejected } = chain.shift()!
      promise = promise.then(onFulfilled  as unknown as OnFulfilled<AxiosRequestConfig>, onRejected)
    }
    return promise
  }
}
如上面步骤第三步将构造后的队列顺序执行,于此同时支持异步。
合并配置项
为axios设置默认配置项,如methods默认为GET方法等等
// axios/Axios.ts
let defaultConfig: AxiosRequestConfig = {
  url: '',
  methods: 'GET',
  timeout: 0,
  headers: {
    common: {
      accept: 'application/json',
    }
  }
}

const getStyleMethods: Methods[] = ['get', 'head', 'delete', 'options']
const postStyleMethods: Methods[] = ['put', 'post', 'patch']
const allMethods:  Methods[] = [...getStyleMethods, ...postStyleMethods]

getStyleMethods.forEach((method: Methods) => {
  defaultConfig.headers![method] = {}
})
postStyleMethods.forEach((method: Methods) => {
  defaultConfig.headers![method] = {
    'content-type': 'application/json',
  }
})
export default class Axios<T = any> {
  public defaultConfig: AxiosRequestConfig = defaultConfig
  request() {
    // merge config
    config.headers = Object.assign(this.defaultConfig.headers, config.headers)
    // ...
  }
  dispatchRequest() {
    // ...
    if (headers) {
      for (const key in headers) {
        if (Object.prototype.hasOwnProperty.call(headers, key)) {
          if (key === 'common' || allMethods.includes(key as Methods)) {
            if (key === 'common' || key === config.methods.toLowerCase()) {
              for (const key2 in headers[key]) {
                if (Object.prototype.hasOwnProperty.call(headers[key], key2)) {
                  request.setRequestHeader(key2, headers[key][key2])
                }
              }
            }
          } else {
            request.setRequestHeader(key, headers[key])
          }
        }
      }
    }
    // ...
  }
}
对请求头headers做处理的目的是为post风格的请求默认添加'content-type': 'application/json',合并配置项区分是否为请求方法或者其他请求头配置。
实现请求与响应的转换
在平常工作中存在前后端并行开发或前端先行开发带来的命名不统一的常见问题,解决方案一般为对对象或者数组属性做映射。类似解决方案如@careteen/match。
上述解决方案可放入axios提供的transformRequest/transformResponse转换函数中。
// axios/types.ts
export interface AxiosRequestConfig {
  // ...
  transformRequest?: (data: Record<string, any>, headers: Record<string, any>) => any;
  transformResponse?: (data: any) => any;
}
实现方式即为在发请求前request方法第一步和发请求后dispatchRequest方法接受响应体时切入。
// axios/Axios.ts
let defaultConfig: AxiosRequestConfig = {
  // ...
  transformRequest: (data: Record<string, any>, headers: Record<string, any>) => {
    headers['common']['content-type'] = 'application/x-www-form-urlencoded'
    return JSON.stringify(data)
  },
  transformResponse: (response: any) => {
    return response.data
  },
}
export default class Axios<T = any> {
  request() {
    if (config.transformRequest && config.data) {
      config.data = config.transformRequest(config.data, config.headers = {})
    }
    // ...
  }
  dispatchRequest() {
    // ...
    request.onreadystatechange = () => {
      if (config.transformResponse) {
        request.response.data = config.transformResponse(request.response.data)
      }
      resolve(request.response)
    }
    // ...
  }
}
取消任务功能
使用取消任务
平常工作需求中在某些场景(离开页面)下期望将没有完成的promise或者xhr请求取消掉。
可先观察axios的使用
const CancelToken = axios.CancelToken
const source = CancelToken.source()
axios({
  method: 'POST',
  url: `${BASE_URL}/post_timeout`,
  timeout: 3000,
  data: {
    timeout: 2000,
  },
  cancelToken: source.token,
}).then((res: AxiosResponse) => {
  console.log('res: ', res)
  return res.data
}).then((data: User) => {
  console.log('data: ', data)
}).catch((err: any) => {
  if (axios.isCancel(err)) {
    console.log('cancel: ', err)
  } else {
    console.log('err: ', err)
  }
})
source.cancel('【cancel】: user cancel request')
查看控制台可取消任务

实现取消任务
根据使用倒推类型定义
// axios/types.ts
export interface AxiosRequestConfig {
  // ...
  cancelToken?: Promise<any>;
}
export interface AxiosInstance {
  // ...
  CancelToken: CancelToken;
  isCancel: (reaseon: any) => boolean;
}
根据使用倒推挂载的CancelToken、isCancel
import { CancelToken, isCancel } from './cancel'
// ...
axios.CancelToken = new CancelToken()
axios.isCancel = isCancel

export default axios
新建cancel.ts文件实现取消功能
// axios/cancel.ts
export class Cancel {
  public reason: string
  constructor(reason: string) {
    this.reason = reason
  }
}

export const isCancel = (reason: any) => {
  return reason instanceof Cancel
}

export class CancelToken {
  public resolve: any
  source() {
    return {
      token: new Promise((resolve) => {
        this.resolve = resolve
      }),
      cancel: (reason: string) => {
        this.resolve(new Cancel(reason))
      }
    }
  }
}
在合适的时机(使用方指定场景下调用source.cancel方法),触发request.abort()进而取消任务。
export default class Axios<T = any> {
  dispatchRequest() {
    // ...
    if (config.cancelToken) {
      config.cancelToken.then((reason: string) => {
        request.abort()
        reject(reason)
      })
    }
    request.send(body)
  }
}
总结
通过上面简易代码实现了一个简版可用axios,还远远不够完善。
目的也是在使用第三方优秀库的同时,通过使用方式倒推底层实现思路,再配合阅读源码,更好的驾驭他们。
常见问题FAQ
- 免费下载或者VIP会员专享资源能否直接商用?
- 本站所有资源版权均属于原作者所有,这里所提供资源均只能用于参考学习用,请勿直接商用。若由于商用引起版权纠纷,一切责任均由使用者承担。更多说明请参考 VIP介绍。
- 提示下载完但解压或打开不了?
- 找不到素材资源介绍文章里的示例图片?
- 模板不会安装或需要功能定制以及二次开发?


发表评论
还没有评论,快来抢沙发吧!