手写简易 VueRouter插件
本文用于复盘自己平时的学习成果。本文针对于有一定 Vue 基础的同学。本文会手写一个简易的 VueRouter 插件,实现路由的基本跳转。本文的讲解思路:
- 简单分析原 VueRouter 使用,提出几点疑问。
- 列出简易 VueRouter 的关键点
- 实现简易 VueRouter 插件。
一、原 VueRouter 插件分析
VueRouter 的使用
router.js 路由配置文件中
// 第一步 引入 VueRouter 插件
import VueRouter from ‘VueRouter‘
// 第二步 安装 VueRouter 插件
Vue.use(VueRouter)
// 第三步 定义路由
const routes = [...]
// 第四步 创建路由实例
const router = new VueRouter({routes})
main.js 中
// 引入路由 router
import router from './router'

// 挂载 router 到 Vue 实例上
new Vue({
  router,
  render: h => h(App)
}).$mount('#app')
添加路由视图 App.vue
<template>
  <div id="app">
    <div id="nav">
      <!-- 路由跳转连接 -->
      <router-link to="/">Home</router-link> |
      <router-link to="/about">About</router-link>
    </div>
    <router-view></router-view>
  </div>
</template>
// 路由跳转
this.$router.push('/')
this.$router.push('/about')
分析:
-
为什么我们要 Vue.use(VueRouter) ?
-
安装 Vue 插件,如果插件是一个对象,必须提供
install方法。如果插件是一个函数,它会被作为 install 方法。install 方法调用时,会将 Vue 作为参数传入。该方法需要在调用
new Vue()之前被调用。当 install 方法被同一个插件多次调用,插件将只会被安装一次。
-
-
new VueRouter() 我们需要传 routes 等参数作为配置项
- 说明我们在实现简易 VueRouter 插件是需要传入 options 作为配置项
-
为什么要把 router 挂到 Vue 实例上?
- 在根上添加 router,以便在全局访问 this.$router 进行路由的相关操作
-
添加路由视图时,使用了 组件,为什么可以直接使用这两个组件?
- 说明全局注册了这两个组件
二、实现简易 VueRouter 需求分析
明确简易 VueRouter 需要实现哪些功能:
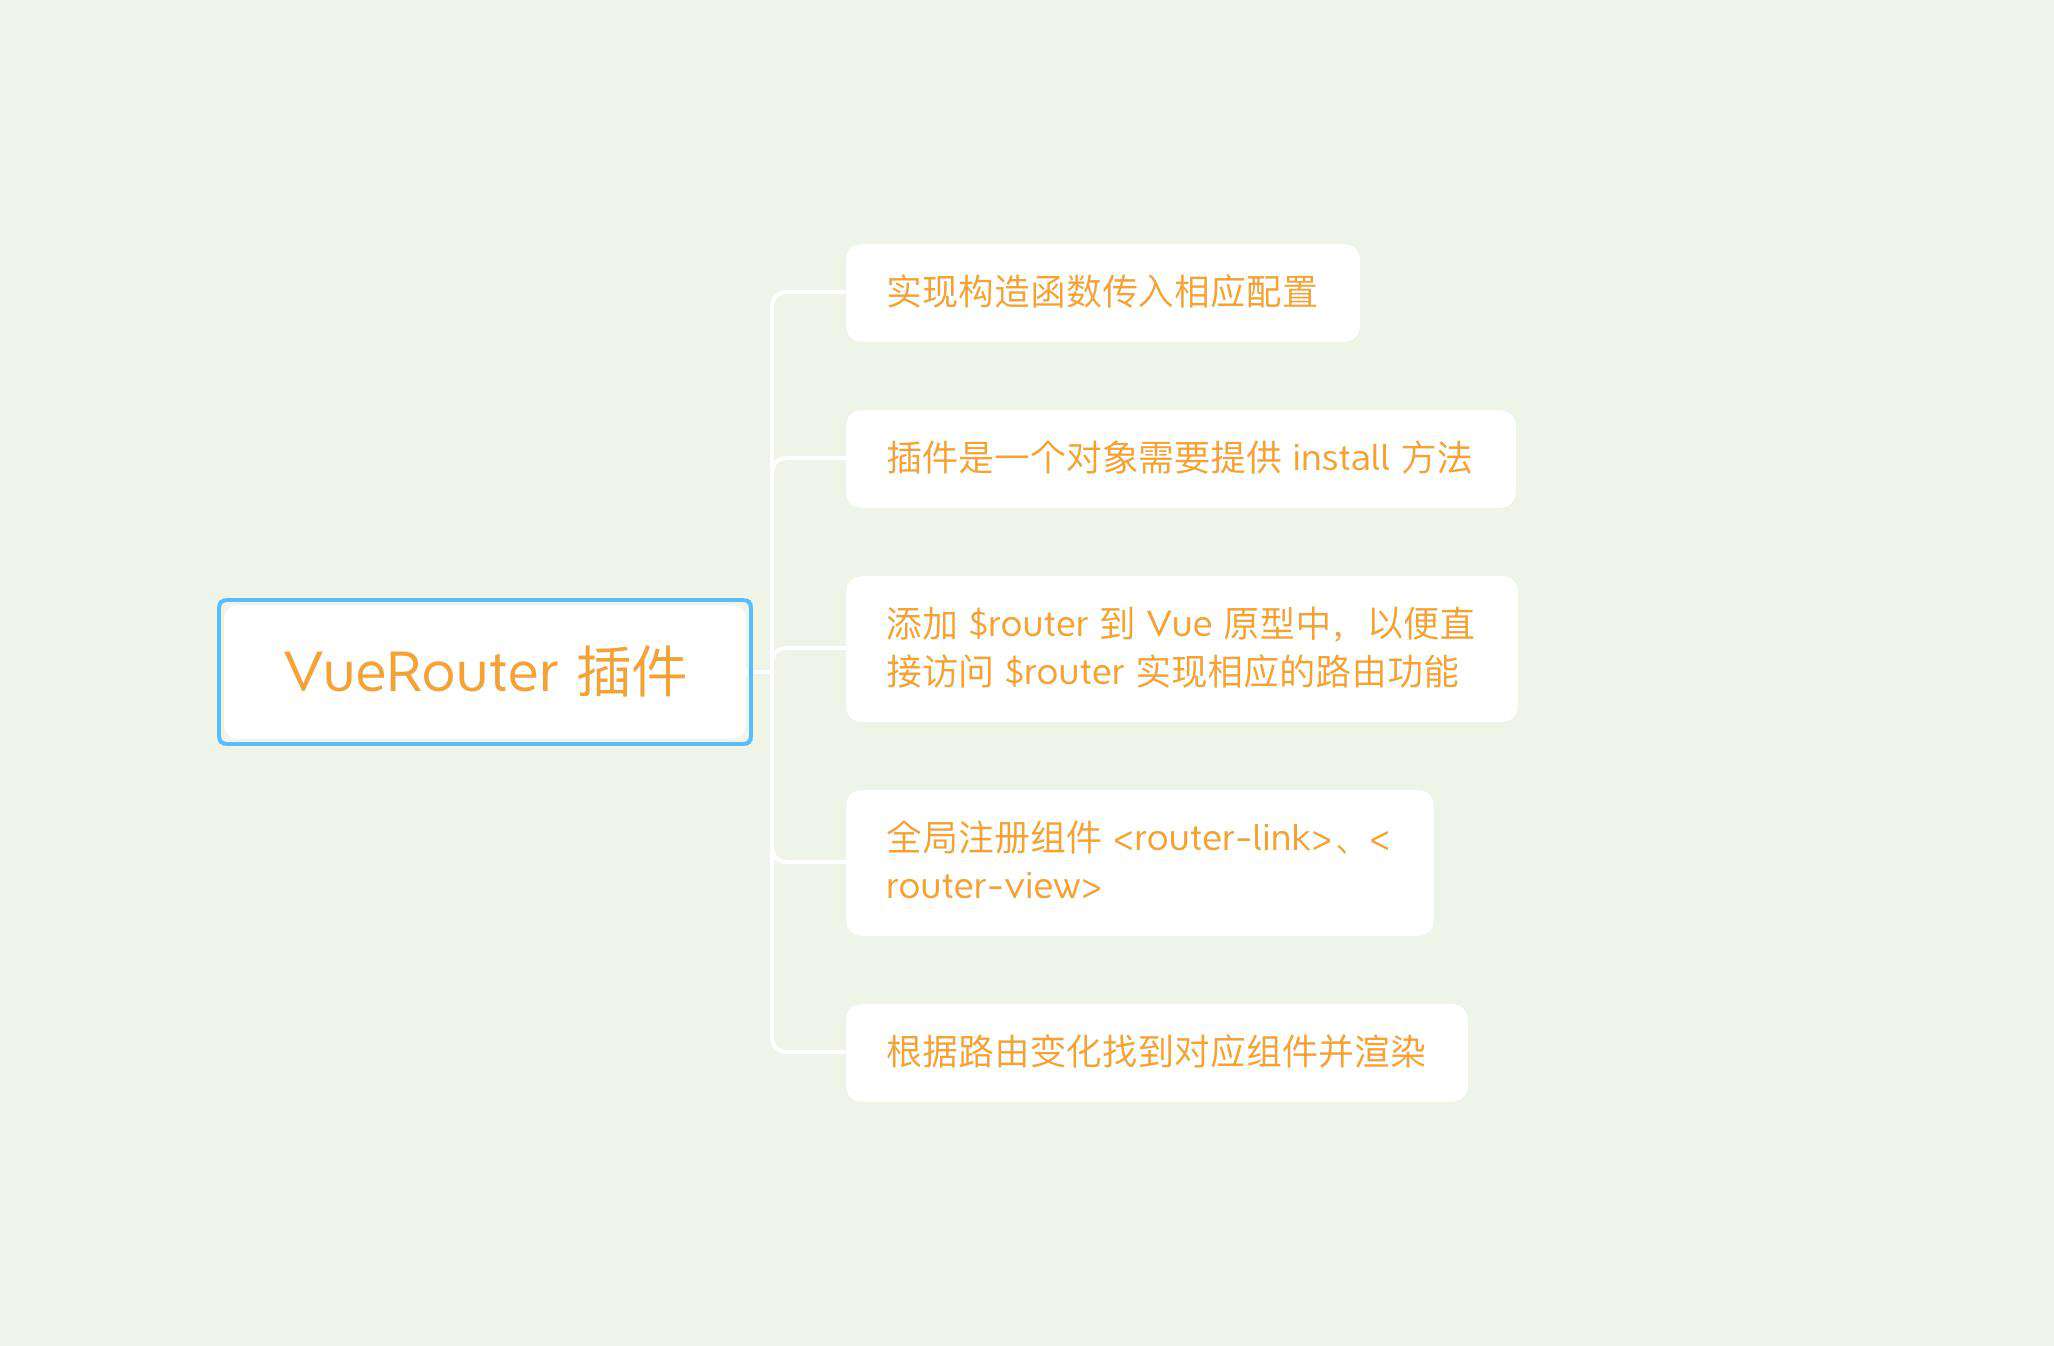
三、代码实现
第一步 按照上面思路搭一个框架
let Vue
// 1. 定义一个类
class VueRouter {
  // 2. 我们使用时是 new VueRouter({routes}),构造函数传入相应的路由配置
  constructor(options) {
    this.$options = options
    // 3. 获取当前路由,以便后续根据路由渲染对应的模板
    // 获取路由地址,比如我们路由地址 http://localhost:8080/#about,实际上我们只需要about就行了
    const initial = window.location.hash.slice(1) || '/'
    // 监听 hash 变化来获取当前路由地址
    window.addEventListener('hashchange', () => [
      this.current = window.location.hash.slice(1)
    ])
  }
}
// 3.Vue.js 的插件应该暴露一个 install 方法。这个方法的第一个参数是 Vue 构造器,
VueRouter.install = (_Vue) => {
  Vue = _Vue
  // 4. 全局注册 router-link、router-view 组件
  Vue.component('router-link', {})
  Vue.component('router-view', {})
}

export default VueRouter
基本的框架就搭好了,但是对比我们的思路,除了细节实现的填充,是不是还少了一步,把 $router 挂到跟上,以便再任何地方都可以 this.$router访问。
因为 new VueRouter({router}),我们怎么拿 router 呢?肯定是从传进来的 options里拿 router 。
我们可以试一下
VueRouter.install = (_Vue) => {
  Vue = _Vue
 	// 新增
  console.log(’this‘, this)
  Vue.prototype.$router = this.$options.router

  Vue.component('router-link', {})
  Vue.component('router-view', {})
}
我们跑一跑看
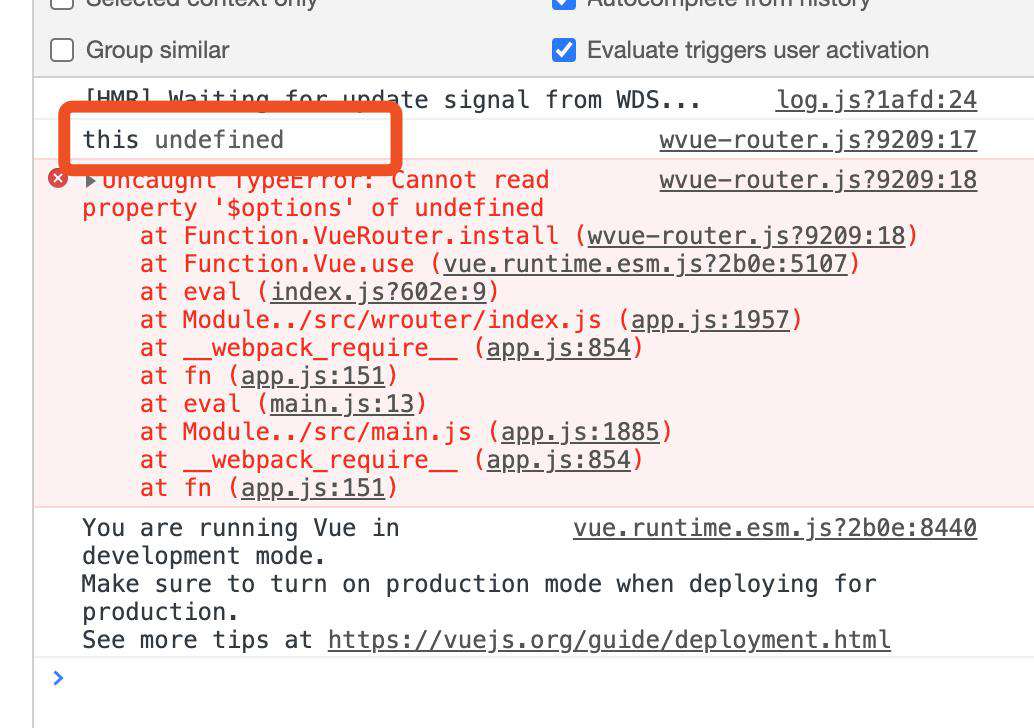
发现 this 是 undefined,这是为什么呢?我们从上文 VueRouter 的使用中可以看到。
Vue.use(VueRouter)
const router = new VueRouter({routes})
// 引入路由 router
import router from './router'

// !!!是不是我们安装是在 new Vue 之前,也就是说安装VueRouter.install = (_Vue) =>{} 这个时候,Vue 的实例还没创建,_Vue自然就是 undefined 了
new Vue({
  router,
  render: h => h(App)
}).$mount('#app')
那么我们怎么解决这个问题呢?我们可以利用 Vue.mixin 全局混入,等到 Vue 实例创建后再去添加 $router。
Vue.mixin({
    beforeCreate() {
      // 因为是全局混入,所以每个组件创建时都会调用,但是只有根实例创建时才传入 router 选项,所以添加如下判断哪避免多次执行
      if (this.$options.router) {
        Vue.prototype.$router = this.$options.router
      }
    }
  })
第二步填充细节
let Vue
class VueRouter {
  constructor(options) {
    this.$options = options
    // 获取路由地址,比如我们路由地址 http://localhost:8080/#about,实际上我们只需要about就行了
    const initial = window.location.hash.slice(1) || '/'
    console.log(initial)
    // 监听 hash 变化来获取当前路由地址
    window.addEventListener('hashchange', () => [
      this.current = window.location.hash.slice(1)
    ])
  }
}
// Vue.js 的插件应该暴露一个 install 方法。这个方法的第一个参数是 Vue 构造器,
VueRouter.install = (_Vue) => {
  Vue = _Vue
  console.log('this', this)
  Vue.mixin({
    beforeCreate() {
      // 因为是全局混入,所以每个组件创建时都会调用,但是只有根实例创建时才传入 router 选项,所以添加如下判断哪避免多次执行
      if (this.$options.router) {
        Vue.prototype.$router = this.$options.router
      }
    }
  })

  Vue.component('router-link', {
    props: {
      to: {
        type: String,
        required: true
      }
    },
    render(h) {
      return h(
        'a',
        {
          attrs: {
            href: '#' + this.to
          }
        },
        this.$slots.default
      )
    }
  })
  Vue.component('router-view', {
    render(h) {
      let componnent = null
      const route = this.$router.$options.routes.find(
        (route) => route.path === this.$router.current
      )
      if (route) {
        componnent = route.componnent
      }
      return h(componnent)
    }
  })
}

export default VueRouter
我们在运行看看,我们发现点击导航路由地址变了,但是并没有重新渲染视图,我们想要每次路有变化都重新渲染视图,我们会想到响应式数据每次发生变化都会调用render渲染函数更新视图。所以我们还需补充,把当前路由设置为相应数据。我们能使用 Vue.util.defineReactive
class VueRouter {
  constructor(options) {
    this.$options = options
    // 获取路由地址,比如我们路由地址 http://localhost:8080/#about,实际上我们只需要about就行了
    const initial = window.location.hash.slice(1) || '/'
    // !!!定义一个对象的响应属性
    Vue.util.defineReactive(this, 'current', initial)
    // 监听 hash 变化来获取当前路由地址
    window.addEventListener('hashchange', () => {
      this.current = window.location.hash.slice(1)
    })
  }
}
这样下来就实现了一个简易的 VueRouter 插件了。今天就记录这么多吧,哈哈哈!
参考:开课吧杨老师课堂
Vue官方文档
常见问题FAQ
- 免费下载或者VIP会员专享资源能否直接商用?
- 本站所有资源版权均属于原作者所有,这里所提供资源均只能用于参考学习用,请勿直接商用。若由于商用引起版权纠纷,一切责任均由使用者承担。更多说明请参考 VIP介绍。
- 提示下载完但解压或打开不了?
- 找不到素材资源介绍文章里的示例图片?
- 模板不会安装或需要功能定制以及二次开发?


发表评论
还没有评论,快来抢沙发吧!