准备
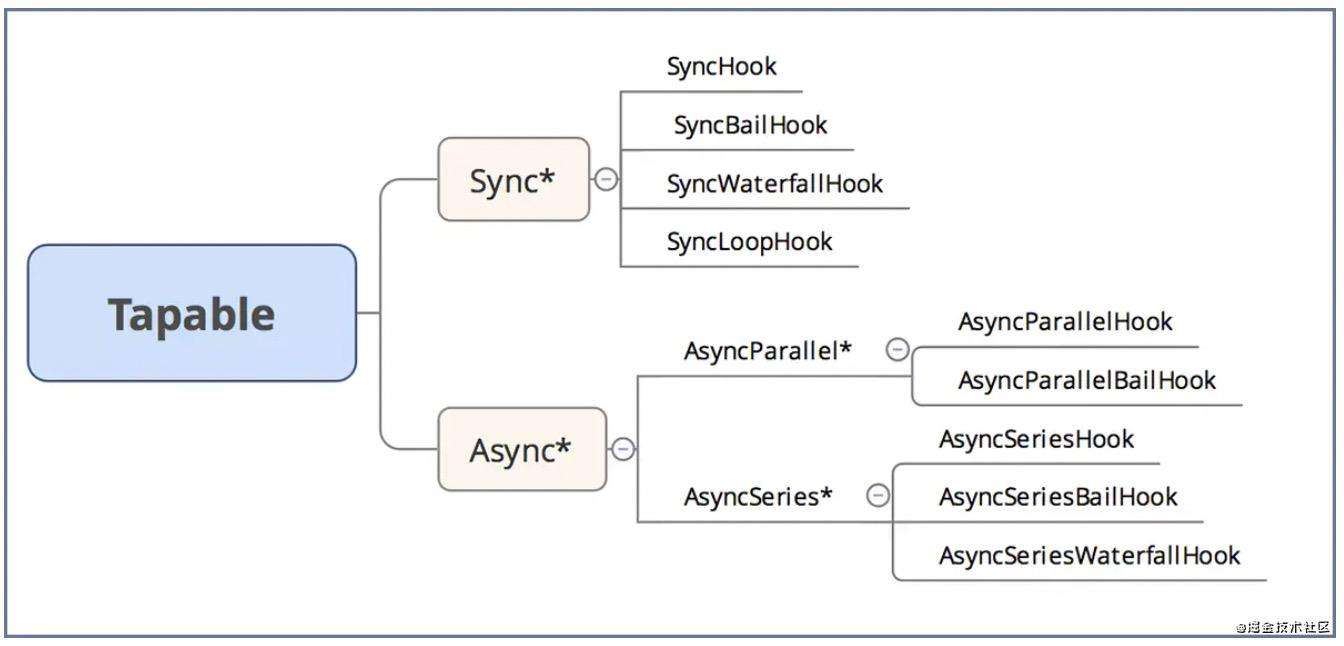
tapable
Webpack 本质上是一种事件流的机制,它的工作流程就是将各个插件串联起来,而实现这一切的核心就是 tapable,Webpack 中最核心的,负责编译的 Compiler 和负责创建 bundles 的 Compilation 都是 tapable 的实例。
tapable 暴露了许多钩子类,这些类可以用来为插件创建钩子。
const {
	SyncHook,
	SyncBailHook,
	SyncWaterfallHook,
	SyncLoopHook,
	AsyncParallelHook,
	AsyncParallelBailHook,
	AsyncSeriesHook,
	AsyncSeriesBailHook,
	AsyncSeriesWaterfallHook
 } = require("tapable");
enhanced-resolve
github.com/webpack/enh…
enhanced-resolve 是一个异步的高度可配置的解析文件路径的库。使用 enhanced-resolve,webpack 能解析三种文件路径:绝对路径、相对路径和模块路径。Webpack 可以根据配置中的参数和默认配置生成 enhanced-resolve 的配置,然后利用 enhanced-resolve 库来解析各种路径。
acorn & ast estree
github.com/acornjs/aco…
github.com/estree/estr…
acorn 是一个完全使用 javascript 实现的,小型且快速的 javascript 解析器。将待解析的代码传给 acorn.parse 即可输出遵循 Estree 规范的 ast。
Estree,是一种 json 风格的 ast ,现在流行的 bable、eslint的实现也是基于 Estree。
比如 let code = "1 + 1"; 解析成ast后是:
{
  "type": "Program",
  "start": 0,
  "end": 11,
  "body": [
    {
      "type": "ExpressionStatement",
      "start": 5,
      "end": 10,
      "expression": {
        "type": "BinaryExpression",
        "start": 5,
        "end": 10,
        "left": {
          "type": "Literal",
          "start": 5,
          "end": 6,
          "value": 1,
          "raw": "1"
        },
        "operator": "+",
        "right": {
          "type": "Literal",
          "start": 9,
          "end": 10,
          "value": 1,
          "raw": "1"
        }
      }
    }
  ],
  "sourceType": "script"
}
loader-runner
github.com/webpack/loa…
juejin.cn/post/684490…
webpack 用来控制执行 loader 的库。
neo-async & async
github.com/suguru03/ne…
github.com/caolan/asyn…
async文档
Async 库是一个异步调用的工具库,提供了大量控制异步流程的方法。neo-async 是 async 的一个增强库,在性能上做了优化。webpack 中有很多利用 neo-async 库并行执行多个方法的场景。
demo
本例所用 webpack 版本号是 4.44.2。
// a.js (webpack config 入口文件)
import add from './b.js'
add(1, 2)
import('./c').then(del => del(1, 2))

-----

// b.js
import mod from './d.js'
export default function add(n1, n2) {
  return n1 + n2
}
mod(100, 11)

-----

// c.js
import mod from './d.js'
mod(100, 11)
import('./b.js').then(add => add(1, 2))
export default function del(n1, n2) {
  return n1 - n2
}

-----

// d.js
export default function mod(n1, n2) {
  return n1 % n2
}
webpack 相关的配置:
{
  mode: "development",
  entry: {
    app: "./debug/src/a.js"
  },
  devtool: "none",
  output: {
    path: path.resolve(__dirname, "dist"),
    filename: "[name].[chunkhash].js"
  },
  module: {
    rules: [
      // 前置
      { enforce: "pre", test: /\.js$/, use: "babel-loader" },
      // 正则匹配
      {
        test: /\.m?js$/,
        exclude: /(node_modules|bower_components)/,
        use: {
          loader: "babel-loader",
          options: {
            presets: ["@babel/preset-env"]
          }
        }
      },
      // 后置
      { enforce: "post", test: /\.js$/, use: "babel-loader" }
    ]
  }
};
其中a.js为 webpack config 当中配置的entry入口文件,a.js依赖 b.js/c.js,而b.js依赖d.js,c.js依赖d.js/b.js。
最终通过webpack编译后,将会生成2个chunk文件,其中:
app.hash.js包含了webpack runtime代码和a.js/b.js/d.js的模块代码;0.bundle.hash.js包含了异步加载的c.js的代码。
编译过程
编译前的准备
首先执行const compiler = webpack(config);创建一个编译流程,并传入上文中的配置。在webpack函数中,首先执行
const webpackOptionsValidationErrors = validateSchema(
    webpackOptionsSchema,
    options
);
对传入的配置做一个类型的校验,然后执行
if (Array.isArray(options)) {
    compiler = new MultiCompiler(
        Array.from(options).map(options => webpack(options))
    );
} else if (typeof options === "object") {
  options = new WebpackOptionsDefaulter().process(options);
  compiler = new Compiler(options.context);
  // ......
}
如果传入的配置是一个数组,那么会创建多个编译流程。这里先讨论传入的配置是一个对象的情况。之后执行
options = new WebpackOptionsDefaulter().process(options);
将系统默认的配置、配置文件合并。 然后使用合并后的配置,执行
compiler = new Compiler(options.context);
创建compiler对象。Compiler类定义了整个构建的流程,是Tapable的扩展类,挂载了一堆钩子done/runemit/seal等等。创建了compiler对象之后,执行
if (options.plugins && Array.isArray(options.plugins)) {
    for (const plugin of options.plugins) {
        if (typeof plugin === "function") {
            plugin.call(compiler, compiler);
        } else {
            plugin.apply(compiler);
        }
    }
}
将配置中的插件注册进来,可以看到注册插件的时候传入了compiler实例,compiler包含整个构建流程的全部钩子,这样插件就可以在compiler实例中的各个钩子中注册事件,来进行处理。其中compiler的部分钩子会传入compilation对象参数,该对象又包含资源构建的很多钩子。
注册完插件后执行
compiler.options = new WebpackOptionsApply().process(options, compiler);
根据options的配置不同,注册激活一些默认自带的插件。至此compiler对象就创建完成了。
执行compiler.run开始编译流程。在compiler.compile方法中,首先执行
const params = this.newCompilationParams();
初始化compilation对象的参数
newCompilationParams() {
  const params = {
      normalModuleFactory: this.createNormalModuleFactory(),
      contextModuleFactory: this.createContextModuleFactory(),
      compilationDependencies: new Set()
  };
  return params;
}
NormalModuleFactory类用于创建一个normalModule实例。在new NormalModuleFactory的时候执行了
this.ruleSet = new RuleSet(options.defaultRules.concat(options.rules));
这个方法格式化了loader的配置,为后面module应用loader做了准备。
然后执行了
const compilation = this.newCompilation(params);
该方法实例化了一个compilation对象,也是扩展于 tapable类。一个compilation对象表现了当前的模块资源、编译生成资源、变化的文件、以及被跟踪依赖的状态信息,代表了一次资源的构建。
至此编译前的准备已完成。接着调用了compiler.hook.make钩子,开始构建模块。
构建模块
从compilation.addEntry方法开始解析入口模块。
resolve路径
从调用moduleFactory.create开始,第一步是解析路径。
触发normalModuleFactory.hooks.resolver钩子,执行
const loaderResolver = this.getResolver("loader");
const normalResolver = this.getResolver("normal", data.resolveOptions);
得到两个resolver对象,这里的resolver是前文提到的enhanced-resolve的实例,用来异步解析绝对路径。然后解析 inline loader
const noPreAutoLoaders = requestWithoutMatchResource.startsWith("-!");
const noAutoLoaders =
    noPreAutoLoaders || requestWithoutMatchResource.startsWith("!");
const noPrePostAutoLoaders = requestWithoutMatchResource.startsWith("!!");
let elements = requestWithoutMatchResource
    .replace(/^-?!+/, "")
    .replace(/!!+/g, "!")
    .split("!");
之后通过asyncLib.parallel并行解析 inline loader 和当前模块的绝对路径。
asyncLib.parallel(
  [
    callback =>
        this.resolveRequestArray(
            contextInfo,
            context,
            elements,
            loaderResolver,
            callback
        ),
    callback => {
        // ......

        normalResolver.resolve(
            contextInfo,
            context,
            resource,
            {},
            (err, resource, resourceResolveData) => {
                if (err) return callback(err);
                callback(null, {
                    resourceResolveData,
                    resource
                });
            }
        );
    }
  ],
  (err, results) => {
  	// ......
  }
)
在回调里,继续解析配置里的laoder,执行
const result = this.ruleSet.exec({
    resource: resourcePath,
    realResource:
        matchResource !== undefined
            ? resource.replace(/\?.*/, "")
            : resourcePath,
    resourceQuery,
    issuer: contextInfo.issuer,
    compiler: contextInfo.compiler
});
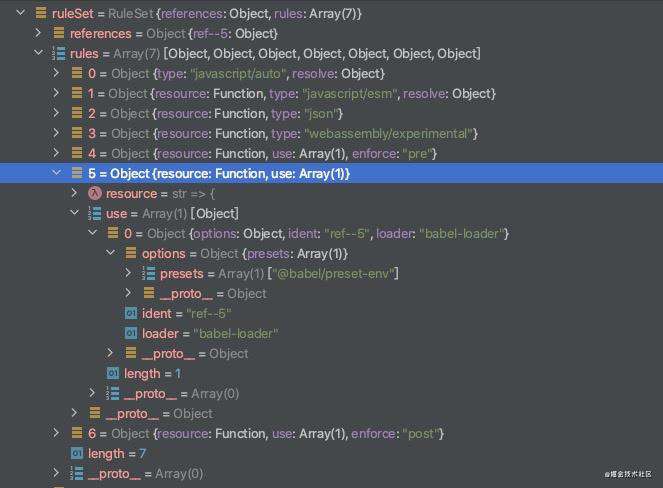
这里的this.ruleSet就是在new NormalModuleFactory时在constructor里创建的RuleSet对象。在new RuleSet对象的时候,已经将配置里的loader相关配置格式化成了
{
  resource: function(),
  resourceQuery: function(),
  compiler: function(),
  issuer: function(),
  use: [
      {
          loader: string,
          options: string,
          <any>: <any>
      }
  ],
  rules: [<rule>],
  oneOf: [<rule>],
  <any>: <any>,
}
格式的对象,其中resource是条件函数,执行这个函数可以筛选出当前模块相对应的loader,use是loader和配置。比如demo中的配置:
module: {
  rules: [
      // 前置
      { enforce: "pre", test: /\.js$/, use: "babel-loader" },
      // 正则匹配
      {
          test: /\.m?js$/,
          exclude: /(node_modules|bower_components)/,
          use: {
              loader: "babel-loader",
              options: {
                  presets: ["@babel/preset-env"]
              }
          }
      },
      // 后置
      { enforce: "post", test: /\.js$/, use: "babel-loader" }
  ]
}
格式化后是
 在执行
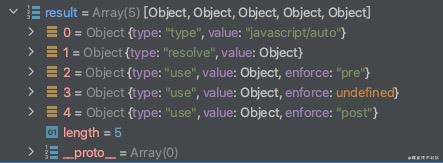
在执行this.ruleSet.exec后就可以得出当前模块对应的loader,如demo中入口文件的a.js,解析后匹配的结果就是:
在得到匹配的loader结果后,将根据前置、普通、后置分类,然后并行解析三组loader的路径
asyncLib.parallel(
  [
      this.resolveRequestArray.bind(
          this,
          contextInfo,
          this.context,
          useLoadersPost,
          loaderResolver
      ),
      this.resolveRequestArray.bind(
          this,
          contextInfo,
          this.context,
          useLoaders,
          loaderResolver
      ),
      this.resolveRequestArray.bind(
          this,
          contextInfo,
          this.context,
          useLoadersPre,
          loaderResolver
      )
  ],
  (err, results) => {
    // ......
  }
)
得到路径后,将行内、前置、普通、后置loader排序合并,规则是:
- 正常情况loader执行顺序: pre -> normal -> inline -> post
- 资源路径前使用'xxx!=!'装饰: pre -> inline -> normal -> post
- 资源路径前使用'-!'装饰: inline -> post
- 资源路径前使用'!'装饰: pre -> inline -> post
- 资源路径前使用'!!'装饰: inline
这样就得到了与模块相匹配的正确顺序的loader。
至此resolve过程结束。
编译模块
路径解析完之后,执行
createdModule = new NormalModule(result);
创建一个module,每一个module都是一个NormalModule对象。从NormalModule.doBuild方法开始编译模块。首先执行
const loaderContext = this.createLoaderContext(
    resolver,
    options,
    compilation,
    fs
);
生成一个给loader使用的上下文对象,然后执行
runLoaders(
  {
      resource: this.resource,
      loaders: this.loaders,
      context: loaderContext,
      readResource: fs.readFile.bind(fs)
  },
  (err, result) => {
  	// ......
  }
)
将module传递给loader处理。这里的runloader是上文中loader-runner库中的方法,作用是按顺序执行loader。
在回调里拿到经过loader处理后的模块,然后执行
const result = this.parser.parse(
    this._ast || this._source.source(),
    {
        current: this,
        module: this,
        compilation: compilation,
        options: options
    },
    (err, result) => {
        if (err) {
            handleParseError(err);
        } else {
            handleParseResult(result);
        }
    }
);
开始解析module。在parse方法中,首先执行
ast = Parser.parse(source, {
    sourceType: this.sourceType,
    onComment: comments
});
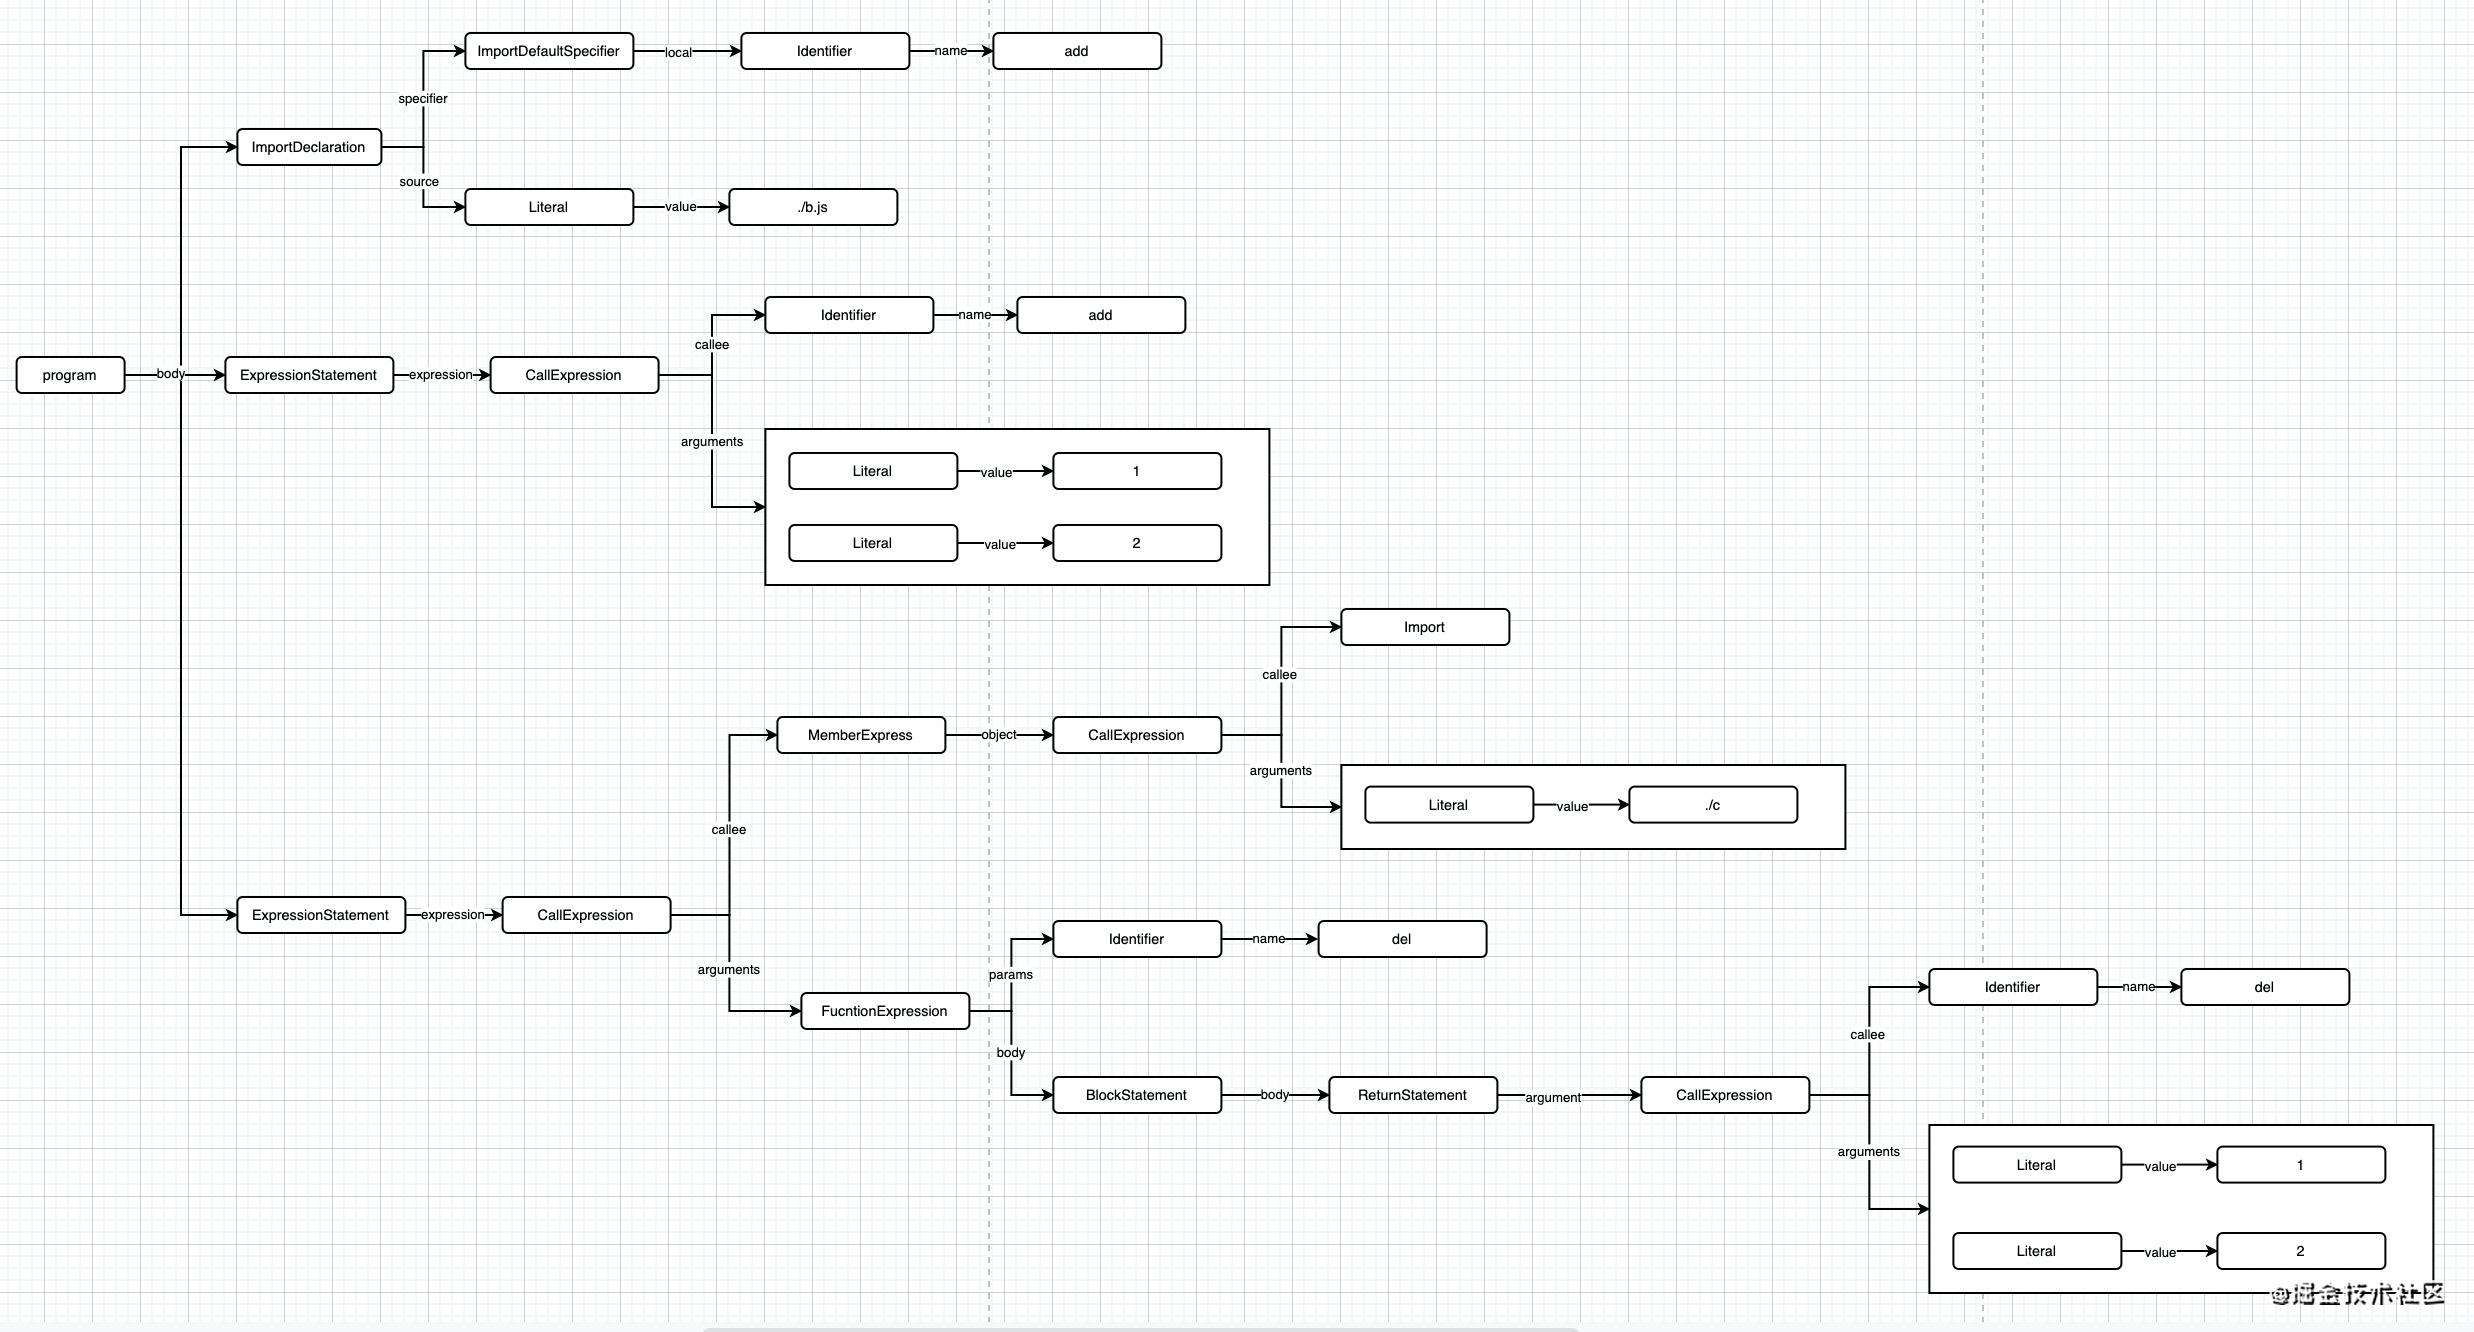
将module解析成遵循Estree规范的ast,这里解析ast是使用的acorn库。以a.js为例,转化成ast后如图:
接下来就是对这个树进行遍历了,执行
if (this.hooks.program.call(ast, comments) === undefined) {
    this.detectMode(ast.body);
    this.prewalkStatements(ast.body);
    this.blockPrewalkStatements(ast.body);
    this.walkStatements(ast.body);
}
这几行代码逐条处理ast,解析模块中的依赖关系。
在this.hooks.program.call(ast, comments)这个hook中,会触发HarmonyDetectionParserPlugin 和 UseStrictPlugin 这两个插件的回调。
HarmonyDetectionParserPlugin中,如果代码中有import或者export或者类型为javascript/esm,那么会增加HarmonyCompatibilityDependency和HarmonyInitDependency依赖。UseStrictPlugin用来检测文件是否有use strict,如果有,则增加一个ConstDependency依赖。
在detectStrictMode中,检测当前执行块是否有use strict,如果有则执行this.scope.isStrict = true
prewalkStatements函数负责处理变量。遍历每个节点,根据statement.type的不同,调用不同的处理函数。比如a.js的第一个节点是 importDeclaration,处理这个节点,首先触发HarmonyImportDependencyParserPlugin插件,增加 ConstDependency 和 HarmonyImportSideEffectDependency 依赖。然后触发HarmonyImportDependencyParserPlugin插件, 执行parser.scope.renames.set(name, "imported var");设置 add 的值为 imported var。
walkStatements这一步则会深入函数内部,对于函数内部的内容调用
this.detectMode(expression.body.body);
this.prewalkStatement(expression.body);
this.walkStatement(expression.body);
循环处理函数中的依赖关系。
所有的依赖都被保存在 module.dependencies 中,对于a.js来说,得到依赖:

然后执行
this._initBuildHash(compilation);
生成hash值,保存在this._buildHash 中,到此一个模块就编译完成了。
回到回调中,执行 afterBuild 回调,然后调用
compilation.processModuleDependencies(module, err => {
    if (err) return callback(err);
    callback(null, module);
});
根据解析出来的依赖关系,循环编译依赖的模块。
至此所有模块编译完成。最终所有的文件就都转化为了module,并且会得到module和依赖的dependencies,后续生成chunck和生成打包文件代码时会使用到。
生成chunk
回到compiler.hook.make的回调,执行compilation.seal函数。seal方法中触发了大量的hook,为侵入 webpack 构建流程提供了海量钩子。
然后开始生成chunk。在这个过程当中首先遍历 config 当中配置的入口 module,为每个入口 module 创建一个空 chunk。之后实例化一个entryPoint,这个entryPoint是一个包含runtimeChunk的chunkGroup,每个chunkGroup可以包含多的 chunk。
然后调用
GraphHelpers.connectChunkGroupAndChunk(entrypoint, chunk);
GraphHelpers.connectChunkAndModule(chunk, module);
建立起 module、chunk、entrypoint 的关系。
然后调用
buildChunkGraph(
    this,
    /** @type {Entrypoint[]} */ (this.chunkGroups.slice())
);
建立起 chunk 与其他依赖之间的关系。在buildChunkGraph方法中,调用了三个方法
// PART ONE
visitModules(
    compilation,
    inputChunkGroups,
    chunkGroupInfoMap,
    blockConnections,
    blocksWithNestedBlocks,
    allCreatedChunkGroups
);

// PART TWO
connectChunkGroups(
    blocksWithNestedBlocks,
    blockConnections,
    chunkGroupInfoMap
);

// Cleaup work
cleanupUnconnectedGroups(compilation, allCreatedChunkGroups);
在visitModules中,首先执行
const blockInfoMap = extraceBlockInfoMap(compilation);

-----------------------------------
const extraceBlockInfoMap = compilation => {
	// ......

  for (const module of compilation.modules) {  // 循环处理每个模块
    blockQueue = [module];
    currentModule = module;
    while (blockQueue.length > 0) {
      block = blockQueue.pop();
      blockInfoModules = new Set();
      blockInfoBlocks = [];

      if (block.variables) {
          for (const variable of block.variables) {
              for (const dep of variable.dependencies) iteratorDependency(dep);
          }
      }

      // 对于同步模块,缓存进blockInfoModules数组
      if (block.dependencies) {
          for (const dep of block.dependencies) iteratorDependency(dep);
      }

     // 对于异步模块,缓存进blockInfoBlocks和blockQueue数组
      if (block.blocks) {
          for (const b of block.blocks) iteratorBlockPrepare(b);
      }

      const blockInfo = {
          modules: blockInfoModules,
          blocks: blockInfoBlocks
      };
      blockInfoMap.set(block, blockInfo); // 将模块关系缓存进blockInfoMap
    }
  }

  return blockInfoMap;
};
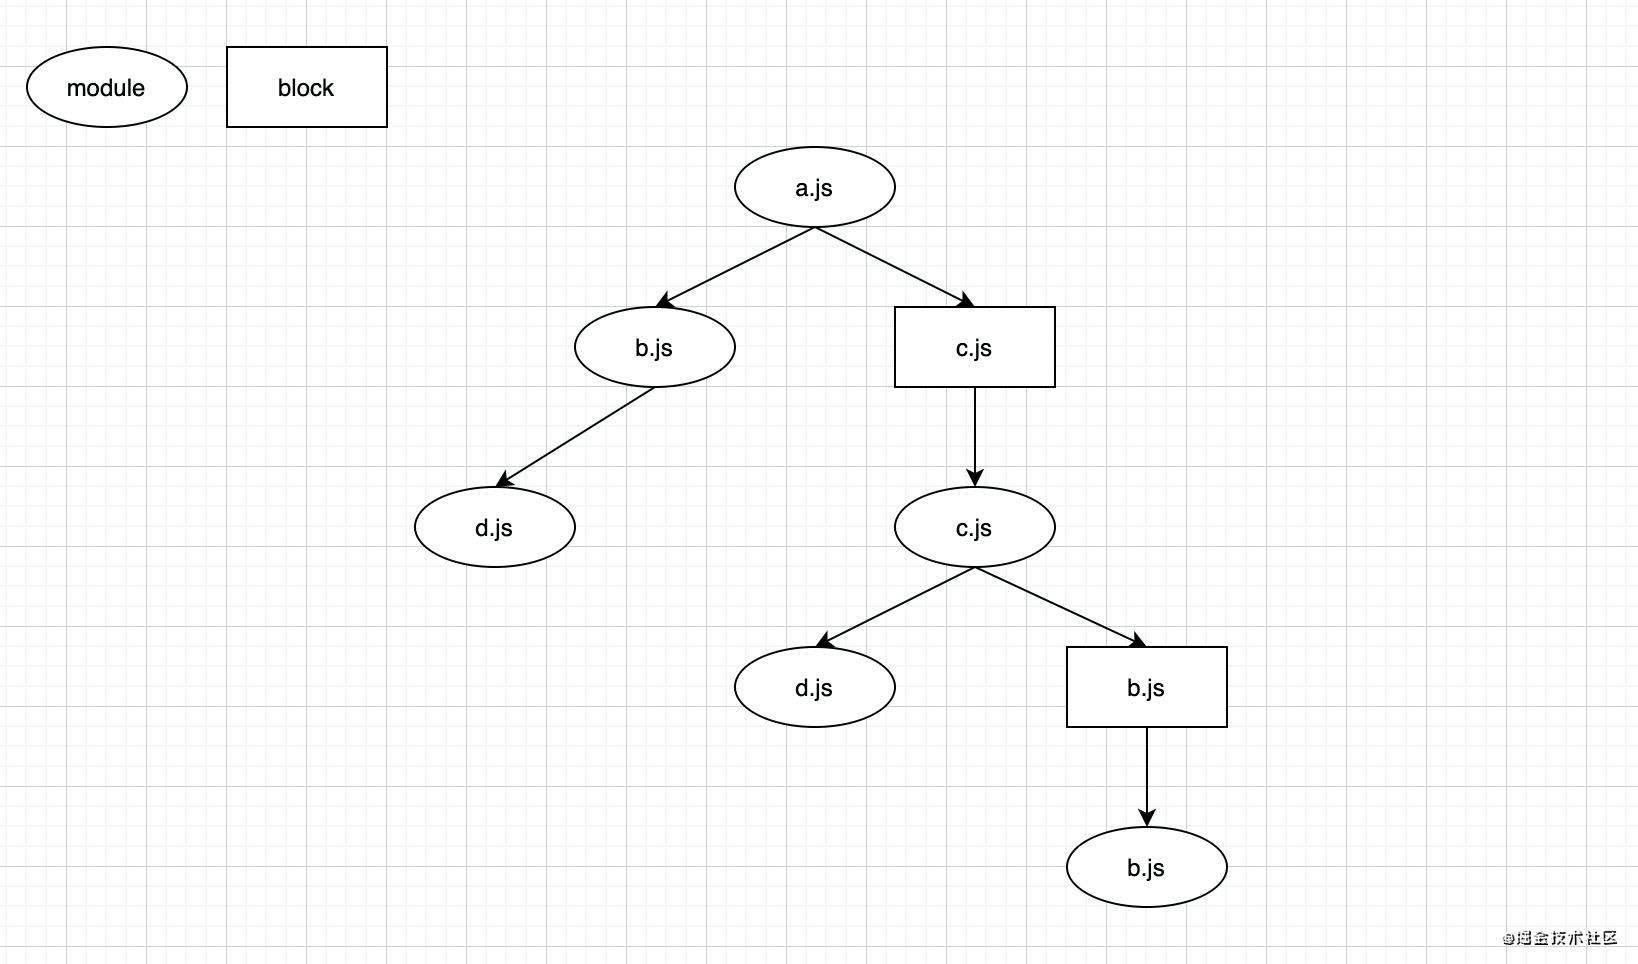
在这个方法中,对所有 modules 进行一次遍历,在遍历 module 的过程中,会对这个 module 的 dependencies 依赖进行处理,获取这个 module 的依赖模块,同时还会处理这个 module 的 blocks(异步加载的模块),每个异步 block 都会被加入到遍历的过程当中,被当做一个 module 来处理。遍历的过程结束后会建立起基本的 module graph,包含普通的 module 及异步 module(block),最终存储到一个 map 表(blockInfoMap)中,代表着模块间的依赖关系。对于 a.js,可得到关系图:
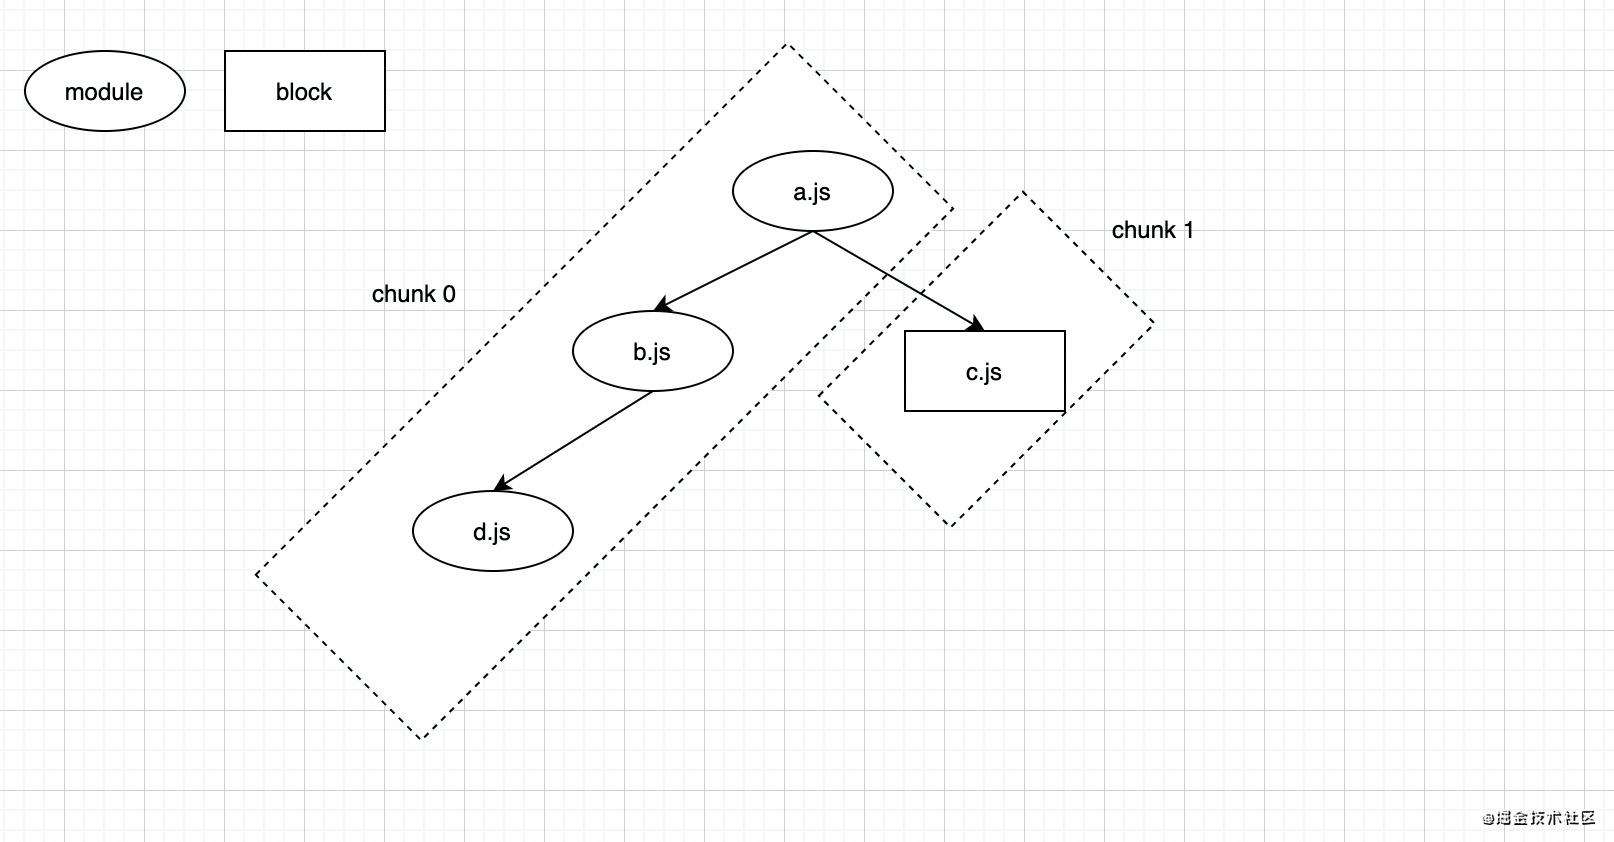
此时只是得到了空的 chunk,和各个单独的模块之间的依赖关系,chunk 和 module 之间尚未关联起来。接下来就是在 chunk 中添加关联的依赖。比如 a.js ,关键的步骤有:
- 处理
a.js,拿到a.js中的依赖关系const blockInfo = blockInfoMap.get(block);, - 对于依赖的普通模块
b.js,如果当前chunk中没有,则加入chunk中,并缓存起来;对于异步模块c.js,则为c.js新建一个 chunk,; - 在当前
chunk中,循环处理b.js中的依赖; - 在新
chunk中,循环处理c.js中的依赖。
当循环处理完所有 module 时,chunk 图也生成了,对于 a.js 来说,生成的 chunk 图如下
然后执行
connectChunkGroups(
    blocksWithNestedBlocks,
    blockConnections,
    chunkGroupInfoMap
);
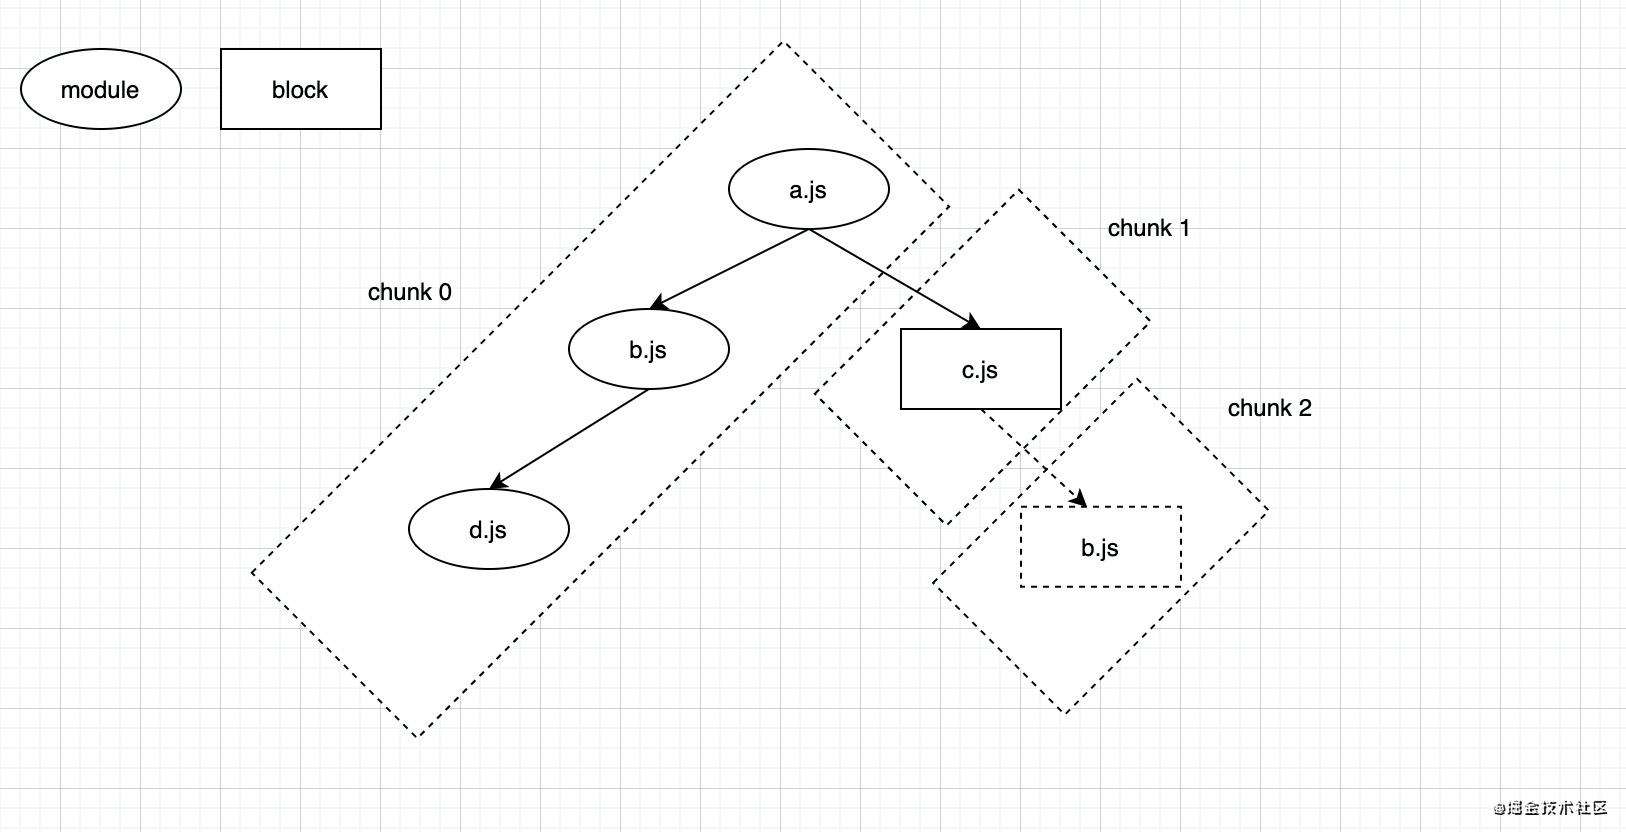
建立起 chunkGroup 之间的父子关系。chunk2 中没有 module ,自然跟其他chunk没有关系。
然后执行
cleanupUnconnectedGroups(compilation, allCreatedChunkGroups);
清除空的没有父子关系的 chunkGroup。
最终生成的 chunk 图为:
生成文件
生成hash
chunk 生成后,调用 seal 钩子中的 this.createHash(); 生成hash值。这个方法主要做了两件事,为 module 生成 hash,和为 chunk 生成 hash。
module hash 的生成代码如下:
createHash() {
   //......
	const modules = this.modules;
	for (let i = 0; i < modules.length; i++) {
		const module = modules[i];
		const moduleHash = createHash(hashFunction);
		module.updateHash(moduleHash);
		module.hash = moduleHash.digest(hashDigest);
		module.renderedHash = module.hash.substr(0, hashDigestLength);
	}
	//......
}
其中关键的 updateHash 方法,封装在每个 module 类的实现中。对于 normalModule 来说,这个方法是:
updateHash(hash) {
  hash.update(this._buildHash);
  super.updateHash(hash);
}
其中 _buildHash 是模块编译完成时生成的 module hash。super.update 代码是
updateHash(hash) {
    hash.update(`${this.id}`);
    hash.update(JSON.stringify(this.usedExports));
    super.updateHash(hash);
}
可以看到 module id 和被使用到的 exports 信息也更新进了 hash 中。super.update 代码是
updateHash(hash) {
    for (const dep of this.dependencies) dep.updateHash(hash);
    for (const block of this.blocks) block.updateHash(hash);
    for (const variable of this.variables) variable.updateHash(hash);
}
各个依赖具体有哪些信息要写入 hash ,由 xxxDependency.js 中 updateHash 方法决定。
可以看到,一个 module 的 hash 包含了:
- 每个
module中自己特有的需要写入hash中的信息; module id和被使用到的exports信息;- 依赖的信息。
chunck hash 的生成,第一步是
chunk.updateHash(chunkHash);

------------------------------------------
updateHash(hash) {
    hash.update(`${this.id} `);
    hash.update(this.ids ? this.ids.join(",") : "");
    hash.update(`${this.name || ""} `);
    for (const m of this._modules) {
        hash.update(m.hash);
    }
}
将 id 、 ids 、 name 和其包含的所有 module 的 hash 信息写入。
然后写入生成 chunck 的模板信息:
const template = chunk.hasRuntime()
                    ? this.mainTemplate
                    : this.chunkTemplate;
template.updateHashForChunk(
    chunkHash,
    chunk,
    this.moduleTemplates.javascript,
    this.dependencyTemplates
);
webpack 将 template 分为两种:mainTemplate 最终会生成包含 runtime 的代码,和 chunkTemplate。我们主要看 mainTemplate 的 updateHashForChunk 方法
updateHashForChunk(hash, chunk, moduleTemplate, dependencyTemplates) {
    this.updateHash(hash);
    this.hooks.hashForChunk.call(hash, chunk);
    // ......
}

----------------------------------------------------
updateHash(hash) {
    hash.update("maintemplate");
    hash.update("3");
    this.hooks.hash.call(hash);
}
这里会将 template 类型 maintemplate 和配置的 publicPath 写入。然后触发的 hash 钩子和 hashForChunk 钩子会将一些文件的输出信息写入。
将相关信息都存入 hash 的 buffer 之后,调用 digest 方法生成最终的 hash,然后从中截取出需要的长度,chunk 的 hash 就得到了。
this.fullHash = /** @type {string} */ (hash.digest(hashDigest));
this.hash = this.fullHash.substr(0, hashDigestLength);
生成文件
hash 值生成之后,会调用
this.createChunkAssets();
来决定最终输出到每个 chunk 当中对应的文本内容是什么。以 demo 的入口 chunk 为例,首先根据 chunk 是否包含有 webpack runtime 代码来决定使用的渲染模板是mainTemplate 还是 chunkTemplate。其中 mainTemplate 除了生成普通 module 的代码之外,还包含了 runtime 代码的生成工作,chunkTemplate 主要用于普通 chunk 的代码生成。
const template = chunk.hasRuntime()
					? this.mainTemplate
					: this.chunkTemplate;
然后通过 getRenderManifest 获取到 render 需要的内容。
const manifest = template.getRenderManifest({
    chunk,
    hash: this.hash,
    fullHash: this.fullHash,
    outputOptions,
    moduleTemplates: this.moduleTemplates,
    dependencyTemplates: this.dependencyTemplates
});
然后执行 source = fileManifest.render(); 用于生成代码。以 mainTemplate 为例:
render: () =>
          compilation.mainTemplate.render(
              hash,
              chunk,
              moduleTemplates.javascript,
              dependencyTemplates
          ),

--------------

render(hash, chunk, moduleTemplate, dependencyTemplates) {
  // 生成runtime代码
  const buf = this.renderBootstrap(
      hash,
      chunk,
      moduleTemplate,
      dependencyTemplates
  );
  // 注册在 MainTemplate 里的方法,包装了runtime代码,调用this.hooks.modules.call生成模块代码
  let source = this.hooks.render.call(
      new OriginalSource(
          Template.prefix(buf, " \t") + "\n",
          "webpack/bootstrap"
      ),
      chunk,
      hash,
      moduleTemplate,
      dependencyTemplates
  );
  // ......
  return new ConcatSource(source, ";");
}
调用完 hooks.render 后,即得到了包含 runtime bootstrap 代码的 chunk 代码,最终返回一个 ConcatSource 类型实例。 最终的代码会被保存在这个 ConcatSource 类的 children 中。
重点来看一下 module 的代码是怎么生成的。在 this.hooks.render.call 中,执行this.hooks.modules.call 生成 module 代码
this.hooks.render.tap(
  "MainTemplate",
  (bootstrapSource, chunk, hash, moduleTemplate, dependencyTemplates) => {
      const source = new ConcatSource();
      // ......
      source.add(
          this.hooks.modules.call(
              new RawSource(""),
              chunk,
              hash,
              moduleTemplate,
              dependencyTemplates
          )
      );
      source.add(")");
      return source;
  }
);
这个钩子是在 JavascriptModulesPlugin 中注册的,执行 Template.renderChunkModules 方法:
compilation.mainTemplate.hooks.modules.tap(
    "JavascriptModulesPlugin",
    (source, chunk, hash, moduleTemplate, dependencyTemplates) => {
        return Template.renderChunkModules(
            chunk,
            m => typeof m.source === "function",
            moduleTemplate,
            dependencyTemplates,
            "/******/ "
        );
    }
);
--------------------------------------------------------
static renderChunkModules(
  chunk,
  filterFn,
  moduleTemplate,
  dependencyTemplates,
  prefix = ""
) {
  // ......
  const allModules = modules.map(module => {
      return {
          id: module.id,
          source: moduleTemplate.render(module, dependencyTemplates, {
              chunk
          })
      };
  });
  // ......
  return source;
}
---------------------------------
render(module, dependencyTemplates, options) {
  try {
      const moduleSource = module.source(
          dependencyTemplates,
          this.runtimeTemplate,
          this.type
      );
      const moduleSourcePostContent = this.hooks.content.call(
          moduleSource,
          module,
          options,
          dependencyTemplates
      );
      const moduleSourcePostModule = this.hooks.module.call(
          moduleSourcePostContent,
          module,
          options,
          dependencyTemplates
      );
      const moduleSourcePostRender = this.hooks.render.call(
          moduleSourcePostModule,
          module,
          options,
          dependencyTemplates
      );
      return this.hooks.package.call(
          moduleSourcePostRender,
          module,
          options,
          dependencyTemplates
      );
  } catch (e) {
      e.message = `${module.identifier()}\n${e.message}`;
      throw e;
  }
}
在 module.source 中,执行
const source = this.generator.generate(
    this,
    dependencyTemplates,
    runtimeTemplate,
    type
);
这里的 generator 是在 NormalModuleFactory 创建 NormalModule 的过程时创建的。generate 中执行 this.sourceBlock ,sourceBlock 中首先
generate(module, dependencyTemplates, runtimeTemplate) {
  // ......
  this.sourceBlock(
      module,
      module,
      [],
      dependencyTemplates,
      source,
      runtimeTemplate
  );

  return source;
}
--------------------------
sourceBlock(
    module,
    block,
    availableVars,
    dependencyTemplates,
    source,
    runtimeTemplate
) {
  for (const dependency of block.dependencies) {
    this.sourceDependency(
        dependency,
        dependencyTemplates,
        source,
        runtimeTemplate
    );
  }
  // ......
}
------------------------------
sourceDependency(dependency, dependencyTemplates, source, runtimeTemplate) {
  const template = dependencyTemplates.get(dependency.constructor);
  // ......
  template.apply(dependency, source, runtimeTemplate, dependencyTemplates);
}
也就是说要挨个执行 dependency 中的 apply 方法。对 a.js 来说,第一个依赖是 HarmonyCompatibilityDependency ,它的 apply 方法是
apply(dep, source, runtime) {
    const usedExports = dep.originModule.usedExports;
    if (usedExports !== false && !Array.isArray(usedExports)) {
        const content = runtime.defineEsModuleFlagStatement({
            exportsArgument: dep.originModule.exportsArgument
        });
        source.insert(-10, content);
    }
}
也就是在代码中插入 __webpack_require__.r(__webpack_exports__);。__webpack_require__.r 方法会为 __webpack_exports__ 对象增加一个 __esModule 属性,将其标识为一个 es module。
然后是 HarmonyInitDependency ,它会遍历所有的 dependency。在这个过程中 a.js 代码
import add from './b.js'
所对应的 HarmonyImportSideEffectDependency 和 HarmonyImportSpecifierDependency 中的 template.harmonyInit 方法将会在这时执行,然后得到下面这句
/* harmony import */ var _b_js__WEBPACK_IMPORTED_MODULE_0__ = __webpack_require__(/*! ./b.js */ "./debug/src/b.js");
然后是 ConstDependency 和 HarmonyImportDependency,在这里啥也没干。
然后是 HarmonyImportSpecifierDependency ,得到
Object(_b_js__WEBPACK_IMPORTED_MODULE_0__["default"])
对应
add()
这一句中的 add。
至此 dependency 就处理完了。
然后执行
sourceBlock(
    module,
    block,
    availableVars,
    dependencyTemplates,
    source,
    runtimeTemplate
) {
	// ......
  for (const childBlock of block.blocks) {
      this.sourceBlock(
          module,
          childBlock,
          availableVars.concat(vars),
          dependencyTemplates,
          source,
          runtimeTemplate
      );
  }
  // ......
}
处理异步模块。可以看到处理异步模块就是把 blocks 中的依赖拿出来,再调用 sourceBlock 循环处理,这里就不赘述了。
当模块解析完毕,将得到一个 ReplaceSource 对象,这个类包含一个 replacements 的数组,里面存放了对源码转化的操作,数组中每个元素结构如下:
[替换源码的起始位置,替换源码的终止位置,替换的最终内容,优先级]
至此,针对源码的操作已经得到了。 然后执行
const moduleSourcePostRender = this.hooks.render.call(
    moduleSourcePostModule,
    module,
    options,
    dependencyTemplates
);
将模块代码包装成函数,这个钩子函数主要的工作就是完成对上面已经完成的 module 代码进行一层包裹,包裹的内容主要是 webpack 自身的一套模块加载系统,包括模块导入,导出等,每个 module 代码最终生成的形式为:
/***/ (function(module, __webpack_exports__, __webpack_require__) {

// module 最终生成的代码被包裹在这个函数内部

/***/ })
然后执行
return this.hooks.package.call(
    moduleSourcePostRender,
    module,
    options,
    dependencyTemplates
);
这个 hook 的作用是添加注释。
至此,一个 module 的包装好的代码就完成了。
回到 renderChunkModules ,得到所有 module 的之后,先判断是否有边界,如果有边界,则将 module 代码组装成数组的形式,否则组装成对象的形式,最后得到:
{

/***/ "./debug/src/a.js":
/*!********************************!*\
  !*** (webpack)/debug/src/a.js ***!
  \********************************/
/*! no exports provided */
/***/ (function(module, __webpack_exports__, __webpack_require__) {

// 内容......

/***/ }),

/***/ "./debug/src/b.js":
/*!********************************!*\
  !*** (webpack)/debug/src/b.js ***!
  \********************************/
/*! exports provided: default */
/***/ (function(module, __webpack_exports__, __webpack_require__) {

// 内容......

/***/ }),

/***/ "./debug/src/d.js":
/*!********************************!*\
  !*** (webpack)/debug/src/d.js ***!
  \********************************/
/*! exports provided: default */
/***/ (function(module, __webpack_exports__, __webpack_require__) {

// 内容......

/***/ })

/******/ }
至此,所有代码已完成。
输出文件
经历了上面所有的阶段之后,执行 emitAssets 将生成的 source 保存在 assets 中。然后回到 compiler ,调用
this.outputFileSystem.mkdirp(outputPath, emitFiles);
在 emitFiles 方法中将文件拼接起来,得到文件的路径、文件名,并将文件写到输出目录里。
参考文献
Webpack 核心模块 tapable 解析
Webpack 核心库 Tapable 的使用与原理解析
webpack与rollup背后的acorn
webpack 4 源码主流程分析
webpack系列之一总览
Webpack源码分析
常见问题FAQ
- 免费下载或者VIP会员专享资源能否直接商用?
- 本站所有资源版权均属于原作者所有,这里所提供资源均只能用于参考学习用,请勿直接商用。若由于商用引起版权纠纷,一切责任均由使用者承担。更多说明请参考 VIP介绍。
- 提示下载完但解压或打开不了?
- 找不到素材资源介绍文章里的示例图片?
- 模板不会安装或需要功能定制以及二次开发?


发表评论
还没有评论,快来抢沙发吧!