简介
React从v16.3的版本开始, 对生命周期的钩子进行了渐进式的调整,分别废弃和新增了一些生命周期的钩子函数,本文会从以下四点开始讲解:
- 新旧生命周期函数的对比
- 分析为什么要废弃旧的钩子函数
- 详解新的生命周期使用场景
- 实例代码演示并进行总结
新旧生命周期对比
一个完整的React组件生命周期会依次调用如下钩子:
old lifecycle
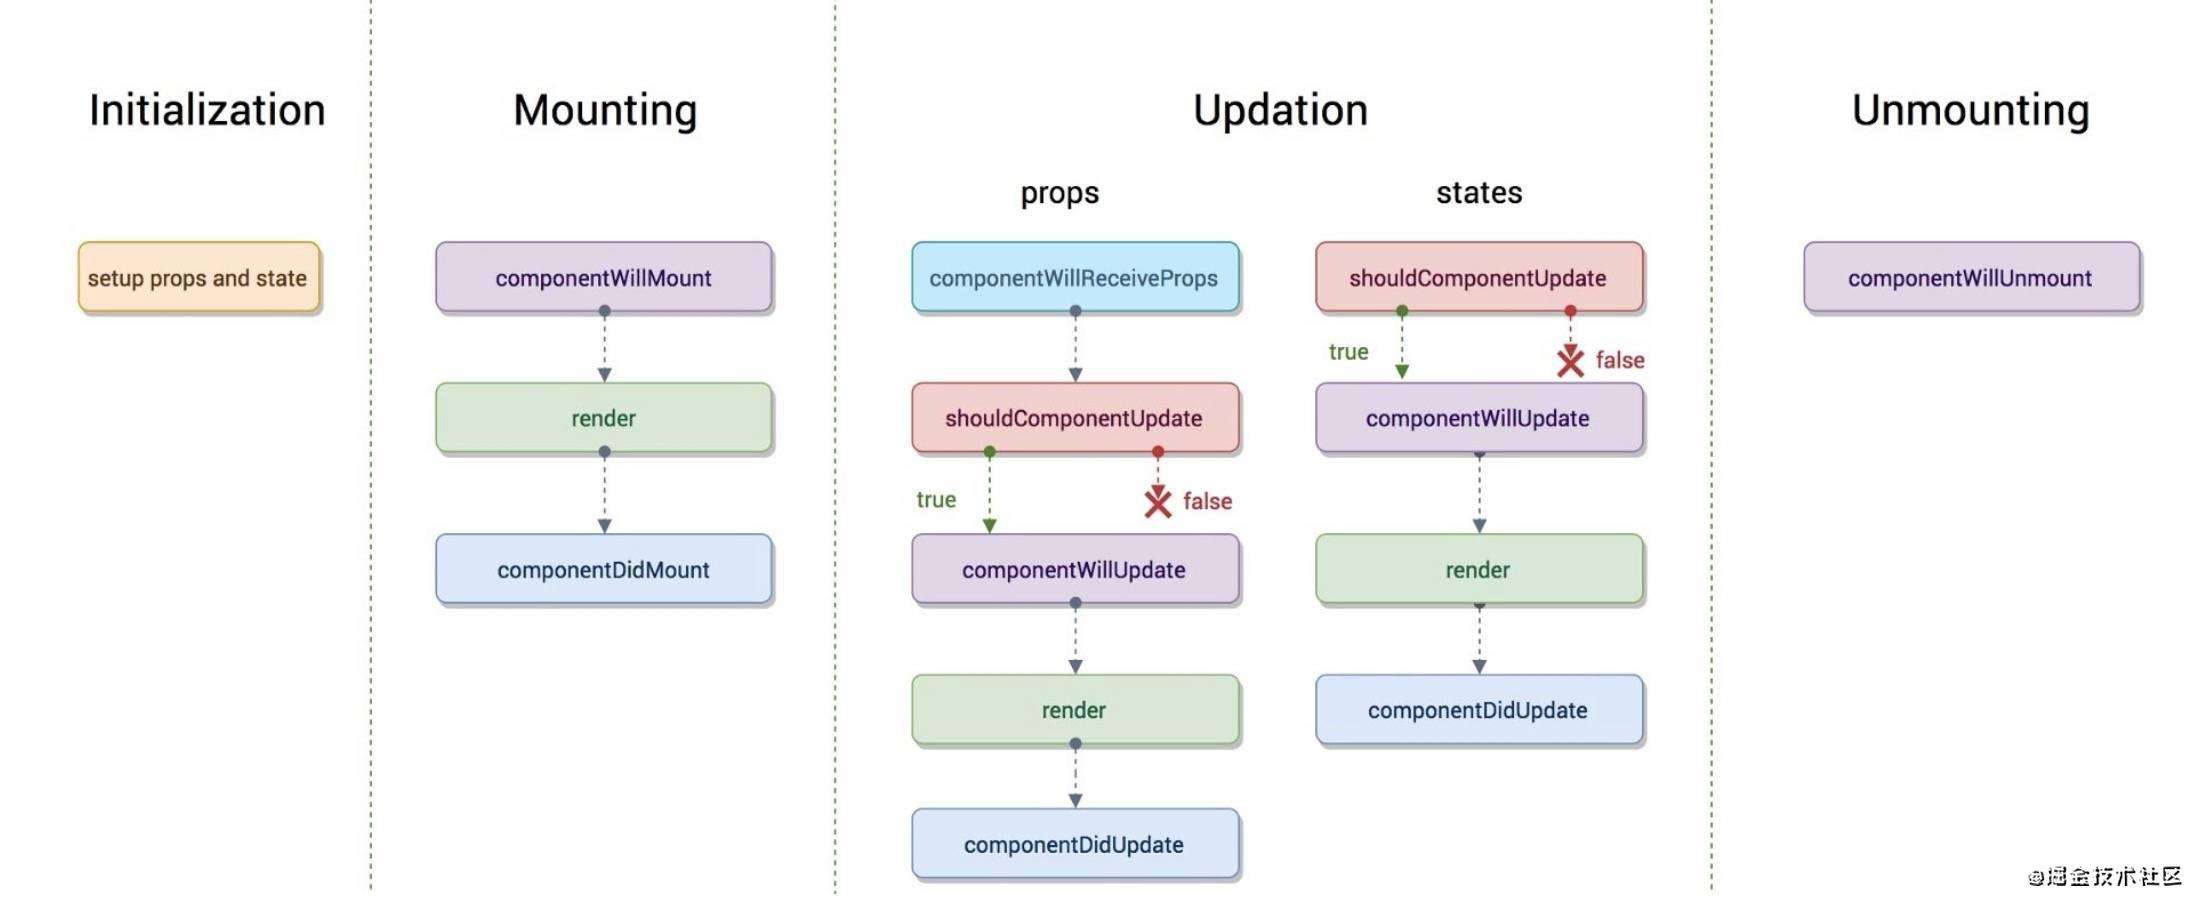
挂载
- constructor
- componentWillMount
- render
- componentDidMount
更新
- componentWillReceiveProps
- shouldComponentUpdate
- componentWillUpdate
- render
- componentDidUpdate
卸载
- componentWillUnmount
new lifecycle
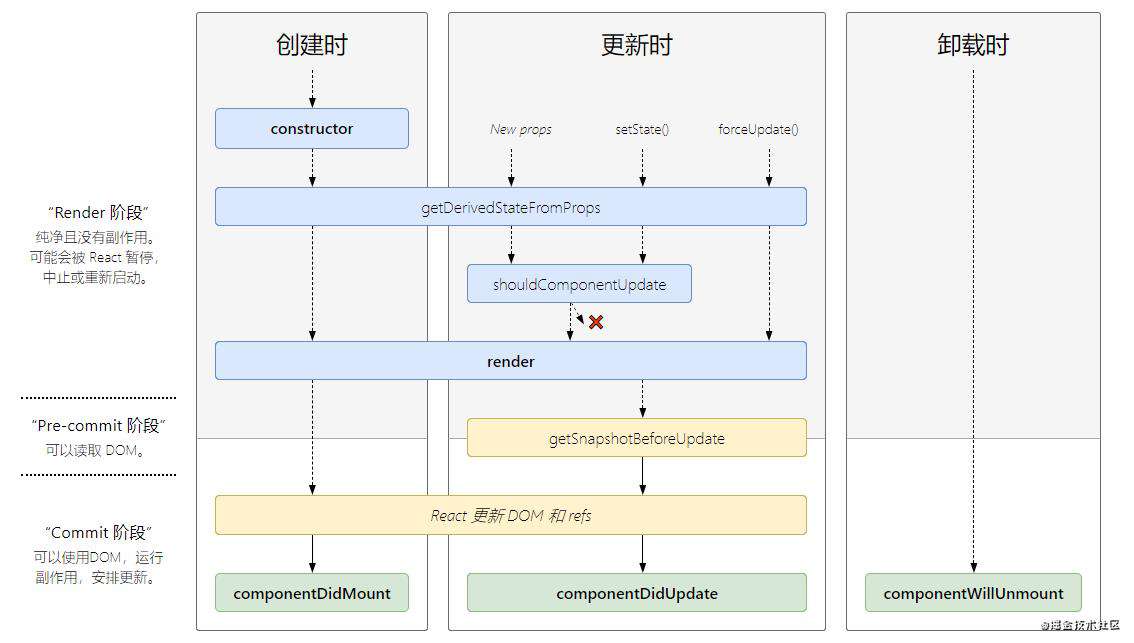
- 挂载
- constructor
- getDerivedStateFromProps
- render
- componentDidMount
- 更新
- getDerivedStateFromProps
- shouldComponentUpdate
- render
- getSnapshotBeforeUpdate
- componentDidUpdate
- 卸载
- componentWillUnmount
从以上生命周期的对比,我们不难看出,React从v16.3开始废弃 componentWillMount componentWillReceiveProps componentWillUpdate 三个钩子函数
分析废弃原因?
Facebook花了两年多的时间搞出了React Fiber, 因为在v15的版本,更新过程是同步的,往往一个主线程长时间被占用,会导致页面性能问题
而 React Fiber的机制: 利用浏览器 requestIdleCallback 将可中断的任务进行分片处理,每一个小片的运行时间很短,这样唯一的线程就不会被独占
需要详细了解可以点下面链接 Morgan大佬 - 知乎
因为React Fiber Reconciliation 这个过程稿有可能暂停然后继续执行,所以挂载和更新之前的生命周期钩子就有可能不执行或者多次执行;
目前React为这几个生命周期钩子提供了别名,分别是:
- UNSAFE_componentWillMount
- UNSAFE_componentWillReceiveProps
- UNSAFE_componentWillUpdate
React17将只提供别名,取个别名的目的就是恶心你,不让你使用。
详解新的生命周期
各个阶段生命周期函数
constructor()
constructor() 在React组件挂载之前被调用,在为React.Component子类实现构造函数时,应在其他语句之前调用 super()
通常,React构造函数仅用于以下两种情况:
- 来初始化函数内部 state
- 为 事件处理函数 绑定实例
static getDerivedStateFromProps(nextProps, prevState)
getDerivedStateFromProps() 在调用 render方法之前调用,在初始化和后续更新都会被调用
至于为什么要这样做?请移步 Morgan大佬 - 知乎
render()
render() 方法是class组件中唯一必须实现的方法,用于渲染dom, render()方法必须返回reactDOM
componentDidMount()
componentDidMount() 在组件挂载后 (插入DOM树后) 立即调用,componentDidMount() 是发送网络请求、启用事件监听方法的好时机,并且可以在 此钩子函数里直接调用 setState()
shouldComponentUpdate(nextProps, nextState)
shouldComponentUpdate() 在组件更新之前调用,可以控制组件是否进行更新, 返回true时组件更新, 返回false则不更新
getSnapshotBeforeUpdate(prevProps, prevState)
getSnapshotBeforeUpdate() 在最近一次的渲染输出被提交之前调用。也就是说,在 render 之后,即将对组件进行挂载时调用。
componentDidUpdate(prevProps, prevState, snapshot)
componentDidUpdate() 会在更新后会被立即调用。首次渲染不会执行
componentWillUnmount()
componentWillUnmount() 在组件即将被卸载或销毁时进行调用。
生命周期执行顺序
创建时
- constructor()
- static getDerivedStateFromProps()
- render()
- componentDidMount()
更新时
- static getDerivedStateFromProps()
- shouldComponentUpdate()
- render()
- getSnapshotBeforeUpdate()
- componentDidUpdate()
卸载时
- componentWillUnmount()
实例展示
下面代码的react版本是16.4.0, 会根据父子组件props改变,父组件卸载、重新挂载子组件,子组件改变自身状态state这几个操作步骤,对其生命周期的执行顺序进行讲解
组件代码展示
父组件:Parent.js
import React, { Component } from 'react';
import { Button } from 'antd';
import Child from './child';

const parentStyle = {
  padding: 40,
  margin: 20,
  backgroundColor: 'LightCyan',
};

const NAME = 'Parent 组件:';

export default class Parent extends Component {
  constructor() {
    super();
    console.log(NAME, 'constructor');
    this.state = {
      count: 0,
      mountChild: true,
    };
  }

  static getDerivedStateFromProps(nextProps, prevState) {
    console.log(NAME, 'getDerivedStateFromProps');
    return null;
  }

  componentDidMount() {
    console.log(NAME, 'componentDidMount');
  }

  shouldComponentUpdate(nextProps, nextState) {
    console.log(NAME, 'shouldComponentUpdate');
    return true;
  }

  getSnapshotBeforeUpdate(prevProps, prevState) {
    console.log(NAME, 'getSnapshotBeforeUpdate');
    return null;
  }

  componentDidUpdate(prevProps, prevState, snapshot) {
    console.log(NAME, 'componentDidUpdate');
  }

  componentWillUnmount() {
    console.log(NAME, 'componentWillUnmount');
  }

  /**
   * 修改传给子组件属性 count 的方法
   */
  changeNum = () => {
    let { count } = this.state;
    this.setState({
      count: ++count,
    });
  };

  /**
   * 切换子组件挂载和卸载的方法
   */
  toggleMountChild = () => {
    const { mountChild } = this.state;
    this.setState({
      mountChild: !mountChild,
    });
  };

  render() {
    console.log(NAME, 'render');
    const { count, mountChild } = this.state;
    return (
      <div style={parentStyle}>
        <div>
          <h3>父组件</h3>
          <Button onClick={this.changeNum}>改变传给子组件的属性 count</Button>
          <br />
          <br />
          <Button onClick={this.toggleMountChild}>卸载 / 挂载子组件</Button>
        </div>
        {mountChild ? <Child count={count} /> : null}
      </div>
    );
  }
}
子组件: Child.js
import React, { Component } from 'react';
import { Button } from 'antd';

const childStyle = {
  padding: 20,
  margin: 20,
  backgroundColor: 'LightSkyBlue',
};

const NAME = 'Child 组件:';

export default class Child extends Component {
  constructor() {
    super();
    console.log(NAME, 'constructor');
    this.state = {
      counter: 0,
    };
  }

  static getDerivedStateFromProps(nextProps, prevState) {
    console.log(NAME, 'getDerivedStateFromProps');
    return null;
  }

  componentDidMount() {
    console.log(NAME, 'componentDidMount');
  }

  shouldComponentUpdate(nextProps, nextState) {
    console.log(NAME, 'shouldComponentUpdate');
    return true;
  }

  getSnapshotBeforeUpdate(prevProps, prevState) {
    console.log(NAME, 'getSnapshotBeforeUpdate');
    return null;
  }

  componentDidUpdate(prevProps, prevState, snapshot) {
    console.log(NAME, 'componentDidUpdate');
  }

  componentWillUnmount() {
    console.log(NAME, 'componentWillUnmount');
  }

  changeCounter = () => {
    let { counter } = this.state;
    this.setState({
      counter: ++counter,
    });
  };

  render() {
    console.log(NAME, 'render');
    const { count } = this.props;
    const { counter } = this.state;
    return (
      <div style={childStyle}>
        <h3>子组件</h3>
        <p>父组件传过来的属性 count : {count}</p>
        <p>子组件自身状态 counter : {counter}</p>
        <Button onClick={this.changeCounter}>改变自身状态 counter</Button>
      </div>
    );
  }
}
界面展示
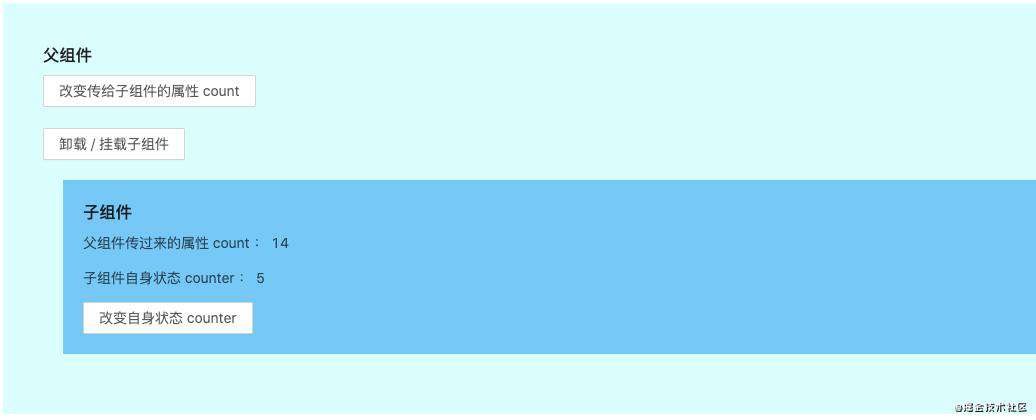
从五种组件状态改变的时机来探究生命周期的执行顺序
一、父子组件初始化
父子组件第一次进行渲染加载时:
控制台的打印顺序为:
- Parent 组件: constructor()
- Parent 组件: getDerivedStateFromProps()
- Parent 组件: render()
- Child 组件: constructor()
- Child 组件: getDerivedStateFromProps()
- Child 组件: render()
- Child 组件: componentDidMount()
- Parent 组件: componentDidMount()
二、子组件修改自身状态 state
点击子组件 [改变自身状态counter] 按钮,其 [自身状态counter] 值会 +1, 此时控制台的打印顺序为:
-
Child 组件: getDerivedStateFromProps()
-
Child 组件: shouldComponentUpdate()
-
Child 组件: render()
-
Child 组件: getSnapshotBeforeUpdate()
-
Child 组件: componentDidUpdate()
三、修改父组件中传入子组件的 props
点击父组件中的 [改变传给子组件的属性 count] 按钮,则界面上 [父组件传过来的属性 count] 的值会 + 1,控制台的打印顺序为:
-
Parent 组件: getDerivedStateFromProps()
-
Parent 组件: shouldComponentUpdate()
-
Parent 组件: render()
-
Child 组件: getDerivedStateFromProps()
-
Child 组件: shouldComponentUpdate()
-
Child 组件: render()
-
Child 组件: getSnapshotBeforeUpdate()
-
Parent 组件: getSnapshotBeforeUpdate()
-
Child 组件: componentDidUpdate()
-
Parent 组件: componentDidUpdate()
四、卸载子组件
点击父组件中的 [卸载 / 挂载子组件] 按钮,则界面上子组件会消失,控制台的打印顺序为:
-
Parent 组件: getDerivedStateFromProps()
-
Parent 组件: shouldComponentUpdate()
-
Parent 组件: render()
-
Parent 组件: getSnapshotBeforeUpdate()
-
Child 组件: componentWillUnmount()
-
Parent 组件: componentDidUpdate()
五、重新挂载子组件
再次点击父组件中的 [卸载 / 挂载子组件] 按钮,则界面上子组件会重新渲染出来,控制台的打印顺序为:
-
Parent 组件: getDerivedStateFromProps()
-
Parent 组件: shouldComponentUpdate()
-
Parent 组件: render()
-
Child 组件: constructor()
-
Child 组件: getDerivedStateFromProps()
-
Child 组件: render()
-
Parent 组件: getSnapshotBeforeUpdate()
-
Child 组件: componentDidMount()
-
Parent 组件: componentDidUpdate()
父子组件生命周期执行顺序总结:
-
当子组件自身状态改变时,不会对父组件产生副作用的情况下,父组件不会进行更新,即不会触发父组件的生命周期
-
当父组件中状态发生变化(包括子组件的挂载以及)时,会触发自身对应的生命周期以及子组件的更新
render以及render之前的生命周期,则 父组件先执行render以及render之后的声明周期,则子组件先执行,并且是与父组件交替执行
当子组件进行卸载时,只会执行自身的
componentWillUnmount生命周期,不会再触发别的生命周期
常见问题FAQ
- 免费下载或者VIP会员专享资源能否直接商用?
- 本站所有资源版权均属于原作者所有,这里所提供资源均只能用于参考学习用,请勿直接商用。若由于商用引起版权纠纷,一切责任均由使用者承担。更多说明请参考 VIP介绍。
- 提示下载完但解压或打开不了?
- 找不到素材资源介绍文章里的示例图片?
- 模板不会安装或需要功能定制以及二次开发?


发表评论
还没有评论,快来抢沙发吧!