前言
之前自己基于微信小程序云开发写了一个周报小程序,前几天突然想着能不能在云函数里写 job ,一查文档,还真可以写定时触发器,但是云函数一个一个写云函数,有大量的冗余代码,感觉很是头疼,又看到小程序·云开发的云函数路由高级玩法这篇文章,就想着自己干脆实现一个包括路由、 job 、 event 的云函数框架,同时也对小程序端进行封装
本人对微信小程序云开发其实并没有太深入学习,此框架主要是用来练手,现在只是实现了云函数路由、简单参数验证、和小程序端 wx.cloud.callFunction() 封装
云函数端路由分发
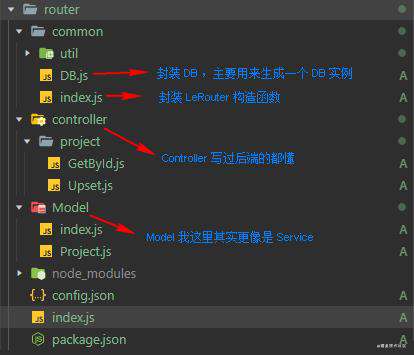
在云函数中,我是新建了一个 router 云函数,现在所有的云函数都会写在这个云函数之中,当然后面也可以分模块来创建多个云函数,这里先看一下我的目录结构
这些暂时是这样封装的,后面还会继续修改让目录结构更清晰一些
先看我们的 index.js 文件变成了什么样子
这里其实就是就是定义选项对象,然后使用选项对象实例化 LeRouter 对象,这个对象中包含了我们的配置信息,并且定义了及一些我们在云函数中经常用到的对象
这里的配置对象我纠结了很久,比如 config 这种配置信息再单独定义一个 config.json 文件更合理一些,但是那样逻辑会更复杂一些,平白浪费性能,以后如果有需要再看是否单独配置吧
cloudfunctions\router\index.js
const { LeRouter } = require('./common/index')
const options = {
  config: {
    env: 'xxx',
  },
  routers: {
    "project.GetById": 'controller/project/GetById',
    "project.Upset": 'controller/project/Upset',
  },
}
const app = new LeRouter(options)
exports.main = app.run()
然后我们看看这个 LeRouter 到底是个什么东西
LeRouter 其实就是初始化 cloud ,然后将我们传进去的配置对象封装进了 this 中,并且在 this 中添加 DB 对象以供后面使用。
这里的 DB 对象再 LeRouter 对象实例化时是不创建的,只有使用到了 DB 对象才会进行创建,因为有的云函数也未必会进行数据库操作嘛
cloudfunctions\router\common\index.js
class LeRouter {
  constructor(options) {
    initAttr.call(this, options);
    initCloud.call(this);
  }
  run() {
    return async (event, context) => {
      const Controller = require(this.routers[event.$url]);
      // checkRequestParams(event, Controller.rules);
      return await Controller.main.call(this, event, context);
    }
  }
}
function initAttr(options) {
  this._cloud = require('wx-server-sdk');
  this.routers = options.routers || {};
  this.config = options.config || {};
  setDB.call(this);
}
function setDB() {
  Object.defineProperty(this, 'DB', {
    configurable: false,
    get() {
      this._DB || (this._DB = require('./DB')(this));
      return this._DB;
    }
  })
}
function initCloud() {
  this._cloud.init({
    env: this.config.env,
  });
}
然后是我们的 DB 文件
DB 文件主要就是暴露一个 initDB 工厂方法,用于生产 DB 对象
cloudfunctions\router\common\DB.js
function initDB(leOptions) {
  const config = leOptions.config
  return leOptions._cloud.database({
    env: config && config.env,
    throwOnNotFound: config && config.DBThrowOnNotFound,
  });
}
module.exports = initDB
我们看一个 controller 吧, Controller 现在主要有 rules 和 main 属性, rules 用于自动进行请求参数的验证, main 方法是实际的 Controller 方法
cloudfunctions\router\controller\project\GetById.js
const { Project } = require('model/index')
module.exports = class GetById {
  static rules = {
    id: ['required', 'string'],
  }
  static main = async function (event, context) {
    const project = new Project(this.DB);
    const _ = this.DB.command
    const where = {
      _id: event.id,
      softDelete: _.neq(true),
    }
    return {
      data: await project.getProject(where)
    }
  }
}
再然后我们来看一个 model ,这里的 model 其实又有一点像 service ,还在考虑是否再加一个 service 层,或者让 Controler 和 model 分工更明确一些,现在我还有写没理太清
然后里面还有一些代码以及一些常用的方法需要看情况再给抽象一下
cloudfunctions\router\Model\Project.js
const COLLECTION_NAME = 'project';

class Project {
  constructor(DB) {
    this.db = DB
  }
  async getProject(where) {
    return await this.db.collection(COLLECTION_NAME).where(where).get()
  }
  async upset(id, project) {
    // ...
    // ...
  }
  getServerDate() {
    return this.db.serverDate();
  }
}
module.exports = Project
小程序端
小程序端主要封装了 wx.cloud.callFunction ,然后对请求分模块进行同意管理
我们先看一下目录结构
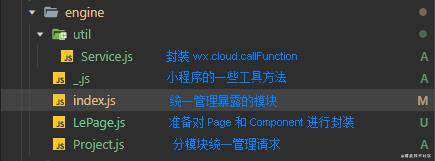
首先看一下对 wx.cloud.callFunction 的封装
这里主要封装了两个方法 callFunction() 和 request() 方法,一般情况下都是使用 request() 即可,如果有特殊需求可以考虑 callFunction() ,同时封装了在请求中弹出“加载中”弹框,请求失败弹出“请求失败”弹框等
miniprogram\engine\util\Service.js
import { Util } from '../index'
export default class ServiceUtil {
  static CLOUD_NAME = 'router'
  static request = (url, data = {}, complete = (res) => {}) => {
    return new Promise((resolve, reject) => {
      ServiceUtil.callFunction(
        url,
        data,
        ((result) => {
          resolve(result?.result?.data);
        }),
        ((reuslt) => {
          reject(reuslt);
        }),
        complete,
      )
    })
  }
  static callFunction = (url, data = {}, success = () => {}, fail = () => {}, complete = (res) => {}) => {
    wx.showLoading({
      title: '加载中',
    })
    wx.cloud.callFunction({
      name: ServiceUtil.CLOUD_NAME,
      data: {
        $url: url,
        ...data,
      },
      success: (res) => {
        success(res);
      },
      fail: (res) => {
        Util.logAndToast(res);
        fail(res);
      },
      complete: (res) => {
        wx.hideLoading();
        complete(res);
      }
    })
  }
}
然后我们看一下封装的请求
这个封装没什么好说的,就是对请求分模块进行了统一管理
miniprogram\engine\Project.js
import ServiceUtil from './util/Service.js'
export default class Project {
  static getById = async (id) => {
    return await ServiceUtil.request('project.GetById', { id });
  }
  static upset = async (params) => {
    return await ServiceUtil.request('project.Upset', params);
  }
}
云函数端请求参数验证
我们的请求参数的验证实在进行路由分发的时候进行的,当我们获取到 Controller 模块对象后,我们就可以获取到其中定义的 rules ,然后根据 rules 对请求参数进行验证
这里只做了是否必传,和第一层字段的类型是否正确,如果字段类型是对象,我们只验证他是不是对象,暂时不验证对象中的字段
如果验证失败,则直接抛出异常
cloudfunctions\router\common\index.js
class LeRouter {
  constructor(options) {
    // ...
  }
  run() {
    return async (event, context) => {
      const Controller = require(this.routers[event.$url])
      checkRequestParams(event, Controller.rules)
      return await Controller.main.call(this, event, context)
    }
  }
}
function checkRequestParams(params, rules = null) {
  if (!rules) {
    return params;
  }
  if (typeof rules !== 'object') {
    throw Error('rules must be object!')
  }
  return checkRequestRules(params, rules)
}
function checkRequestRules(params, rules, keyString = 'event') {
  const keys = Object.keys(rules);
  for(let i = keys.length - 1; i + 1 ; i--) {
    const key = keys[i];
    keyString = `${keyString}.${key}`
    // 判断是否必传
    if (rules[key].includes('required') && !params[key]) {
      throw Error(`The ${keyString} argument is required`);
    }
    // 使用 typeof 判断参数的类型
    if (!rules[key].includes(typeof params[key])) {
      throw Error(`The '${keyString}' argument mast be of type ${rules[key]}`);
    }
  }
  return true;
}
Controller 中我们定义 rules 对象,定义请求参数的验证规则
cloudfunctions\router\controller\project\GetById.js
const { Project } = require('model/index')

module.exports = class GetById {
  static rules = {
    id: ['required', 'string'],
  }

  static main = async function (event, context) {
    // ...
    // ...
  }
}
总结
云函数端就是只创建一个云函数(也可以分模块创建多个),然后进行路由分发,找到对应的 Controller
小程序端就是封装请求,将 wx.cloud.callFunction() 需要传的 name 字段固定,然后将我们自己定义的路由名封装到请求的 data 中
而请求参数验证就是定义验证规则,然后获取验证规则进行验证即可
感悟
虽然整个并不复杂,我实现的还如此简陋,但是已经让我在封装的过程中满是纠结,以前学习其他框架的时候只是跟着人家的思路往下走,包括也看过公司项目中搭建项目的封装,如今自己写,故头不顾尾的
后面我还会去争取实现小程序端 Page 和 Component 的封装,云函数中 job 和 event 的封装,先把主要功能实现了,能跑起来,然后再考虑优化吧
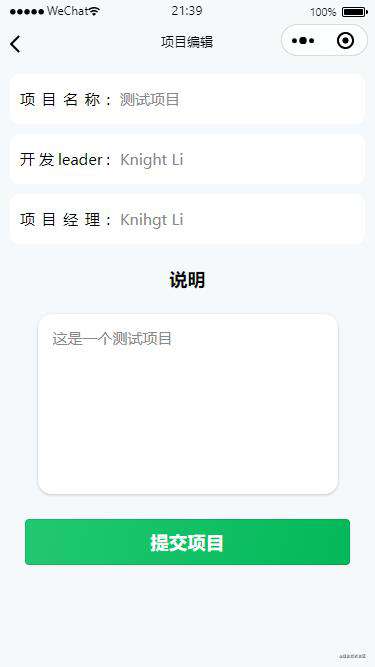
最后看一下实现效果吧
运行成功!能运行就行了,要啥自行车呀
常见问题FAQ
- 免费下载或者VIP会员专享资源能否直接商用?
- 本站所有资源版权均属于原作者所有,这里所提供资源均只能用于参考学习用,请勿直接商用。若由于商用引起版权纠纷,一切责任均由使用者承担。更多说明请参考 VIP介绍。
- 提示下载完但解压或打开不了?
- 找不到素材资源介绍文章里的示例图片?
- 模板不会安装或需要功能定制以及二次开发?


发表评论
还没有评论,快来抢沙发吧!